Pupillary Distance and Heights Featured

Introduction To Dispensing – Pupillary Distance & Heights

Measuring the correct pupillary distance and pupil heights for your customers is quintessential to proper optical dispensing. Get it right and your customers will love their new glasses, get it wrong and they will promptly be back to return their glasses.

In this lesson, you will learn why are these measurements so important, as well as how they are used during the lens edging & mounting process.

Why Are Pupillary Distance and Pupil Height Measurements So Important?

To gain a deeper understanding let’s first review a few important points from previous lessons:

Here’s an example:

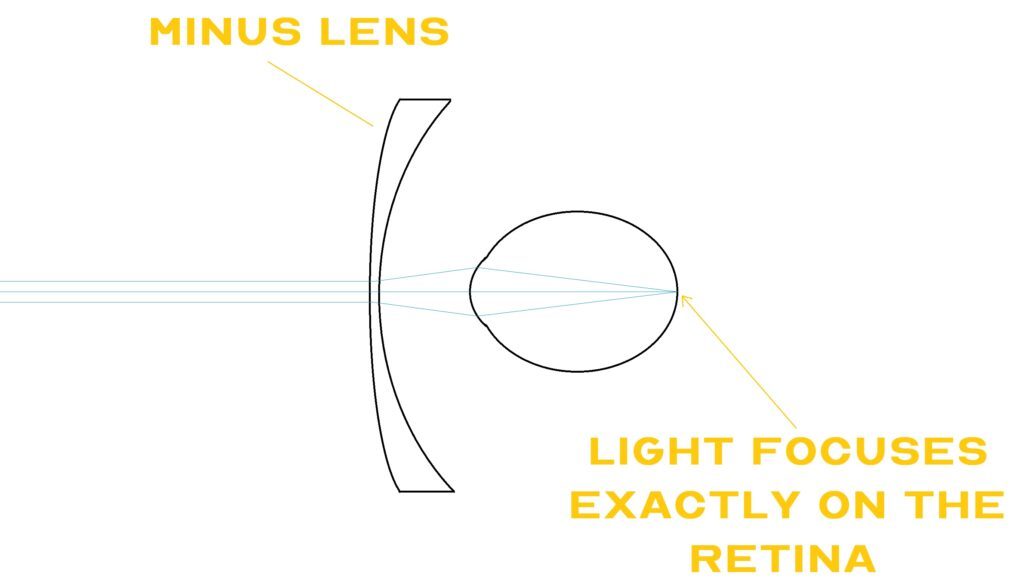
Light is focused on the retina - minus lens

In this example, we have a myopic eye. A minus lens diverges light slightly, then the cornea (a plus lens) converges the light to a focal point that is on the retina.

Side note: Compared to ray diagrams in The Optics of Vision course, you might think that I’ve drawn an absurdly large lens in this diagram. In actuality, this is much closer to the real-life proportions of the lenses we work with.
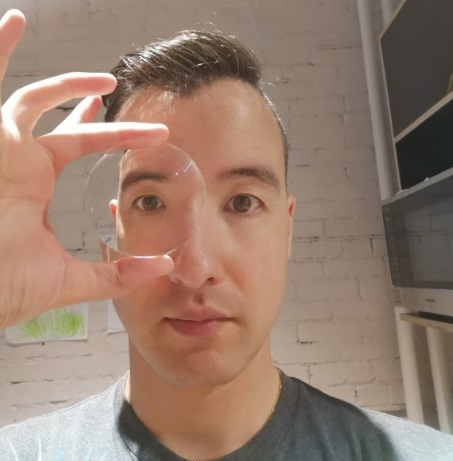
Picture showing the size of a lens blank compared to the eye

Now let’s focus in on the area of interest from the diagram above; the focal point forming on the retina.
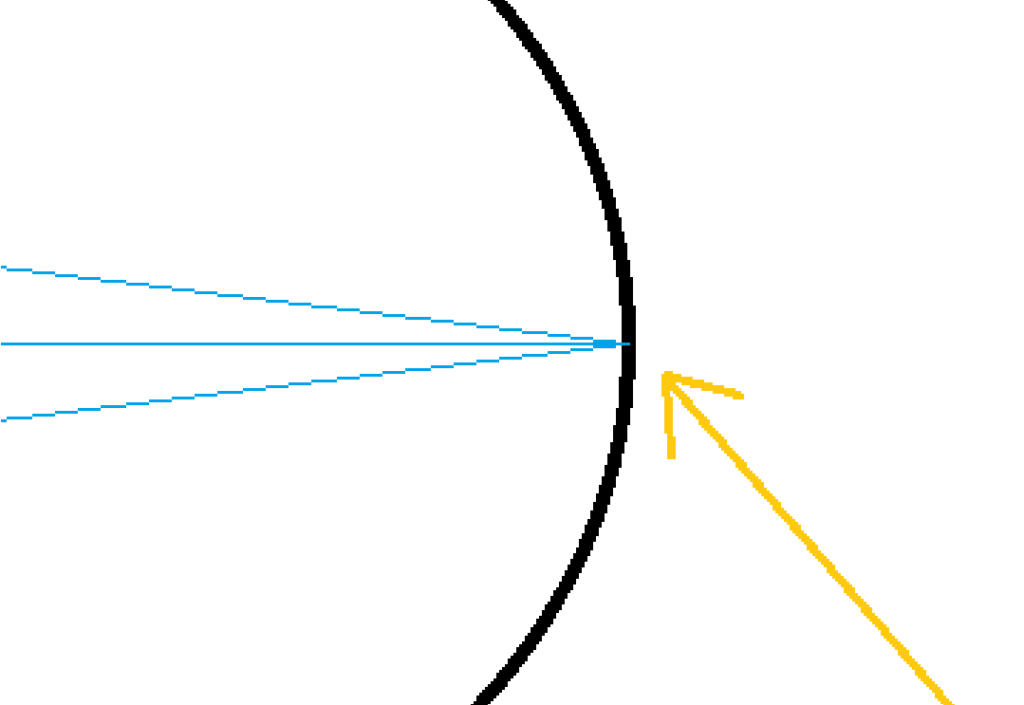
Close up of light focusing on retina
Light comes to a focus precisely on the retina.

In reality, we don’t just want the focal point to be on the retina, we want it to be exactly on the macula.

What is the Macula?

The macula is a small red area on the retina that is able to produce very sharp vision. Click here for more information.

What is the Difference Between the Retina and the Macula?

The retina is the entire layer that lines the inside back portion of the eyes. Most of the retina cannot produce sharp vision.

The macula makes up a very small portion of the retina, but it is the only portion able to produce sharp vision.
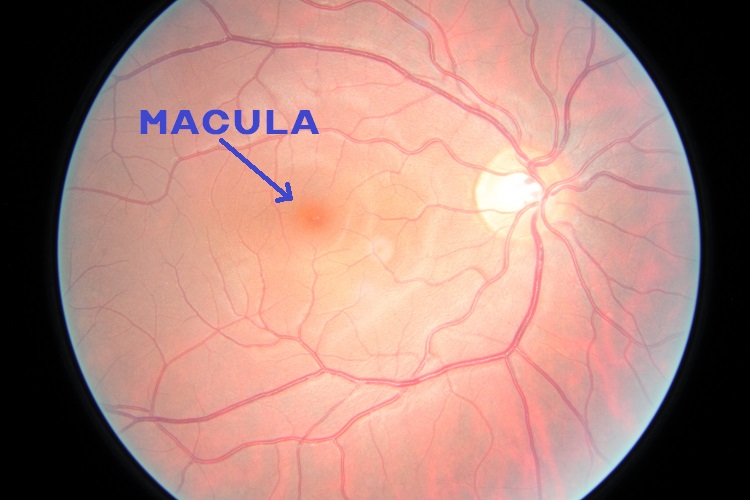
Picture of the Macula

This image shows the macula. It appears as a small red spot inside the eyes. It is on that tiny little red spot that light must come to a focus for us to see clearly. The rest of the retina senses light, but does not produce sharp vision.

Important Take-Home:

The macula produces sharp vision, the rest of the retina does not.

Therefore:

Light must focus on the macula for vision to be clear. 

Here is how I will represent the macula in a cross-section diagram.
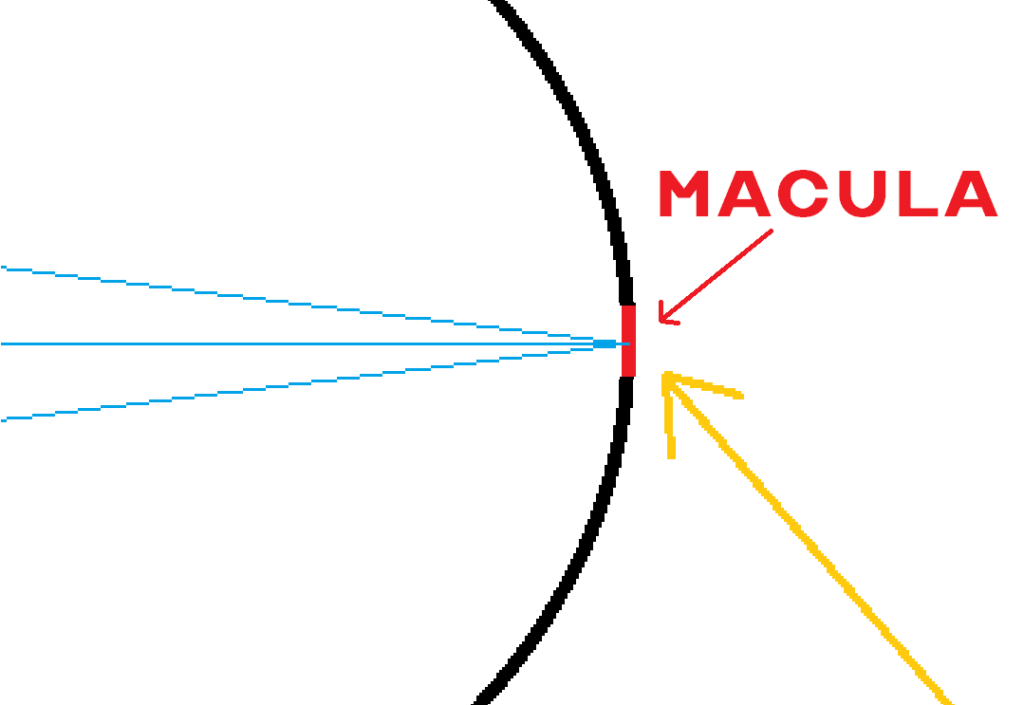
Close up of light focusing on the macula

How Do We Get The Focal Point Onto The Macula?

In order to properly position the focal point on the macula, we have to know:

  1. Where a lens’ focal point will be.
  2. Where the macula is.

Where Is The Focal Point?

A lens’s focal point is always in line with its optical center.

Here is a diagram that illustrates a plus lens creating a focal point. Notice that lens’s optical center and its focal point both lie on the same straight line (green).
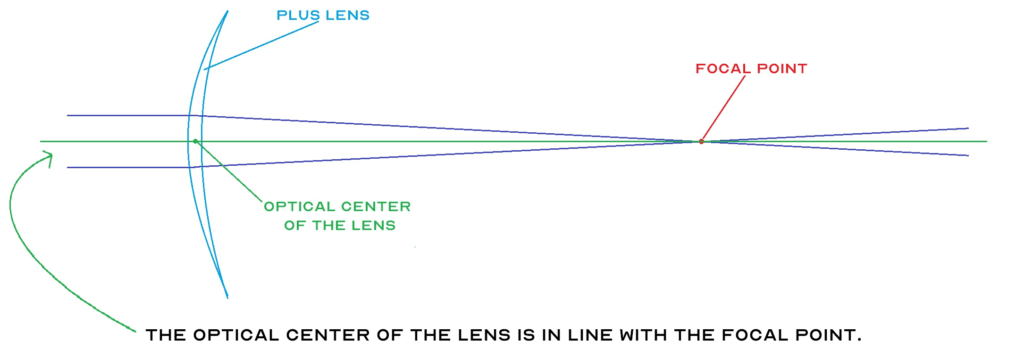
Diagram illustrating the focal point is in line with the optical center of the lens

Where Is The Macula?

The macula is always in line with the center of the pupil.

Here is a cross section of an eye. Notice that the center of the pupil and the macula both lie on the same straight line (green).
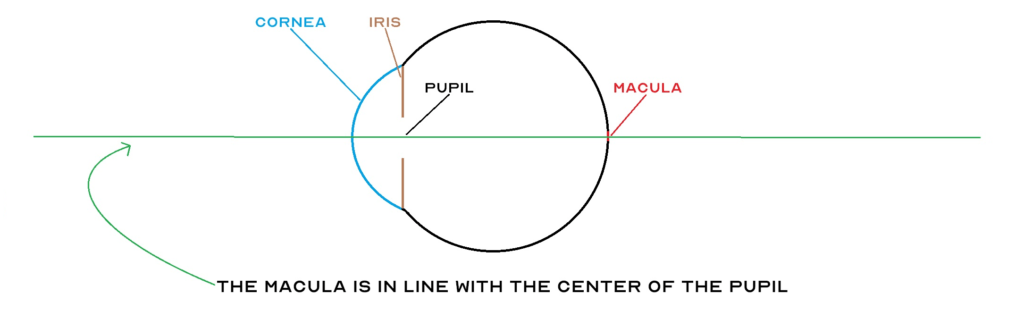
Diagram illustrating that macula is in line with the center of the pupil

Combine It All Together

We now know that that focal point is in line with the lens’ optical center, and the macula is in line with the center of the pupil. Combining these two pieces of information tells us that aligning the lens’ optical center with the center of the pupil will place the focal point on the macula.

This is a diagram showing the optical center of the lens being lined up with the center of the pupil. As a result, the focal point falls exactly on the macula.
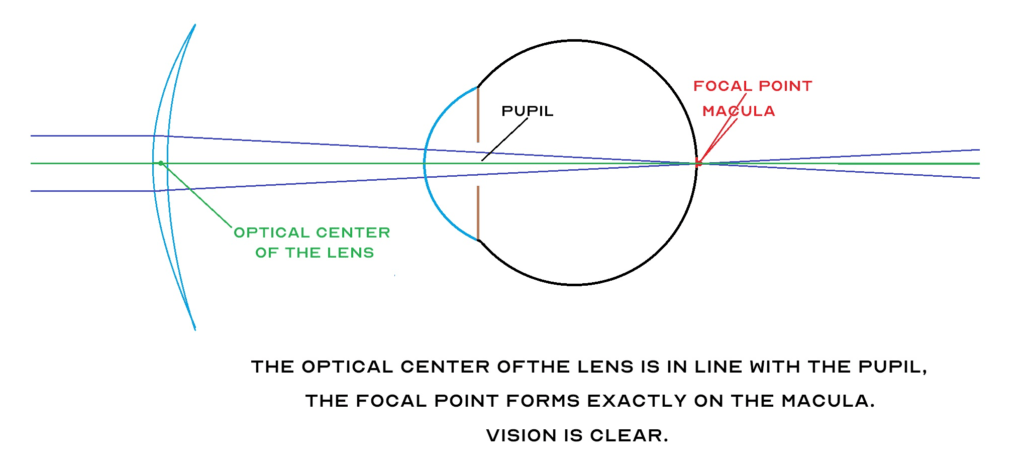
Diagram illustrating the focal point on the macula

This is a diagram showing what happens with the optical center of the lens is not lined up with the center of the pupil. As a result, the focal point does not form on the macula.
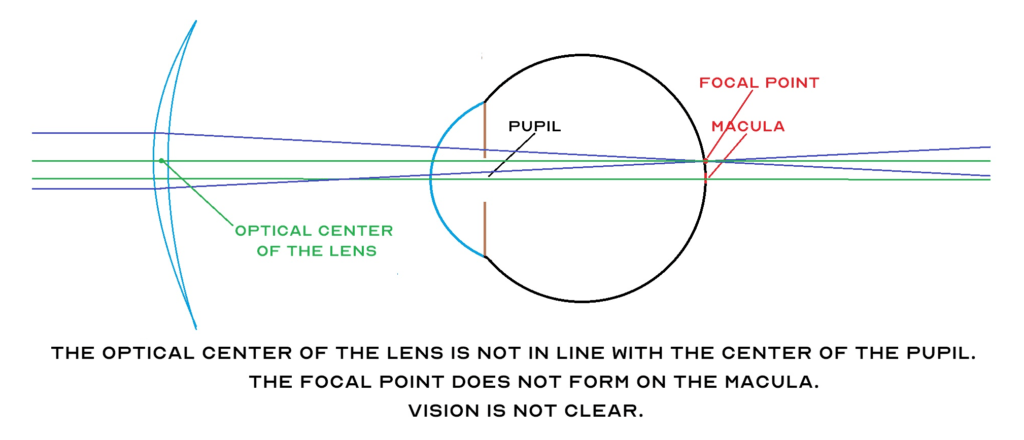
Diagram illustrating the focal point not on the macula

Main Take-Aways

For vision to be clear, the lens must focus light exactly on the macula.

For a lens to focus light exactly on the macula, the optical center of the lens must be aligned with the center of the pupil.

Note to all the seasoned dispensers reading this If you’re screaming ‘INDUCED PRISMATIC EFFECT‘ at the screen right now; cool it. This is a beginners course.

Now, let’s shift gears and talk about glasses.

How To Align the Optical Center of a Lens With The Center of the Pupil

Glasses frames do one thing; they hold the lenses in front of the eyes. But before the lenses are placed in the frames, they are just large discs called semi-finished lenses.

Semi-finished lenses have prescription in them, and coatings on them, but they are not yet cut to the shape of the glasses frame they will eventually be mounted into.
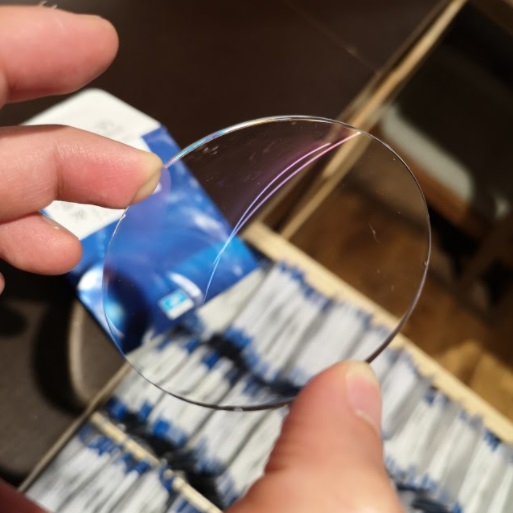
example of a semi-finished lens drawer full of semi-finished lenses
A semi-finished lens. A drawer full of semi-finished lenses in different prescriptions.

Semi-finished lenses typically have a diameter of 70mm. This is intentionally bigger than most glasses frames so that they can be cut down to fit any size/shape of frame.
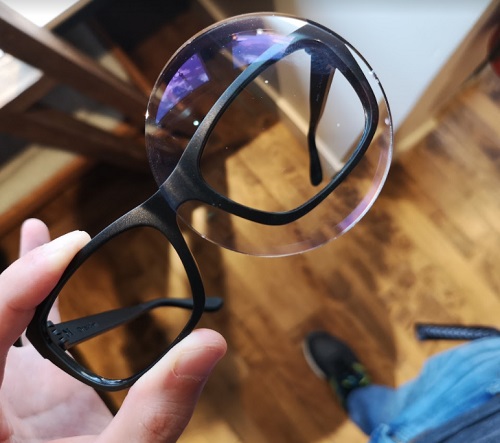
Semi finished lens compared to glasses frames
The size of a semi-finished lens compared to glasses frames.

So if we’re starting with a lens that is way bigger than the glasses frame, here’s the problem: Which part of the lens are we going to put into the frame?

Just imagine that the semi-finished lens blank is a sheet of rolled out cookie dough and the shape of frame is the cookie cutter. We have to cut out a piece of the lens and put it in the frame. But which part of the semi-finished lens (cookie dough) are you going to cut out and use for the glasses?
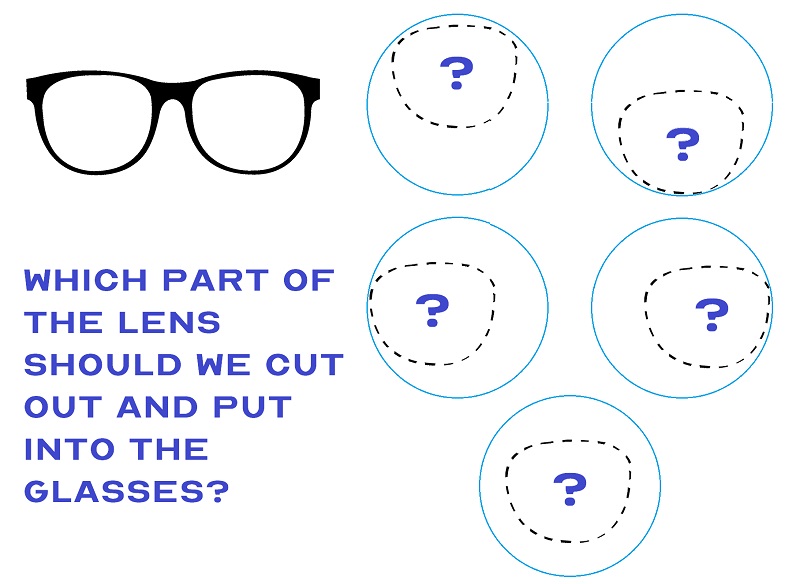
Which Part of The Semi-Finsihed Lens Should Be Cut

Let’s remember what the goal is.

The goal is to align the optical center of the lens with the center of the pupil.

This means we’re going to need to know 2 things:

  1. Where the optical center of the lens is
  2. Where the center of the pupil is when the glasses are worn

Where is the Optical Center of a Semi-Finished Lens?

For now, you can assume that the optical center is in the exact middle of the semi-finished lens. This is not always the case, but for the purpose of this lesson we can assume that it is.
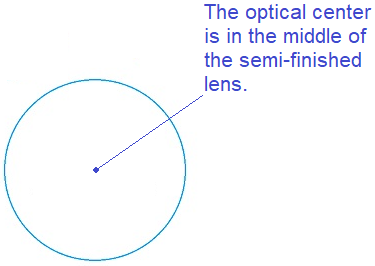
optical center of semi finished lens blank

Where is the center of the pupil when the glasses are worn?

Where the center of the pupil falls when glasses are worn will be different for every person and for every frame. Here is an example of me wearing a pair glasses:

a man wearing black glasses

Look at where the center of my pupils are on both the left and right sides. That is where the optical center of the lenses should be placed.

In order to place the optical center of the lenses exactly where my pupils are, we need two measurements:

  1. The pupillary distance
  2. The pupil height

The Pupillary Distance

The pupillary distance (PD) is the distance between the center of the two pupils, measured in millimeters (mm). It is a very useful measurement to take because for any given (adult) person, the PD never changes. This means that you only have to measure a person’s PD once, and it can used with any frame.

The image below shows that my pupillary distance is 60mm.

pupillar distance


Pupils Heights

The pupils height, often just called the height, is the distance from the center of the pupil to the frame’s bottom rim, measured in millimeters (mm). This measurement is frame specific, meaning that for any given person, wearing a different frame will result in a different height measurements.

The image below shows that my pupil height with this frame is 23mm.
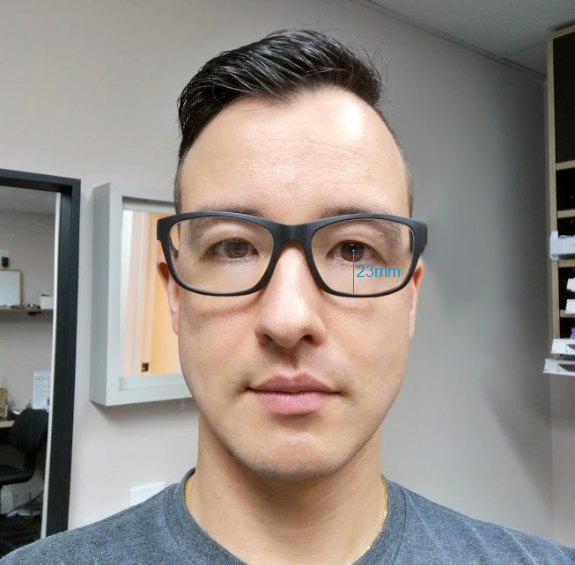
pupil height

Why are Heights Frame Specific but the Pupillary Distance is Not?

You do not have to understand this, but if that’s what you’re wondering: I like where you’re head’s at. You should consider becoming an optician.

Once the pupillary distance and pupil heights have been measured, you have essentially established a set of coordinates. These coordinates will tell the edging lab exactly where and how to cut the semi-finished lenses in order for the optical center of the lenses to be perfectly aligned with the center of the pupils when the glasses are worn.

Measuring Pupillary Distance and Pupil Heights

There are many ways to measure both the pupillary distance and pupil heights. In order to properly explore all the relevant techniques, I will dedicate a separate lesson for this.

Let’s Do A Run Through

The customer has chosen a frame and wants to get his prescription put into them. We have a semi-finished lens blank with the customer’s prescription in it. What do we need to do in order to properly position the lens within the frame?

Remember: The goal is to position the lens’ optical center directly over top of the center of the customer’s pupil.
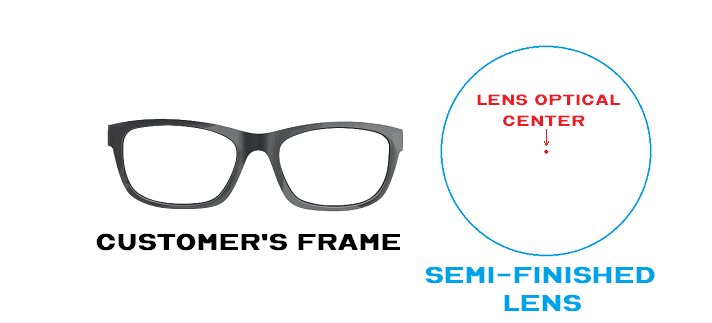
Customers Frame and Semi Finished Lens Blank


Step 1: Measure the customer’s PD (glasses off). This gives us the horizontal position for the lens.

Step 2: Measure the customer’s pupil height (glasses on). This gives us the vertical position for the lens.

We now have all the information to determine exactly where the center of pupils will be when the customer wears the glasses.
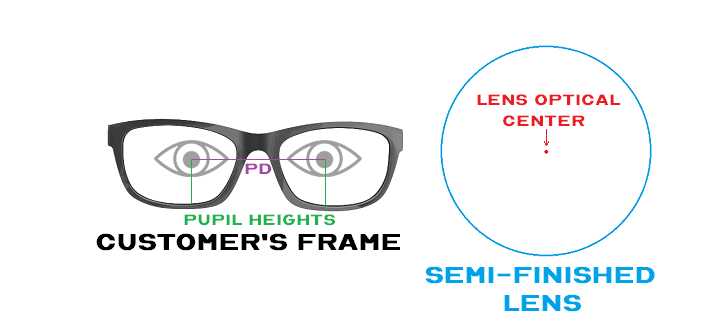
Customers Frame and Semi Finished Lens Blank With Eyes

This tells the edging lab exactly what part of the semi-finished lens to cut out and put into the frame to give the customer the best vision possible.
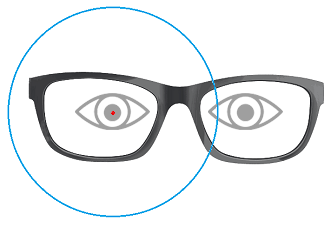
Semi Finished Lens Centered On Pupil

Summary

Making glasses is not as simple as just putting a lens into a frame. Many things have to be taken into careful consideration, including where the optical center of lens is in relation to the customer’s eyes.

Here is a summary of the key take-homes:

  • Every prescription lens has an optical center – the part of the lens that offers the best possible vision
  • The goal when making glasses is to align the lens’ optical center with the center of the customer’s pupil
  • To pinpoint where the center of the customer’s pupil will be when the glasses are worn, two measurements need to be taken – the pupillary distance and the pupil height

In the next lesson we will learn the techniques and instruments used to take these measurements.
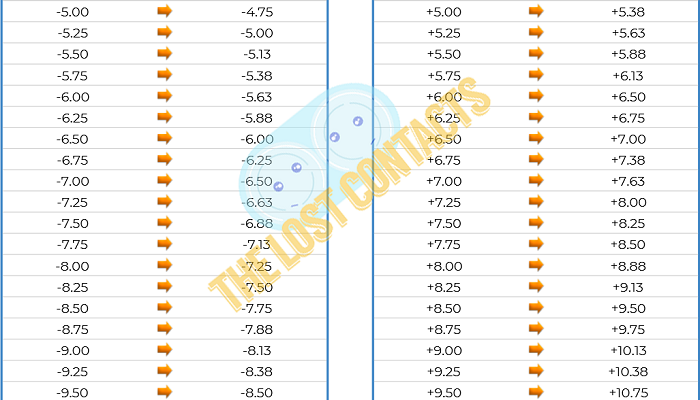


Vertex Distance Conversion Chart Motherload - Featured

Vertex Distance Conversion Chart Motherload

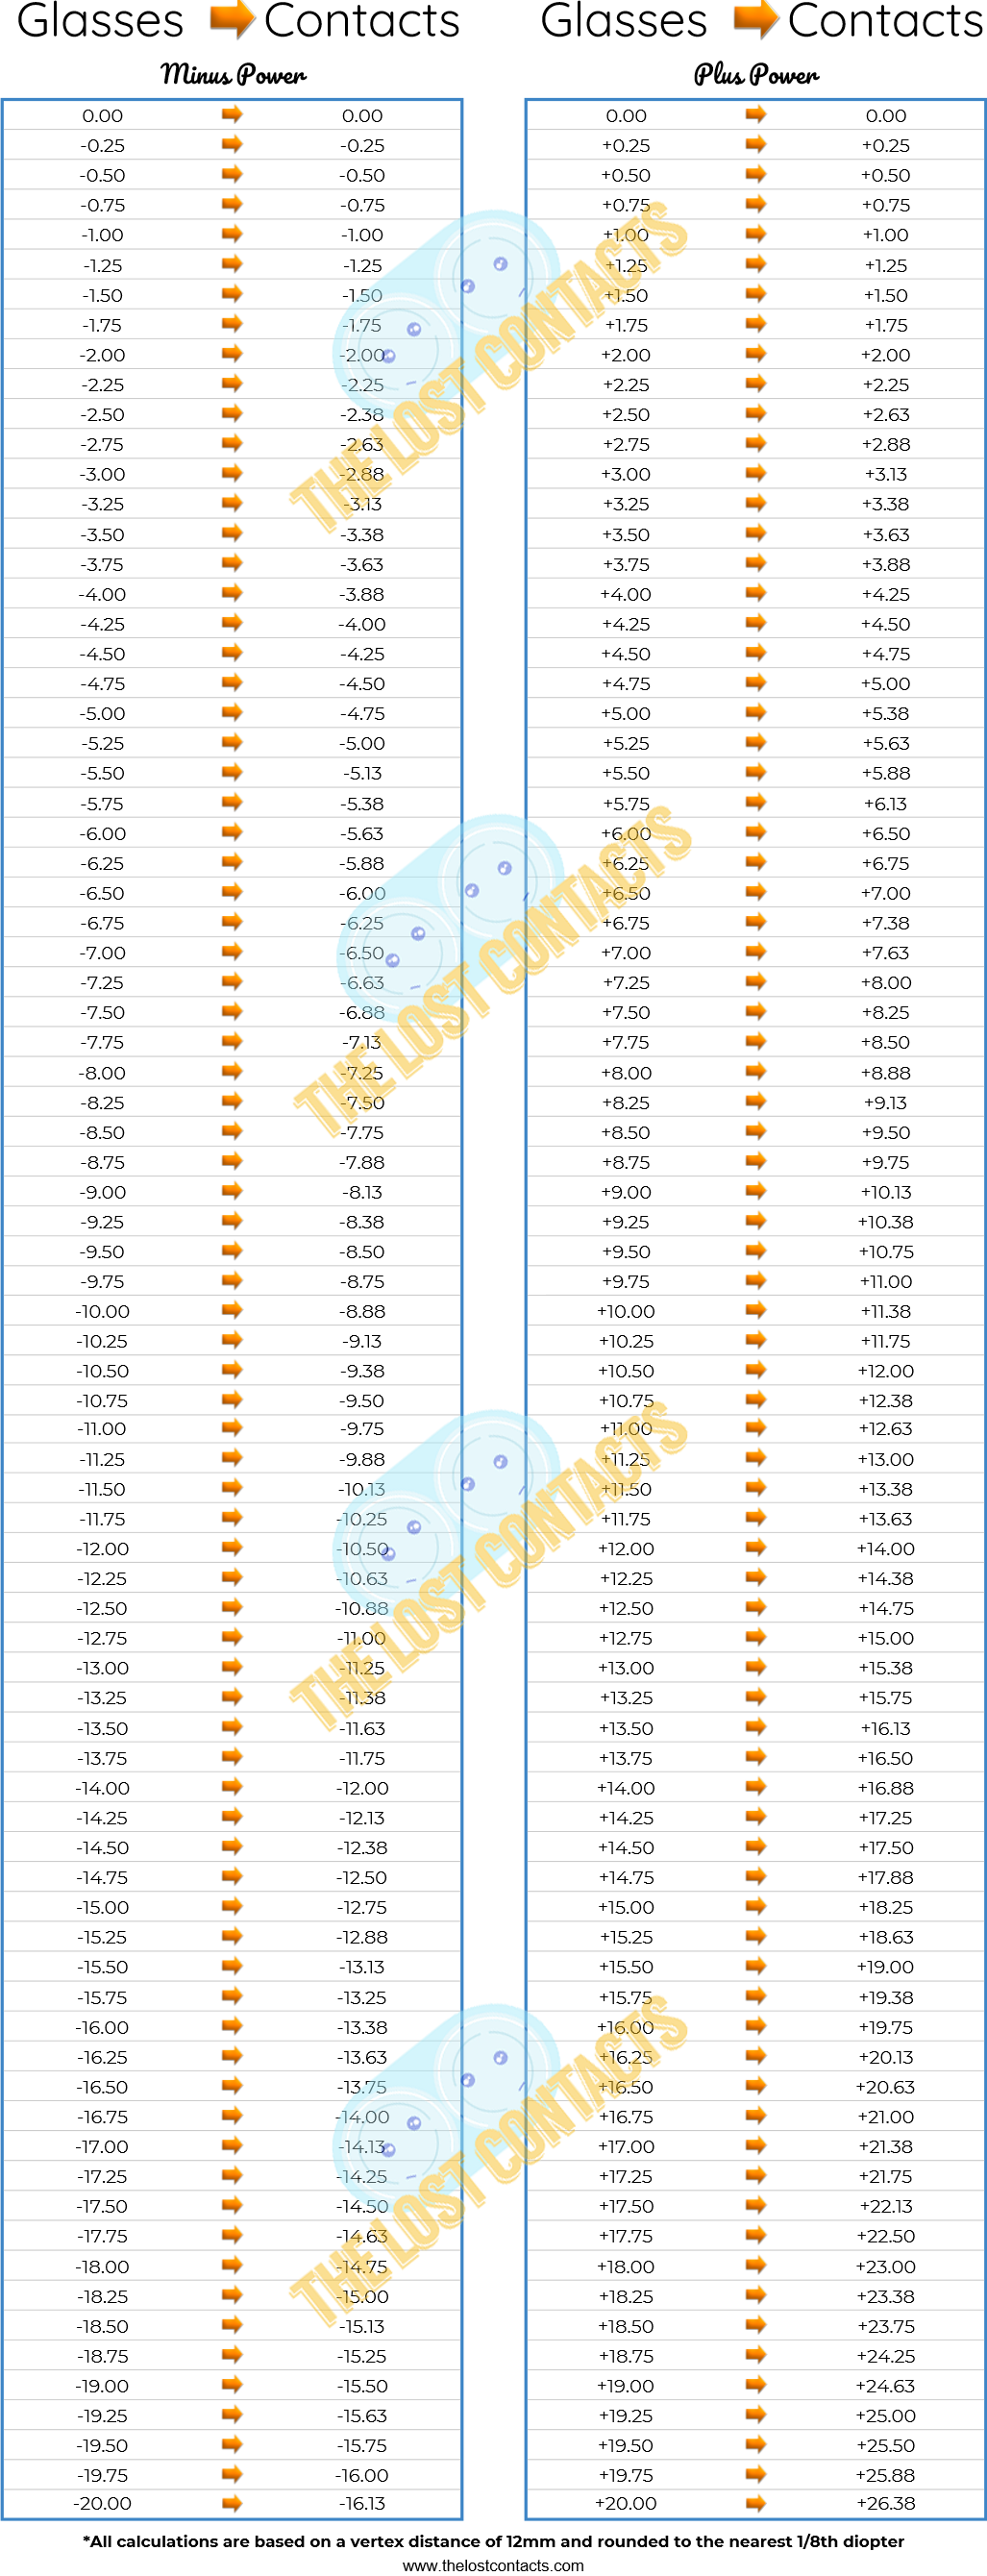
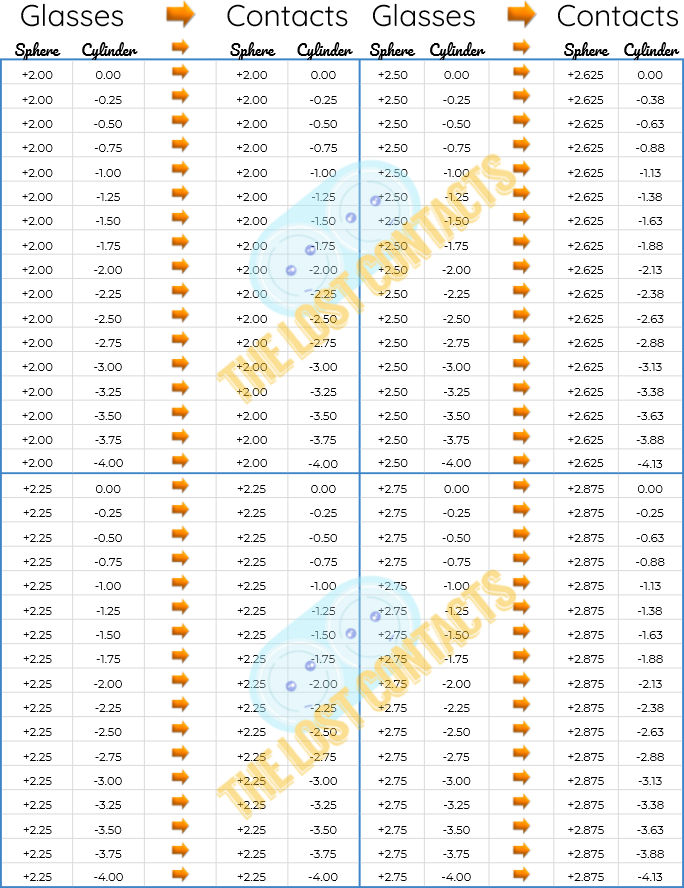
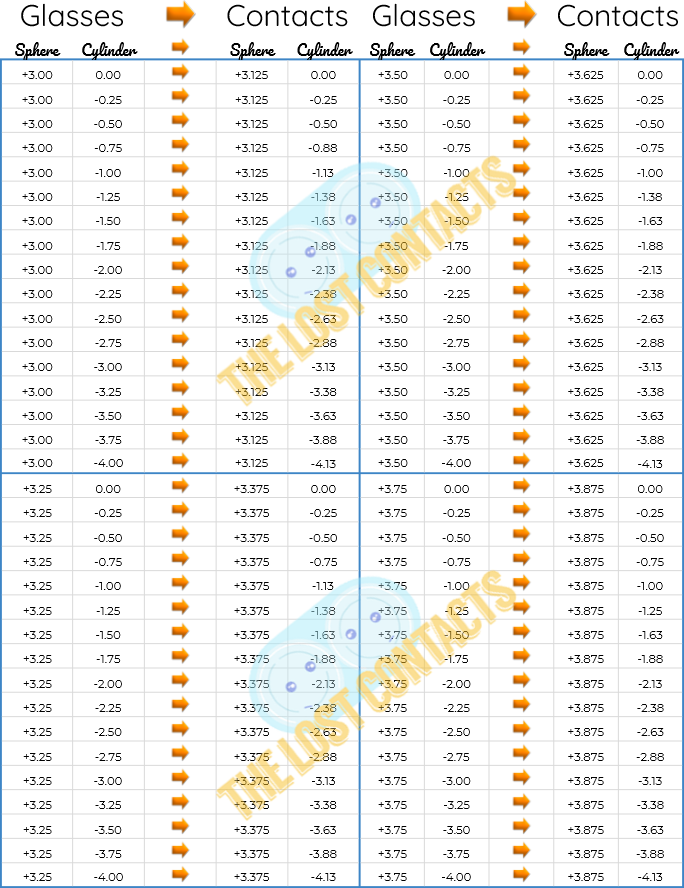
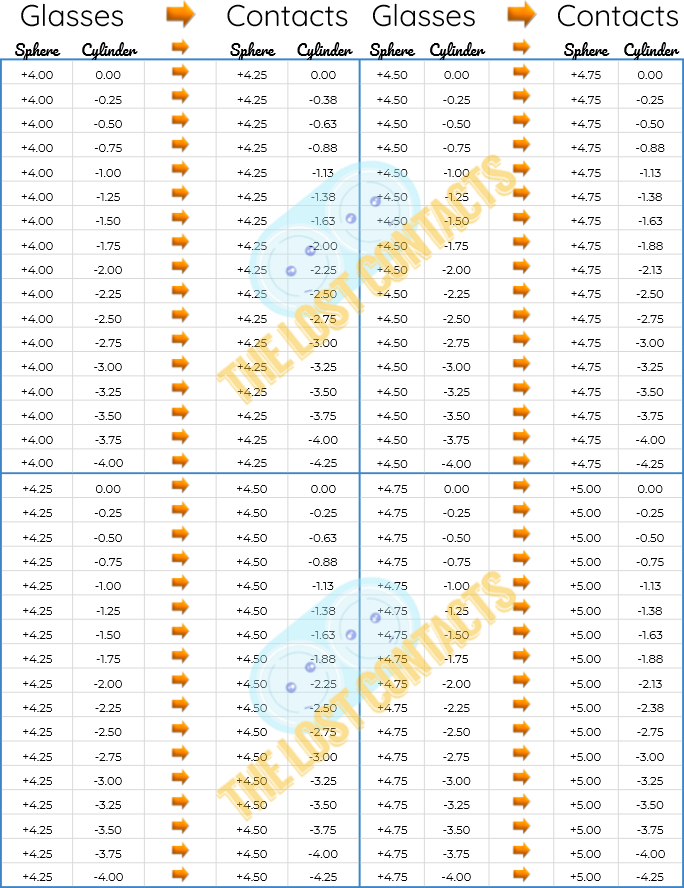
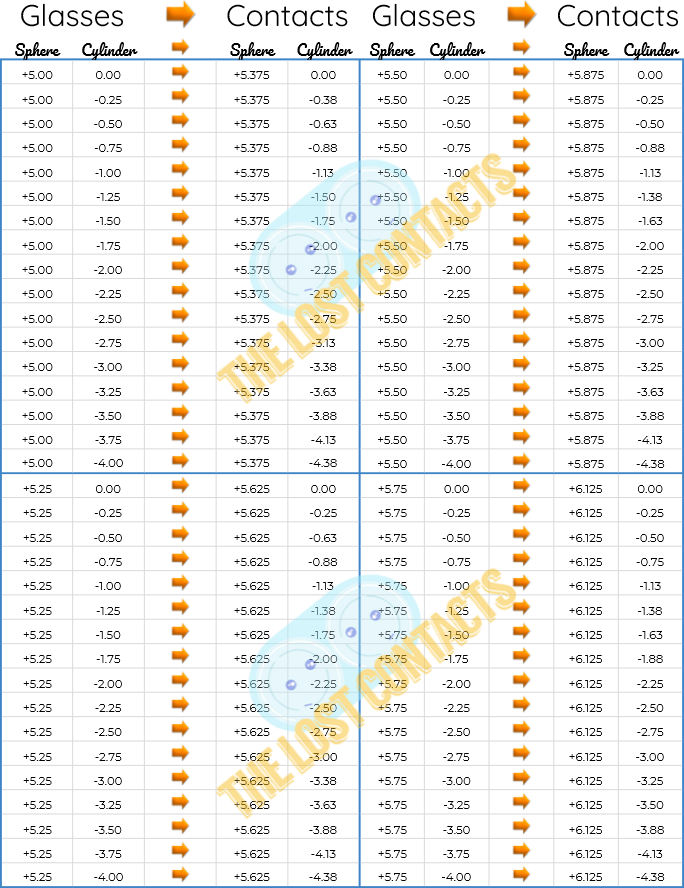
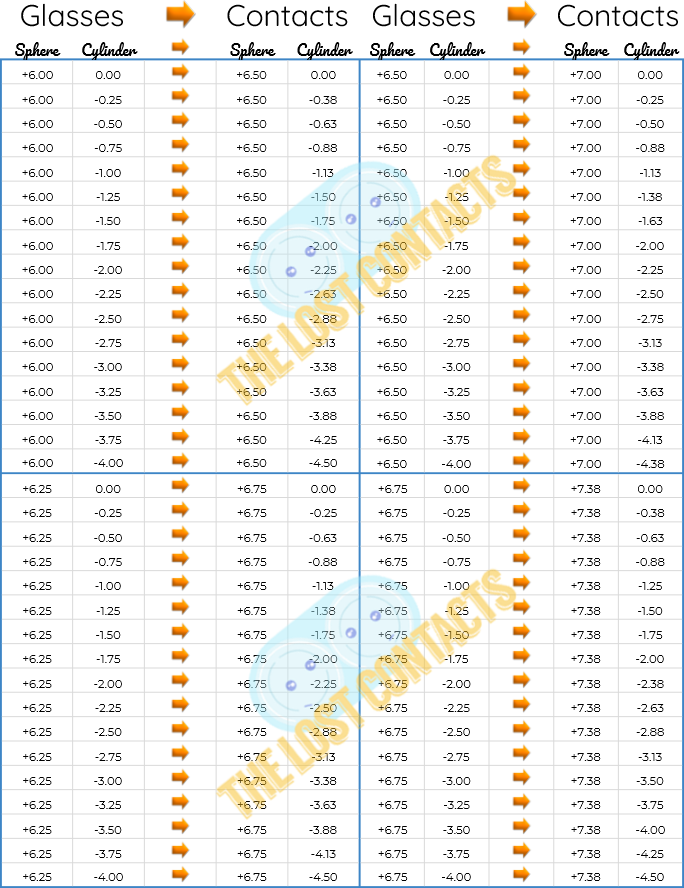
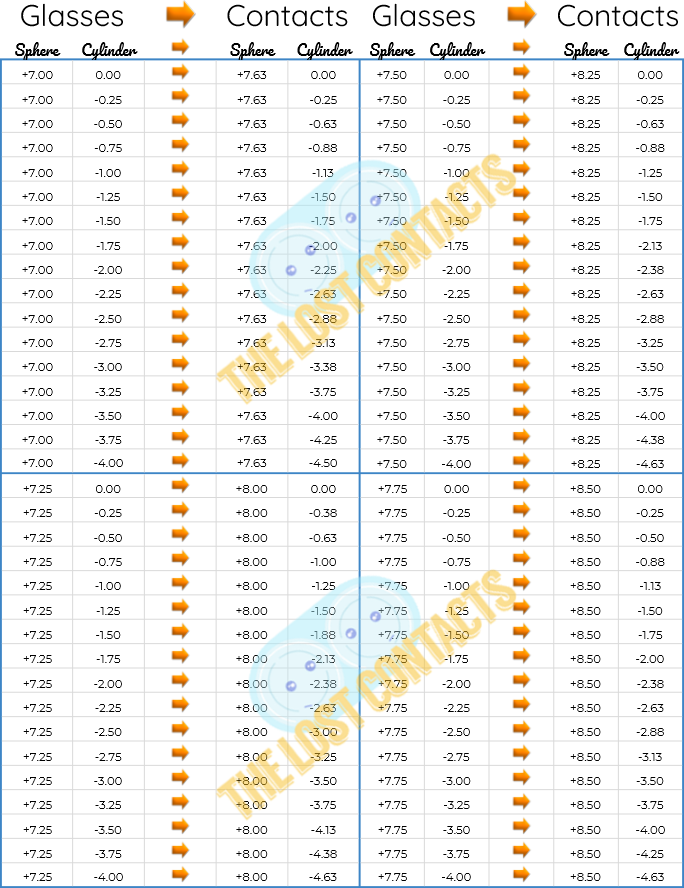
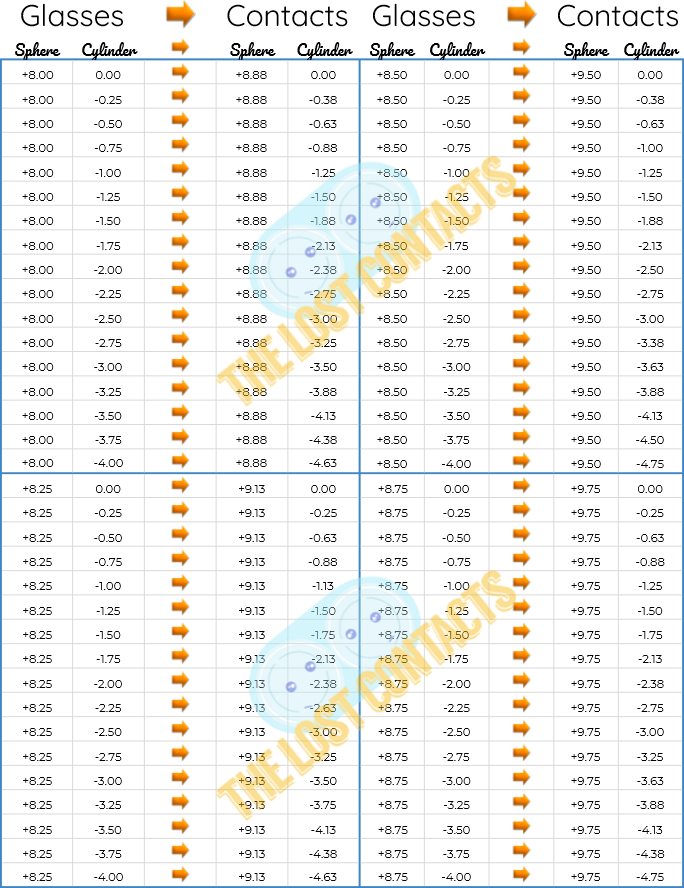
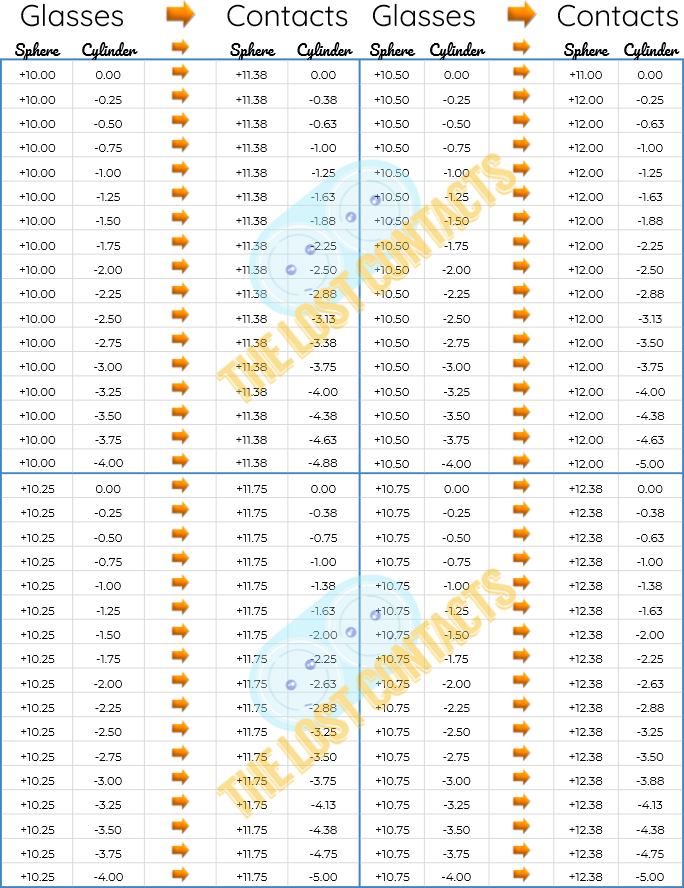
If you’re looking for a vertex distance conversion charts, you’ve found the motherload. Here you will find vertex distance conversion charts for single powers (i.e Sphere power only), as well as for astigmatism (Sphere + Cylinder combinations).

Pdf versions of all the charts shown on this page are available on The Lost Contact’s Downloads page. 

Sphere Power Only

Lets start your typical Sphere Power Only Vertex Distance Conversion Chart.

Vertex Distance Conversion Chart - Sphere Power

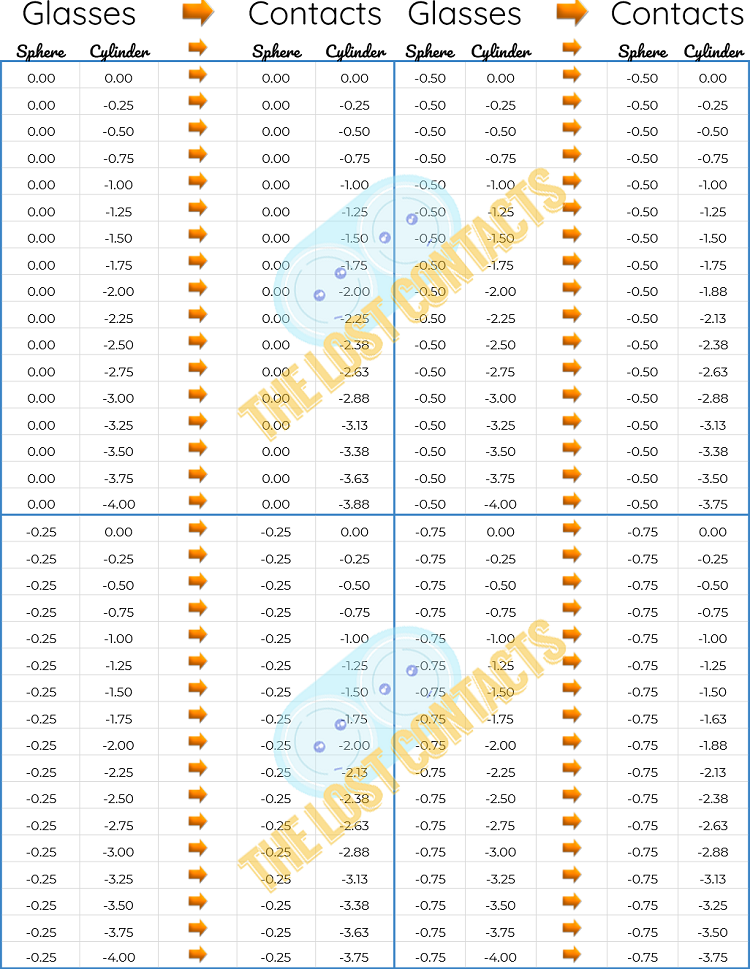
If you are looking you convert a combination of Sphere and Cylinder powers, you will need to reference the following Vertex Distance Conversion Chart for Astigmatism.

Astigmatism Charts For Minus Sphere Powers

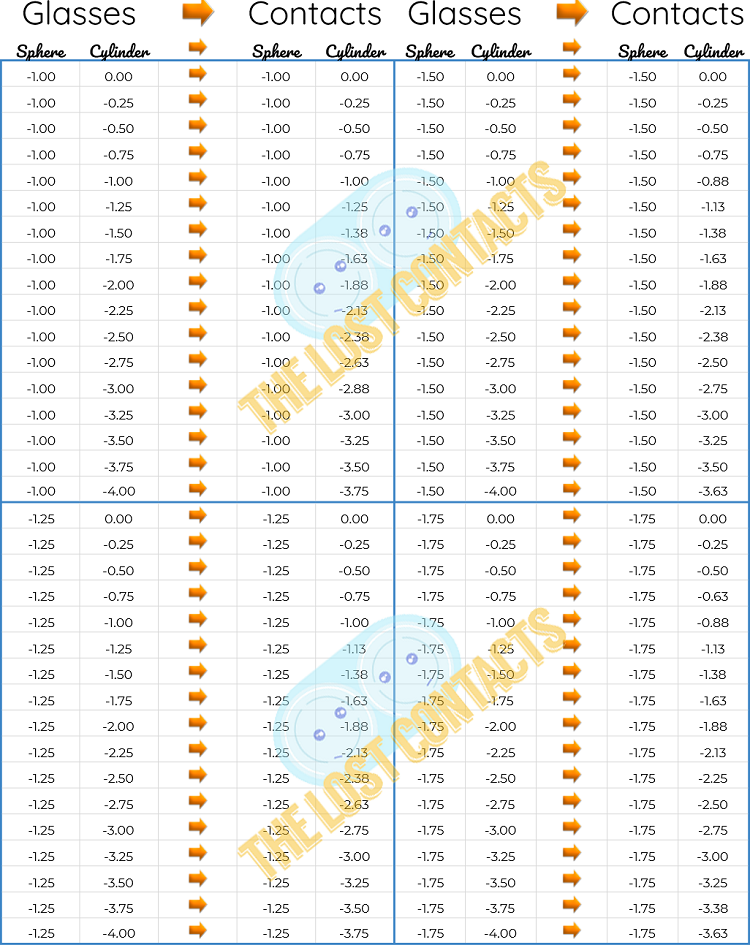
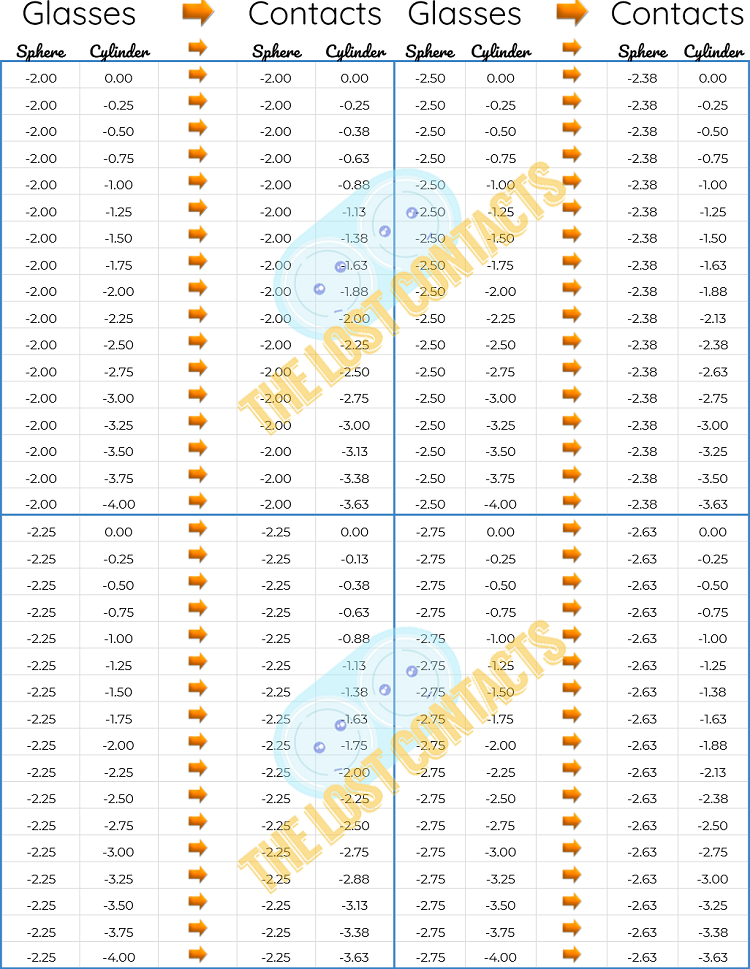
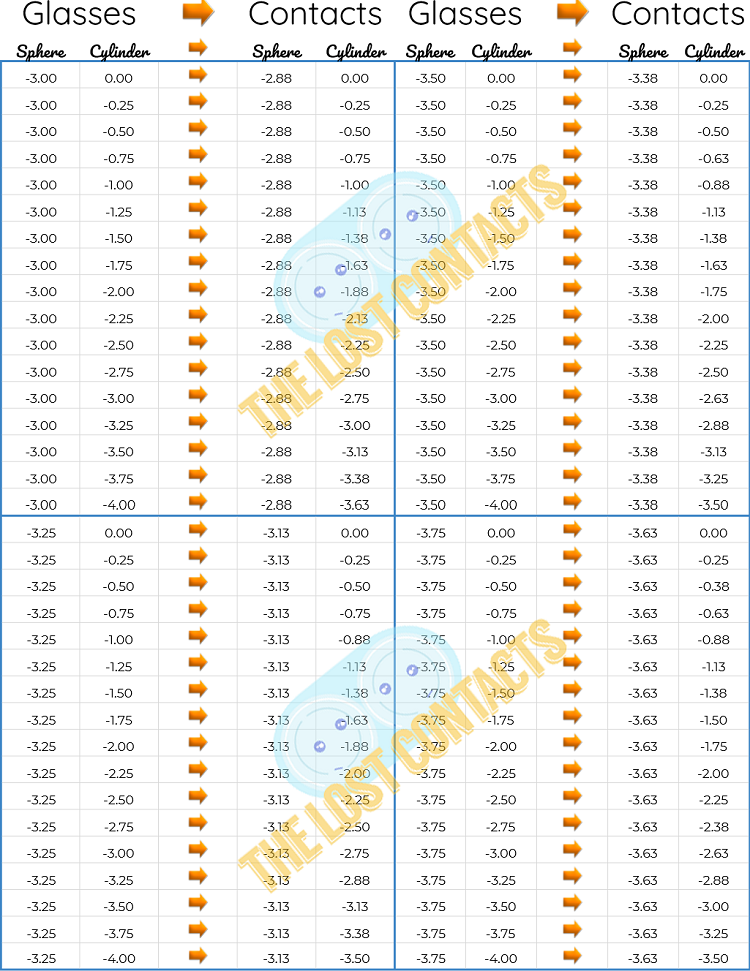
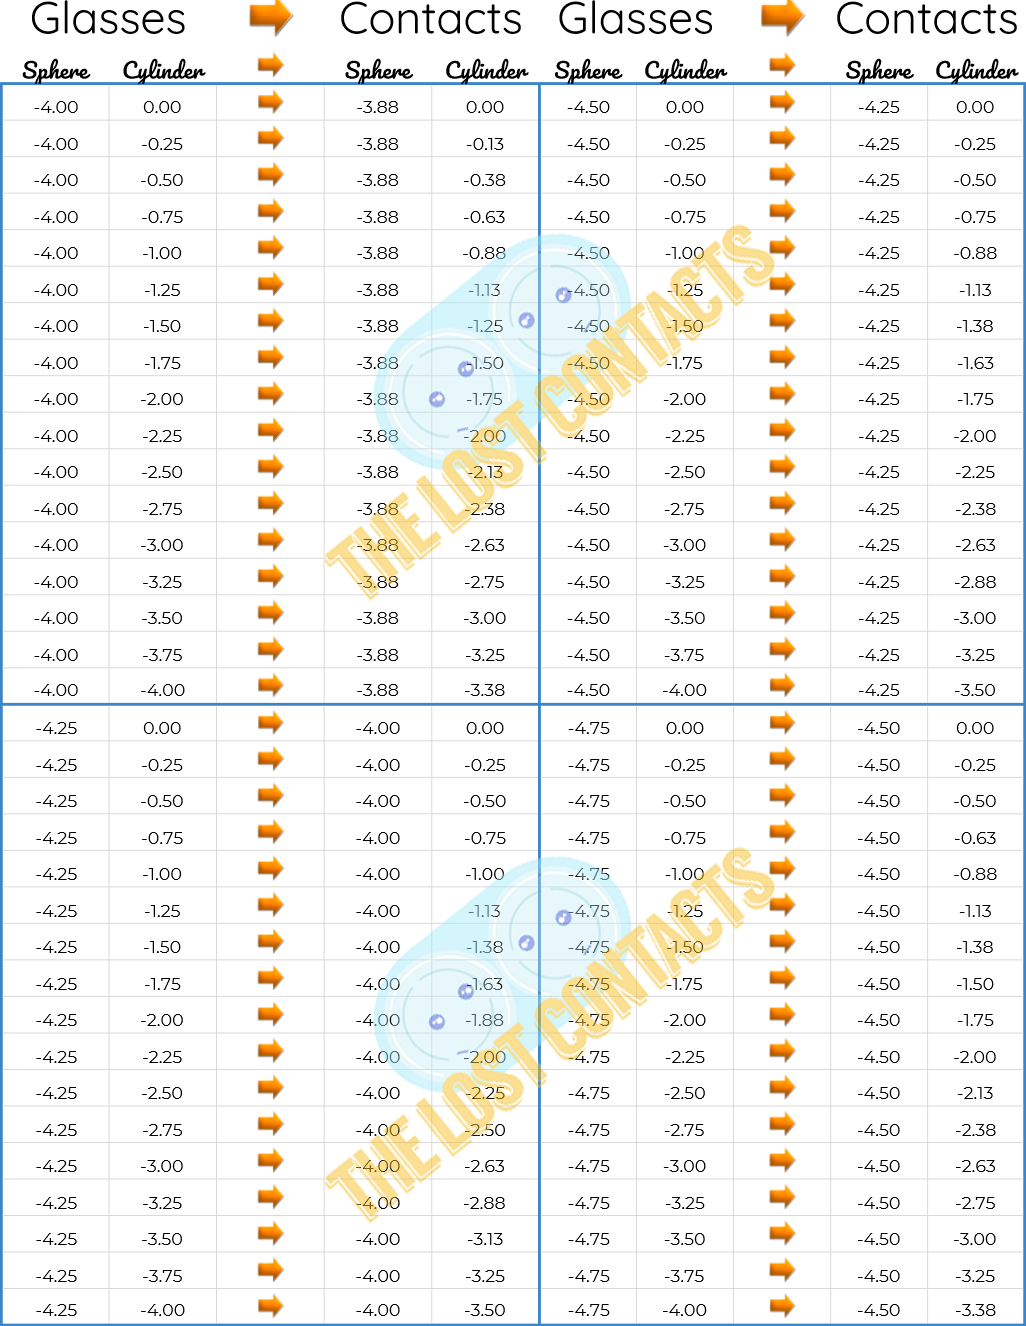
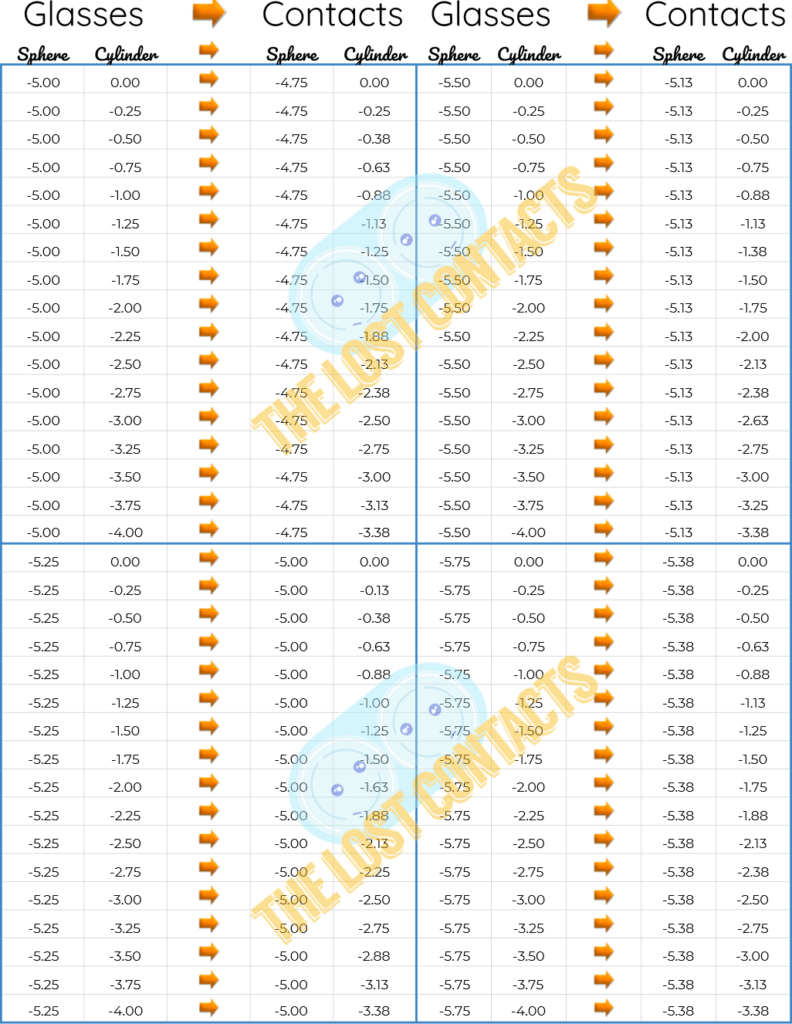
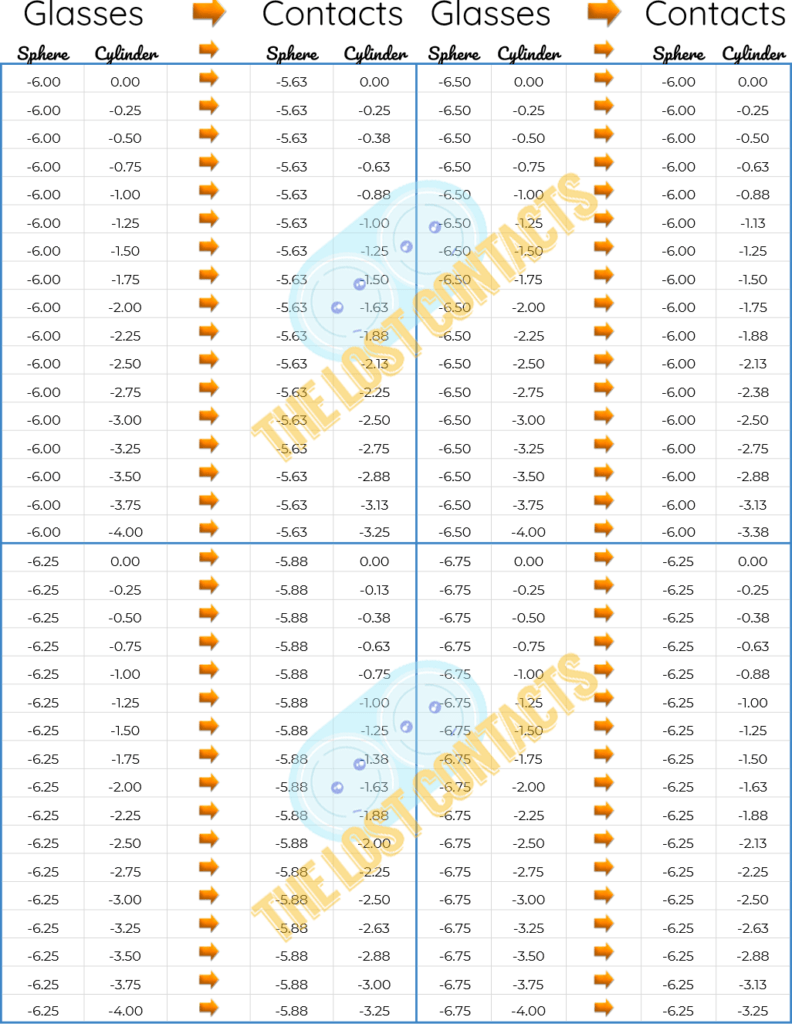
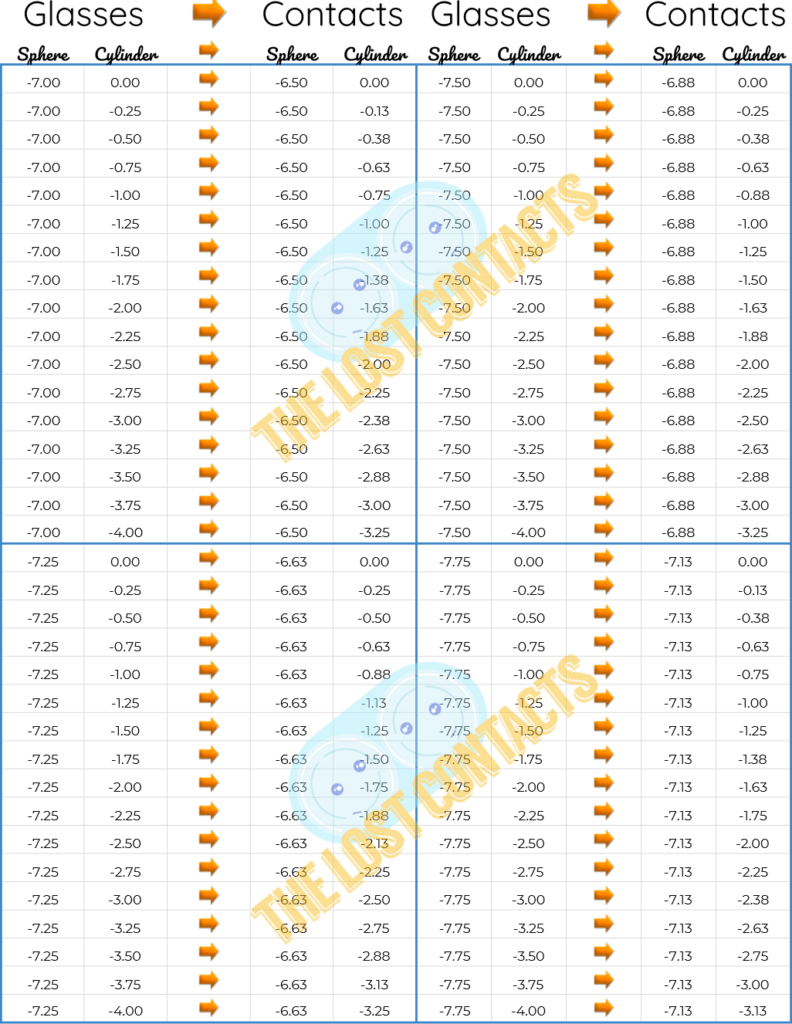
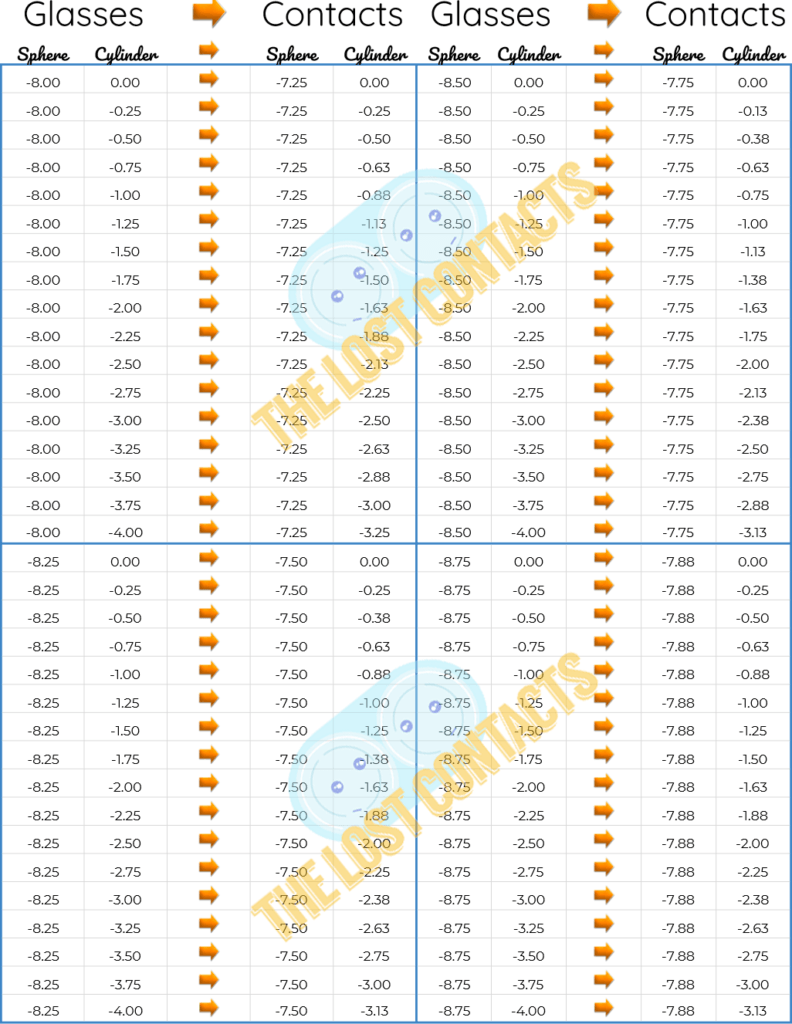
This series of charts will cover all Sphere and Cylinder combinations ranging from Sphere Power 0 to -10.75 and Cylinder Power 0 to -4.00.

Vertex Distance Conversion Chart For Astigmatism 0 to -0.75

Vertex Distance Conversion Chart For Astigmatism -1.00 to -1.75

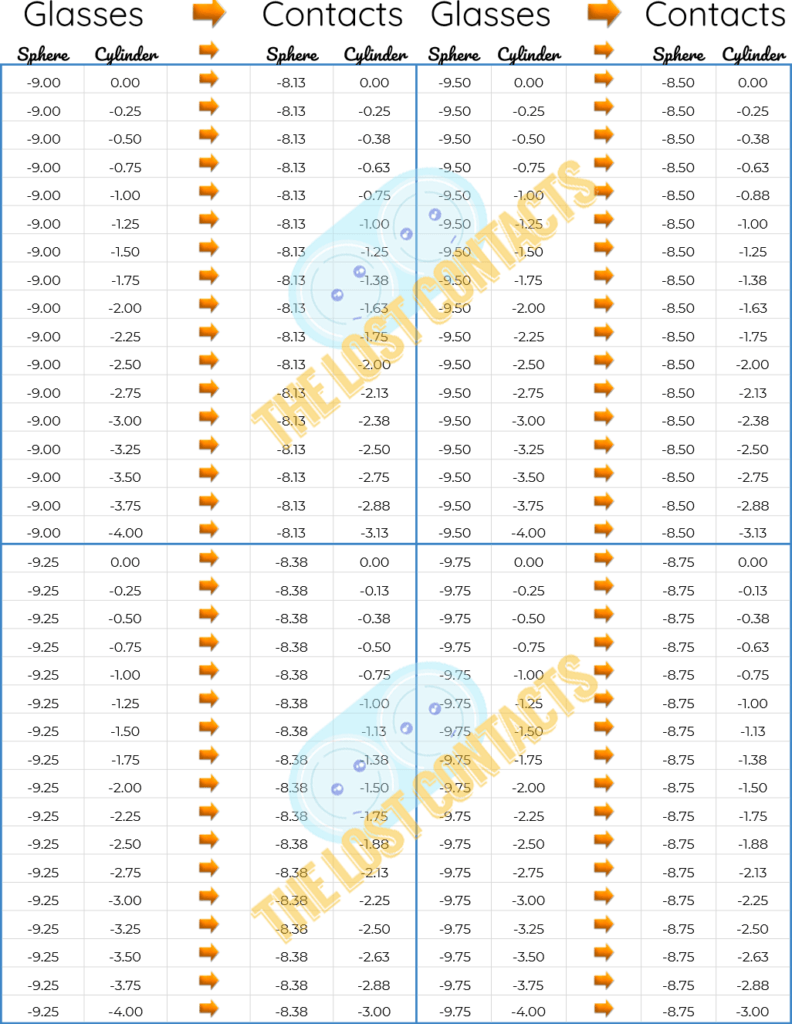
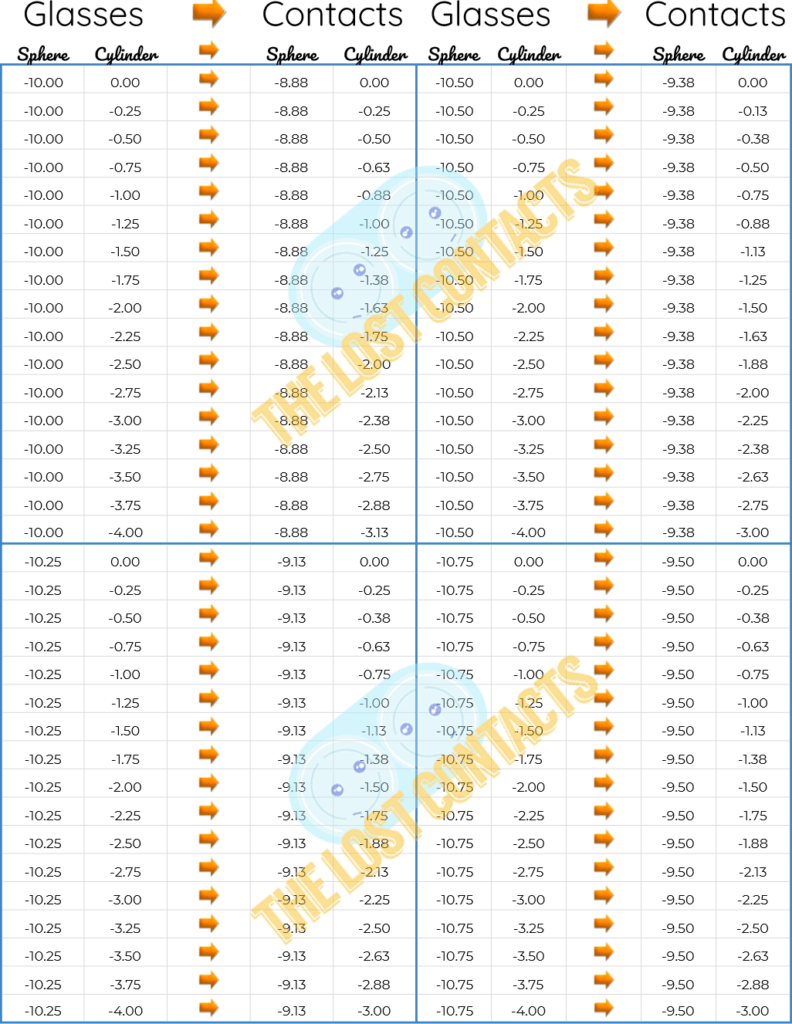
Vertex Distance Conversion Chart For Astigmatism -2.00 to -2.75

Vertex Distance Conversion Chart For Astigmatism -3.00 to -3.75

Vertex Distance Conversion Chart For Astigmatism -4.00 to -4.75 Vertex Distance Conversion Chart For Astigmatism -5.00 to -5.75

Vertex Distance Conversion Chart For Astigmatism -6.00 to -6.75

Vertex Distance Conversion Chart For Astigmatism -7.00 to -7.75 Vertex Distance Conversion Chart For Astigmatism -8.00 to -8.75 Vertex Distance Conversion Chart For Astigmatism -9.00 to -9.75 Vertex Distance Conversion Chart For Astigmatism -10.00 to -10.75

Astigmatism Charts For Plus Sphere Powers

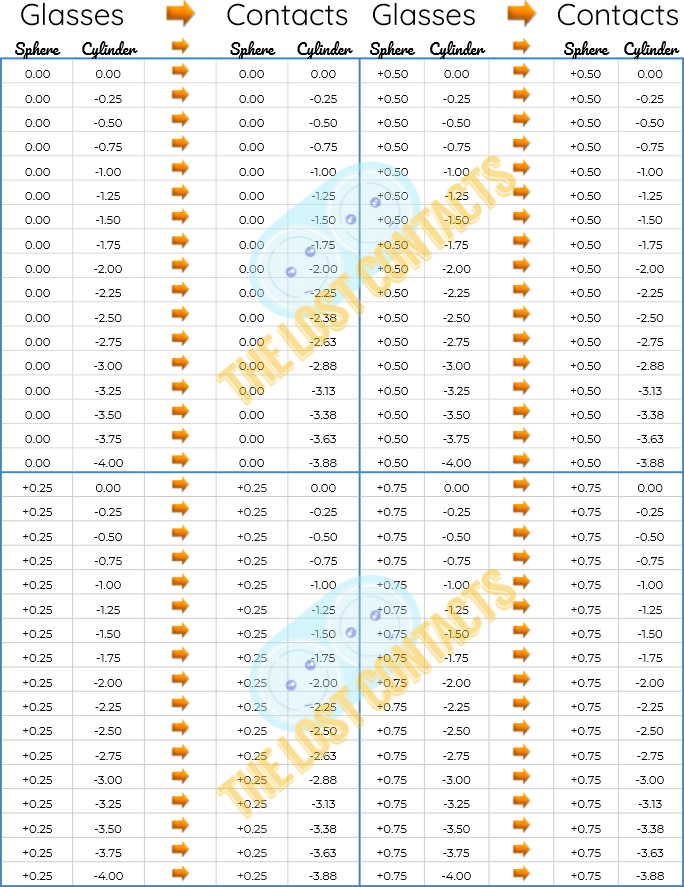
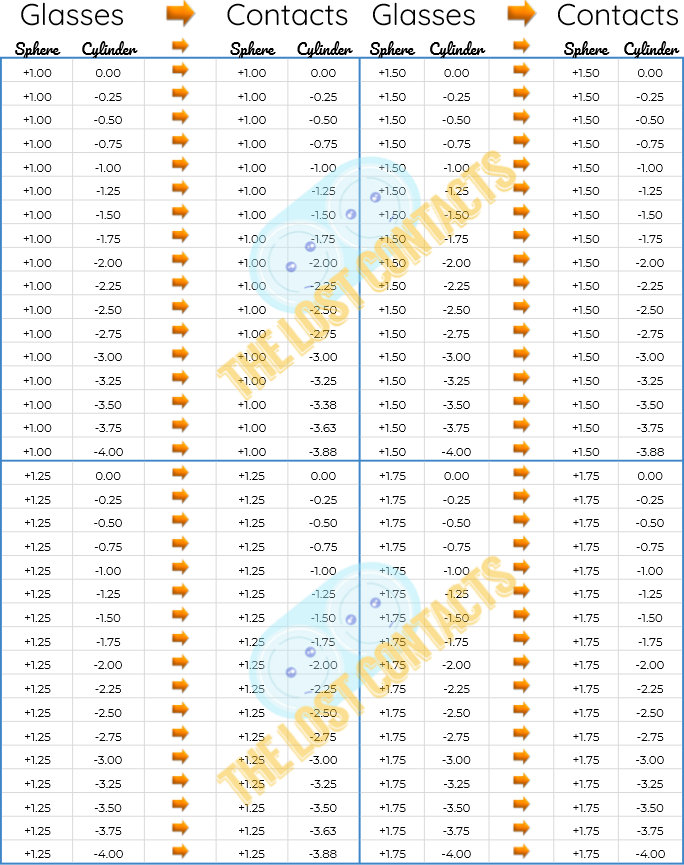
The next series of charts will cover all Sphere and Cylinder combinations ranging from Sphere Power 0 to +10.75 and Cylinder Power 0 to -4.00.

Vertex Distance Conversion Chart For Astigmatism 0 to +0.75

Vertex Distance Conversion Chart For Astigmatism +1.00 to +1.75

Vertex Distance Conversion Chart For Astigmatism +2.00 to +2.75

Vertex Distance Conversion Chart For Astigmatism +3.00 to +3.75

Vertex Distance Conversion Chart For Astigmatism +4.00 to +4.75

Vertex Distance Conversion Chart For Astigmatism +5.00 to +5.75

Vertex Distance Conversion Chart For Astigmatism +6.00 to +6.75

Vertex Distance Conversion Chart For Astigmatism +7.00 to +7.75

Vertex Distance Conversion Chart For Astigmatism +8.00 to +8.75

Vertex Distance Conversion Chart For Astigmatism +10.00 to +10.75

How Were These Charts Calculated?

All the charts were populated using the following equation:

Vertex Distance Conversion Formula

The vertex distance used in every calculation was 12mm. 

Summary

I hope these charts provide value for you and save you time in your clinic. If you would like to download and print these charts, you can get the pdfs in The Lost Contacts downloads section.  

How To Convert A Glasses Prescription To Contact Lenses - featured

How To Convert A Glasses Prescription To Contact Lenses

Now that you know who can or can’t wear contact lenses, it’s time to get the contact lens fitting started. The first step is to determine the power of contact lenses needed for your patient. To do this so it is crucial to know how to convert a glasses prescription to contact lenses.

Is A Contact Lens Prescription The Same As Glasses?

NO!

Well… sometimes yes.

Ok, it depends! let me explain.

What’s The Difference?

Glasses hold lenses up in front of the eyes, whereas contact lenses sit directly on the eyes. By understanding this key difference between contact lenses and glasses, you will understand why contact lens and glasses prescriptions are not always the same.

Why Does Distance Between Lens And Eye Matter?

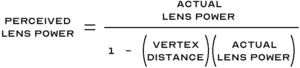
It matters because of this:

Vertex Distance Conversion Formula

In a nutshell, this simple equation states that the perceived power of lenses changes as you change the distance between the lens and the eye.

“The perceived power of lenses changes as you change the distance between the lens and the eye.”

Now, as we know, the lenses in glasses are at a different distance from the eyes than contact lenses are. The distance between a corrective lens and they eye is called the vertex distance.

  • For glasses, the vertex distance is usually somewhere between 12-15mm
  • For contact lenses, the vertex distance is always zero

This equation tells us that, for example, a -6.00D lens held 13mm from the eye will not feel like a -6.00D lens if placed directly on the eye. That’s why we need this equation in order to convert a glasses prescription to contact lenses.

Do We Really Need An Equation Though?

I can already sense that you’re trying to find a way around doing calculations using this or any other equation. So don’t worry! I only brought up the equation in order to help explain the concept and the math behind doing these conversions.

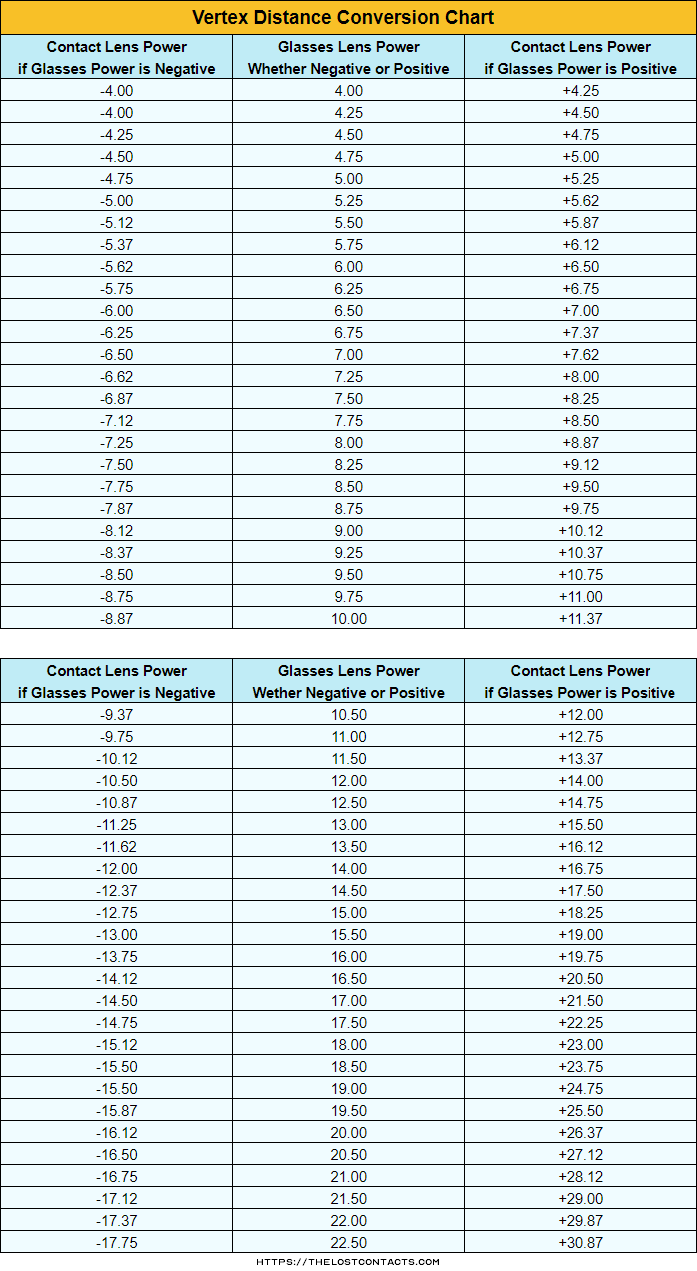
The much easier way is to refer to a chart which already has the results of the equation listed for every single possible lens power. These charts have several different names, but I tend to go with vertex conversion chart or vertex distance conversion chart.

Vertex distance conversion charts are easy to find online, but I’ve made my own just for you! If you find this chart useful you can download & print it for your office.

Vertex Distance Conversion Chart
*Note that this chart is based on a vertex distance of 14mm

How To Use A Vertex Distance Conversion Chart

Using a vertex distance conversion chart is simple.

  • The ‘Glasses Lens Power’ column refers to the power on the glasses prescription.
  • If the power on the glasses prescription is negative, then the converted power is directly to the left.
  • If the power on the glasses prescription is positive, then the converted power is directly to the right.

Let’s do a quick example to demonstrate this.

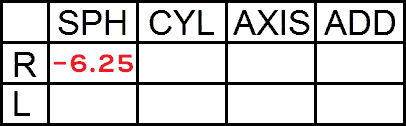
Say you have this glasses prescription and want to convert it to contact lenses:

Example Glasses Prescription

You could use the formula:

Vertex Distance Conversion Formula

Perceived lens power = -6.25 / {1 – [(0.014)(-6.25)]} = -5.75

Or, we can simply refer to the vertex distance conversion chart:

Example Use of a Vertex Distance Conversion Chart

Find the number on the glasses prescription in the middle column. If that number is negative, the converted number is the one on the left as is the case in this example. If number on the glasses prescription was positive, the converted number would be on the right.

This is showing that a -6.25D lens placed at 14mm from the eye would only seem like a -5.75D if it was place directly on the eye’s surface. Recall that a prescription for glasses is measured with lenses at 14mm from the eye, not at the eye’s surface. So if -6.25D was given in contact lenses, it would actually feel like -6.75D at 14mm which would be too strong!

This may feel a little confusing but the minutia of the exact reason and mechanism by which this happens is not overly important to practitioners like yourselves.

What About Low Powers?

You probably noticed that the vertex distance conversion chart above only starts at glasses prescriptions of +/-4.00D. What about zero to +/-4.00D? Good observation!

The nature of the equation which populates vertex distance conversion charts is such that for small powers, the converted power is not significantly different than the original power. Remember that glasses and contact lenses are only available in steps of 0.25. So if the vertex distance conversion formula yields a difference of less than 0.25 than it is of no real significance.

So what happens to glasses prescriptions between zero and +/-4.00D? By and large, for these values the glasses and contact lens power will be the same.

For powers between 0 and +/- 4.00D, glasses and contact lens prescriptions are the same. 

The Exception: ASTIGMATISM!

If the sphere and the cylinder numbers combined add up to more than -4.00, a conversion is necessary. To learn how to convert a glasses prescription to contact lenses that has astigmatism, click right here!

If you don’t have time or learn the full the process, you can simply look up the conversion in my Astigmatism Vertex Distance Conversion Chart.

How Accurate Is This?

Using a vertex distance conversion chart to convert a glasses prescription to contact lenses is just the first of many steps involved in getting to the final contact lens prescription. Remember, it’s just a mathematical formula spitting out numbers. Every eye is different and every contact lens brand is different. Sometimes the vertex distance conversion chart will give the best result for your patient or client, and sometimes it will have to be modified. It’s the job of a good contact lens practitioner to verify and determine the best power for your patient or client.

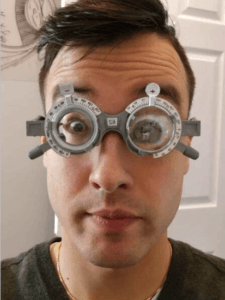
How Can You Confirm The Results?Patient Behind a Phoropter

Once you’ve used a vertex distance conversion chart to convert a glasses prescription to contact lenses, the following things should be done to confirm the results.

  1. Pull out some trial contact lenses in those powers and have your patient or client try them on.
  2. Give the contact lenses a couple of minutes to settle in.
  3. Measure the visual acuity of each eye individually.
  4. Perform an over-refraction on eye each using loose trial lenses or a phoropter.
  5. Use the results of the over-refraction to pull new trial contact lenses and repeat the process.

The process ends when the refraction over the contact lenses is zero for each eye.

Summary

So far we’ve covered how to convert a glasses prescription to contact lenses for a few different scenarios.

Briefy, they are:

  • For glasses power between zero and +/- 4.00D –> No conversion needed.
  • For glasses power over +/- 4.00D –> Use a vertex distance conversion chart.
  • When using a vertex distance conversion chart it’s important to confirm the results with an over-refraction.

But major element are what are we still missing? That’s right. Astigmatism.

What you’ve learned here will work just fine so long as there’re no astigmatism present in the glasses prescription. To learn how to deal with astigmatism when converting a glasses lens prescription to contact lenses, we’ll need a whole separate article.

==>Click here to read ‘How To Convert A Glasses Prescription To Contact Lenses: Astigmatism'<==


Who Can Wear Contact Lenses

Knowing Who Can Wear Contact Lenses

Can everyone wear contact lenses? No. There are definitely some people who can’t wear contact lenses, but in this article, I will discuss the kinds of people who can wear contact lenses. Not only that, but there are some people for whom contact lenses are the best option for their vision, and I will go over those scenarios as well.

Who Can Wear Contact Lenses

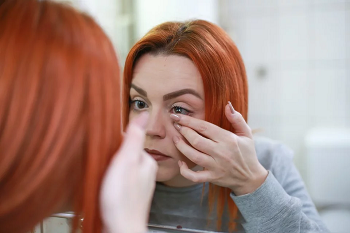
Woman inserting contact lensesThis is by far and away, the biggest category. These days, contact lenses are available in a wide range of different parameters and have become quite remarkably comfortable. This means that most people should be able to find a contact lens that works at least reasonably well.

People Who Can Wear Contact Lenses And Can Expect Perfect Vision

People with any amount of nearsightedness or farsightedness and no astigmatism can expect to be able to wear contact lenses and see perfectly well.

Rough range: Sphere: +6.00D to -10.00D, Cylinder: 0, Axis: None

People Who Can Wear Contact Lenses And Can Expect Near Perfect Vision

People who are nearsighted or farsighted in combination with low to moderate amounts of astigmatism, or people who have low to moderate amounts of astigmatism on its own, will still do very well in contact lenses.

Rough range: Sphere: +6.00D to -10.00D, Cylinder: 0 to -1.25, Axis: 001 to 180

People Who Can Wear Contact Lenses And Should Expect Somewhat Reduced Vision

When the levels of astigmatism start to get moderately high to high, the vision can still be quite good but there will be a noticeable departure from a perfect vision.

Rough range: Sphere: +6.00D to -10.00D, Cylinder: -1.25 to -2.75, Axis: 001 to 180

There are several reasons why the vision could be reduced in this prescription range:

  1. woman squinting her eyesUnstable contact lenses. With a high cylinder power, it becomes very important for the contact lens to sit perfectly aligned on the eye and never move throughout the day. Due to all of the different ways in which our eyes move throughout the day in combination with all the different head positions and eyelid-contact-lens interactions, it is nearly impossible for contact lenses for astigmatism to remain still. When they move far enough out of their ideal position, the vision will become and remain blurry until the lenses return to their ideal fit. This could take anywhere from seconds to minutes.
  2.  Falling between available parameters. Most contact lenses for astigmatism will offer an axis between 10 and 180 and in 10-degree steps. I.e., 10, 20, 30, 40, 50, and so on. However, a person’s vision may require an axis of any number between 1 and 180. I.e., 003, 017, 134, 166, 175, etc. This forces the eye doctor to have to choose the closest axis possible to the prescription, but this may not necessarily be exactly what is needed in order to see perfectly.

Who Should Wear Contact Lenses

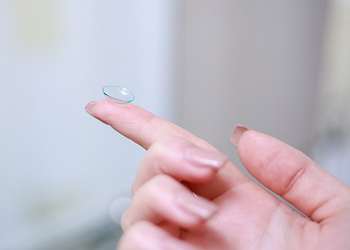
woman holding up a contact lensFor most prescriptions, wearing glasses is the go-to solution. For most prescriptions, contact lenses can offer an alternative to glasses but are not necessarily better. However, there are certain people for whom contact lenses would actually correct the vision much better than glasses. I will discuss these situations now.
Anisometropia & Antimetropia

Anisometropia Definition

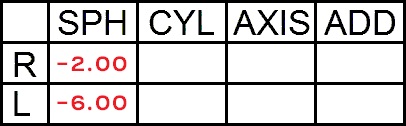
Anisometropia means that the prescriptions for the right and the left eye are considerably different. How different is considerable? It’s usually when the overall difference reaches around 1.50D or more.

For example: Right: -2.00D, Left: -6.00.

Anisometropic Prescription

Glasses are not ideal when dealing with high levels of anisometropia. I will discuss why in just a second.

Antimetropia Definition

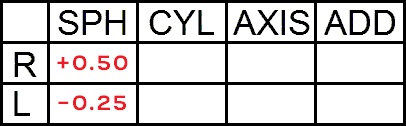
Antimetropia is the condition where one eye is nearsighted and the other eye is farsighted. This is sometimes called ‘mixed anisometropia’.

Antimetropia, if very low doesn’t cause too many problems.

For example: Right: +0.50D, Left -0.25D.

Antimetropic Prescription

However, if antimetropia and anisometropia are present together, that’s when glasses can start causing problems.

Why Aren’t Glasses Ideal For Anisometropia & Antimetropia?

In a nutshell, glasses induce visual distortions. The magnitude of these distortions depends on the strength of the glasses. When both eyes experience roughly the same levels of distortions, the brain is still able to combine the information it receives from both eyes into one coherent image of the world. However, when the distortions are vastly different, the brain cannot combine the information it is receiving from each eye; they are just too different.

The result of wearing glasses for anisometropia can range from uncomfortable vision, to double vision, eyestrain, headaches, loss of depth perception, and more.

Click here to learn more about anisometropia.

If you have a very savvy optician or optometrist, he/she can attempt to mitigate the symptoms of anisometropia by altering various properties of the glasses such as lens index, vertex distance, base curve, bevel position, etc.

Click here for more information on this type of solution.

However, a simpler solution would be to simply wear contact lenses!

Why Are Contact Lenses Ideal For Anisometropia & Anitmetropia?

Contact lenses do not produce any of the distortions in vision that glasses produce, no matter how different the prescription is between the two eyes. Why is that? Because not only do visual distortions depend on the strength of the lenses, but also the distance between the lens and the eye.

You can think of it this way:

Visual Distortions = [Strength of Lens] X [Distance Between Lens & Eye]

When using glasses for anisometropia, the strength of the lens will be different for each eye and the distance between the lens and the eye is usually about 12-14mm. This will lead to considerably different visual distortions for each and result in visual discomfort.

When using contact lenses for anisometropia, the strength of the lens doesn’t matter because the distance between the lens and the eye is always zero. That results in zero visual distortions for each eye every time.

Very High Sphere Power

Size of Eyes through very storng myopic and hyperopic glasses
Me wearing a -20D lens on the right and +20D lens on the left. Note the way that each change the apparent size of my eyes.

When you have a very high prescription, glasses start to affect the apparent size of your eyes. Sometimes this can be distracting or unappealing.

If you have a very strong hyperopic prescription, it will make your eyes look unnaturally big.

If you have a very strong myopic prescription, it will make your eyes look unnaturally small.

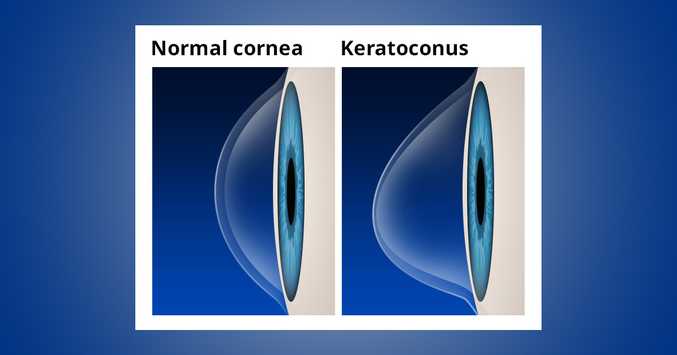
Keratoconus

Keratoconus is a condition that causes the cornea to develop something known as irregular astigmatism. Glasses and regular soft contact lenses are not able to correct irregular astigmatism. In this case what is needed are hard contact lenses called RGPs (rigid gas permeable).

Normal Cornea VS Keratoconus

Click here to learn more about keratoconus.

Summary

There are some people that can’t wear contact lenses but as you can see now, most people can and there are even many people for whom contact lenses are the best option.

Can you think of any scenarios that I’ve missed? If so, please share them in the comments below!

Once a suitable contact lens candidate has been found, it’s time to start analyzing what power of contact lenses they will need.

==>Click here to learn how to convert a glasses prescription to contact lenses<==

The Optics of the Eye Lesson 6 Emmetropia and Myopia Featured Image

The Optics of Vision – Lesson 6: Emmetropia & Myopia

Congratulations, you’ve made it to Lesson 6 where we’re finally going to start talking about glasses! This lesson will focus mostly on nearsightedness but you will also learn about much lesser known ‘condition’ known as emmetropia.

This lesson will continue to build on everything we’ve learned in Lessons 1-5. So if you haven’t done so already, here they are:

Refractive Conditions

Refractive conditions refers to all the conditions that require us to wear glasses.

The word refraction refers to what happens to light when it passes through lenses.  

Since the cornea acts like a lens, it can be said that the cornea refracts light.

I will continue to use the term ‘refract’ in the appropriate contexts, but whenever I do, you can pretty much replace that word in your head with the word ‘focus’ and you won’t miss a beat.

As we learned in Lesson 5, if the light is refracted such that it becomes perfectly focused on the retina, clear vision will be produced.

However, if the light entering the eyes is not refracted perfectly onto the retina, vision will be blurry and the eye is said to have a refractive condition. (I.e., a focusing condition)

The 3 main refractive conditions are:

  • nearsightedness (myopia)
  • farsightedness (hyperopia)
  • astigmatism

The lack of a refractive condition is called emmetropia.

Emmetropia Vs Ammetropia

What is Emmetropia?

Emmetropia is the ‘condition’ where light focuses perfectly inside the eyes and the vision is clear.

The word emmetropia is the name of the ‘condition’ and the word emmetropic is used to describe somebody with emmetropia. I.e., He has emmetropia, he is emmetropic.

This is not a common term and you will not see it used in the day-to-day operations of an optical store or optometry clinic. Remember, emmetropic people don’t need glasses so we usually just say that they have perfect vision instead of calling them emmetropic. 

In Lesson 5, the ray diagram of the eye that we studied was in fact depicting emmetropia. Here it is again:

Ray Diagram of an Emmetropic Eye

This diagram depicts emmetropia because the incoming parallel light is perfectly refracted by the cornea to come to a focus precisely on the retina. This is what the eye needs in order to see clearly.

What is Ammetropia?

Ammetropia is an umbrella term for anything that is not emmetropia. That means that the focal point of parallel light entering the eyes does not come to a focus on the retina. There are many refractive conditions that fall under the category of ametropia and in the rest of today’s lesson we will cover one of the most common one; myopia.

Myopia

What is Myopia?

Myopia is the refractive condition that results when the focal point of parallel light entering the eye forms in front of the retina.

The word myopia is the name of the condition and the word myopic is used to describe somebody with myopia. I.e., She has myopia, she is myopia.

The more commonly used term for myopia is nearsightedness. I.e., She has nearsightedness, she is nearsighted.

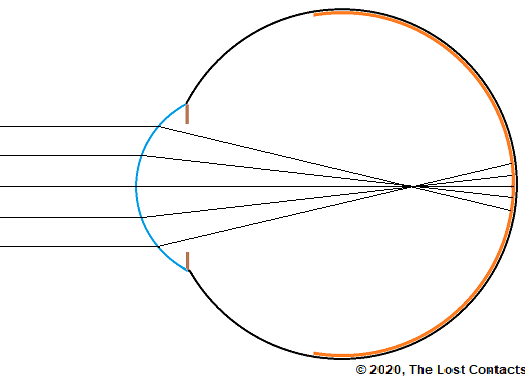
Here is an example of a ray diagram of myopia:


Ray Diagram of Moderate Myopia
A ray daigram representing myopia. Note that the focal point is well in front of the retina.

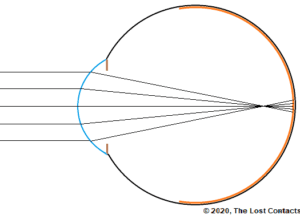
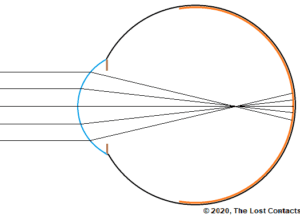
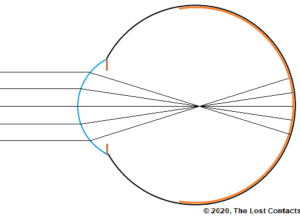
Myopia is not just a single state. It is a continuum. It can be very low if the focal point is only slightly in front of the retina, or it can be very high if the focal point is very far in front of the retina. Here are examples of 3 different levels of myopia

Ray Diagram of Low Myopia Ray Diagram of Moderate Myopia Ray Diagram of High Myopia
Low Myopia Moderate Myopia High Myopia

What Causes Myopia?

Can you think of different things that can place an eye in a state of myopia?

There are 2 possible ways.

  1. The cornea is too storng (it has too much converging power)
  2. The eye is too long and the retina is too far back

By far and away the biggest cause is #2: The eye is too long and the retina is too far back.

The 3 diagrams above are helpful in showing different severities of myopia, but they correspond more to the cornea being the cause of myopia, which is not the case in reality.

Here is a more accurate way of thinking of myopia:

Ray Diagram of Different Stages of Myopia

Note that in all 3 of the ray diagrams above, the focal length is the same. The focal point is exactly the same distance from the cornea in each case. The only thing that changes is the walls of the eye (and the retina) getting further and further back.

How to Treat Myopia

The goal when treating myopia is to put the focal point back onto the retina.

In myopia, the foal distance is not long enoug to reach the retina. Therefore, we have to increase the focal distace.

Since you’ve studied Lesson 3 on lens power, you know that stronger converging lesnses have shorter focal distances, and weaker converging lenses have longer focal distance.

So all we have to do to increase the focal distance of the eye is to lower the overall convergence of the cornea!

Another way of saying the exact same thing is: increase the overall divergence of the cornea.

Decreasing Convergence = Increasing Divergence

Increasing Convergence = Decreasing Divergence

The easiest way to decrease the convergence (increase the divergence) of the cornea is simply to add a diverging lense in front of it. A.k.a: Glasses!

Prescribing Lenses for Myopia

The job of an optometrist is to determine exatly what strength of diverging lens needs to be placed in front of a myopic eye in order to place the focal point back onto the retina.

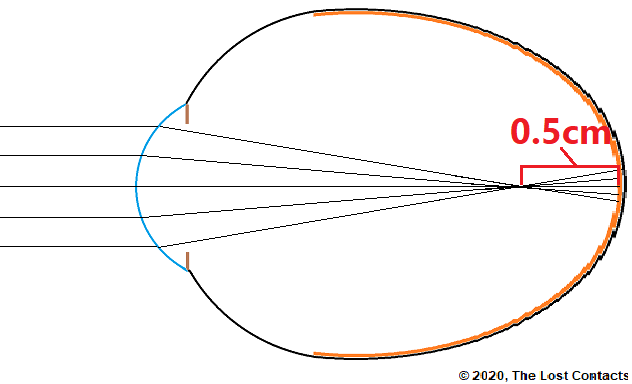
Let’s do an excerise to give you an idea of how this works. Remeber this image:

Ray Diagram of Eye Blank Longest with Rays

Let’s pretend this is our patient. She is myopic, but what lens will she need in order to see clearly?

In this example, we will say that the focal point is exacty 0.5cm in front of the retina.

We will also assume that the cornea has a power of +50D, which gives rise to a focal point exactly 2cm behind the cornea. If you don’t understand how that works, please review Lesson 5.

Ray Diagram of Myopia example

Calculations

The formula for lens power is:

lens power = 1 / focal distance

In this example we want the focal distance to be 2.5cm (because that’s how far the retina is from the cornea).

lens power = 1 / 0.025

lens power = +40D

This means that for the focal point to be on the retina, the cornea must have a lens power of +40D. But is has a lens power of +50D, not +40D, so what do we do?

Well, since the cornea has +10D more power than we need, we will offset that by adding a -10D lens in front of the cornea.

Calculations

Total Power Needed = Power of the Cornea + Power of Glasses Needed

+40D = +50D + Power of Glasses Needed

Power of Glasses Needed = +40D – (+50D)

Power of Glasses Needed = -10D

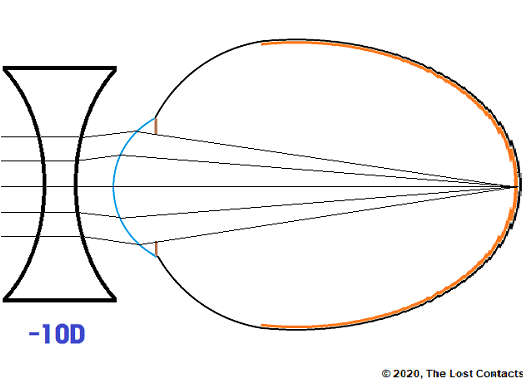
Here is the ray diagram for the same eye with a -10D lens in front of it.

Ray Diagram of Myopic Eye Corrected With A Minus Lens


Because of the diverging power of the minus lens, it reduced the overall convergence power of the eye. This results in the focal point forming further away from the cornea. In the example above, a -10D lens is required to place the focal point exactly onto the retina.

In a nutshell, that’s what myopia is and how it is corrtected. However, during an eye exam optometrists do not do any of the calculations you saw here in this lesson. Instead, they place different lenses in front of the eyes until the vision becomes clear. When the vision is the clearest, that’s when the optometrist knows that the focal point is on the retina. The diagrams and calculations in this lesson are meant to help you better understand what is going on inside the eyes when people are nearsighted.

Pop Quiz!

I have challenging question for all of you reading through this course. Test yourself by thinking about it, re-reading this lesson and previous lessons if necessary, and leave your answer in the comments section below to see if you are correct.

Question:

Why do nearsighted people need glasses to see clearly in the distance, but don’t need to glasses to see well up close?

Hint: Think of what type of lenses nearsighted people wear, what effect these lenses have on light, and how else you can create that same effect.

Leave comment below to find out the answer!

If you’re comfortable with the concepts covered in this lesson then it’s time to start learning about hyperopia! However, if you found this lesson challenging, please re-read it a few times and leave any questions you still have about it in the comments below and I will answer them for you.

==>The Optics of Vision – Lesson 7: HYPEROPIA <==