Introduction to Lenses The Index - Featured

Introduction To Lenses – The Index

Hello and welcome to the first lesson of The Lost Contacts’ Introduction To Optical Dispensing course! Before tackling this course, please keep in mind that it is meant to build on the knowledge laid out in The Lost Contacts’ The Optics of Vision course. Please make sure you are familiar with the topics in that course before taking this one.

Today’s topic will be something known as a lens index. But let’s make sure we’re familiar with a few things first.

What is a Lens?

Basically, a lens is a clear (transparent) & curved material used for the purpose of refracting light.

Please review The Optics of Vision – Lesson 2: Introduction to Lenses for more information about what lenses are.

What is Refraction?

Refraction is what happens to light when it passes from one medium to another.

A medium in this context is anything that light can travel through. For example, the first medium for light produced by the sun is the vacuum of outer space.  Eventually it reaches Earth and then switches medium from space to Earth’s atmosphere (air). Then it switches medium again when it enters your eyes.
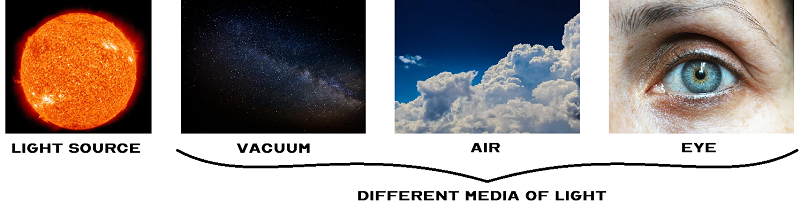
Different media of light

Other common examples of media that light can travel through are: water, glass & clear plastics.

Whenever light passes from one medium to another, the trajectory of the light changes. This change in trajectory is referred to as refraction. Lenses (usually plastic or glass) are a different medium than the air around them. So as light passes through lenses, it is refracted.

Generally speaking, the denser the medium is, the more it will change the trajectory of the light. Every medium has a different index of refraction, which is a number describes how much it changes the path of light.

The Index of Refraction

In this lesson, we will learn about one of the most important properties of a lens; the index of refraction.

Nowadays, lenses for glasses are made from plastic – not glass. But there isn’t just one plastic that’s used for all lenses. We have a lot of different plastics at our disposable when making a pair of glasses.

The reason for having so many types of plastics to make lenses is to take advantage of their different indices of refraction.

Let me explain.

As mentioned before, different media with different indices of refraction will alter the trajectory of light passing through them by varying amounts.

  • Plastic lenses that have a lower index of refraction will not bend light as much and therefore the focal point will be further away.
  • Plastic lenses that have a higher index of refraction will bend light more and therefore the focal point will be closer.

You may recall from The Optics of Vision – Lesson 3: Lens Power, that the curvature of lenses also affects where the focal point will be.

  • Plastic lenses that have a lower curvature will result in the focal point being further away.
  • Plastic lenses that have a higher curvature will result in the focal point being close.

This means that we now have 2 tools with which to adjust the position of the focal point; the curvature of lens and the index of refraction of the lens.

In the every day operations of an optical store, the index of refraction is simply referred to as ‘the index’.

Why Is The Index Important?

As you may already intuitively know, the more curved a lens is, the thicker it will be. That means that people with prescriptions for strong lenses will have thick lenses. But when it comes to lenses that we wear on our heads all day long, we don’t want those lenses to be too thick.

The solution is to increase the index. Doing this allows us to reduce the curvature (which reduces the thickness) without affecting the focal point of the lens.

Here are two lenses of the same power side by side. Notice that one of them is significantly thicker than the other. This is because they are made from two different lens indices.
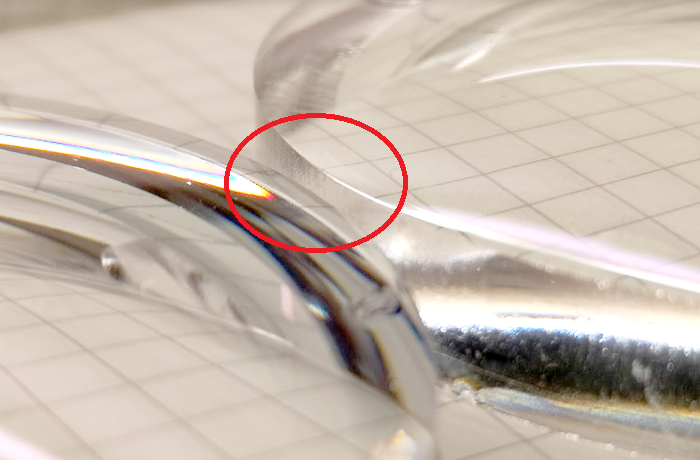
-4.00 normal versus high index lens
Notice the difference in edge thickness in the red circle.

Different Lens Indices


1.50 Index

  • Also known as CR-39.
  • 1.50 CR-39 is the ideal lens index for low prescriptions. It is the least expensive lens material, but also the thickest.
  • Recommended for prescriptions between +2.00 and -3.00
  • 1.50 CR-39 lenses block some but not all UV light.

Keep in mind that 1.5 is not very impact resistant and should not be sold to people who are prone to breaking their glasses/lenses.

Be careful when mounting 1.50 CR-39 lenses into certain frames as they are prone to chipping.


1.53 Index

  • Also known as Trivex.
  • 1.53 Trivex is a light-weight and highly impact resistant lens material. It is more expensive than 1.5 CR-39, but also a little thinner.
  • 1.53 Trivex blocks 100% of UV light.

1.59 Index

  • Also known as polycarbonate.
  • 1.59 polycarbonate is also light-weight and highly impact resistant. It is slightly thinner than 1.53 Trivex but also slightly heavier.
  • 1.59 polycarbonate blocks 100% of UV light.

1.53 Trivex and 1.59 polycarbonate have very similar uses. They are generally used for children’s glasses & safety glasses.


1.61 Index

  • 1.61 index lenses and above are considered to be ‘high index’ lenses. 1.61  index offers considerably thinner lenses than 1.50.
  • Recommended for prescriptions +2.50 to +4.50 and -3.00 to -5.00.
  • 1.61 index lenses block 100% of UV light.

1.67 Index

  • 1.67 index is similar to 1.61 index but used for even strong prescriptions.
  • Recommended for prescriptions +4.50 or higher and -5.50 or higher.
  • 1.67 index lenses block 100% of UV light.

1.74 Index

  • 1.74 is the thinnest and also most expensive lens material offered by most optical stores. The benefits of 1.74 are marginal as it does not make lenses considerably thinner than 1.67, but it does make them considerably more expensive.
  • It can be used instead of 1.67 if customers insist on the thinnest lenses possible.
  • 1.74 index lenses block 100% of UV light.

Here is a diagram showing the relative thicknesses of different lens indices.
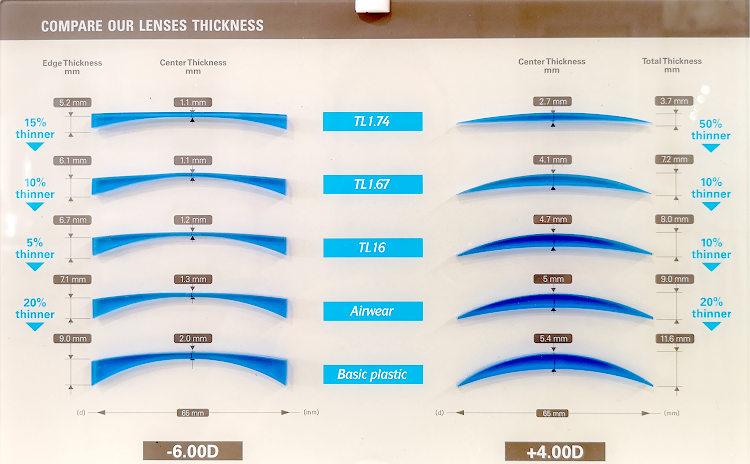
Lens Index Comparisons
From bottom to top the lens indices shown above are 1.53, 1.59, 1.6, 1.67, 1.74

Clear Lenses Can Block 100% of UV light?

Yes, all lens indices except for 1.50 CR-39 block 100% of UV light and yet they are not tinted. This is something that most people aren’t aware of as we usually think of lenses that block UV light to be sunglasses (tinted lenses).

Despite the fact that clear lenses can block 100% of UV light, that does not mean that sunglasses aren’t necessary. Sunglasses are generally larger and hence offer more protection then regular glasses as well as increased visual comfort from reducing the overall brightness.

Remember to Look at the Cylinder

Recommended power rangers for different lens indices typically just show the ‘sphere’ power. But what if your customer has ‘sphere’ and ‘cylinder’ in his/her prescription?

FOR EXAMPLE

If this is your customer’s prescription:
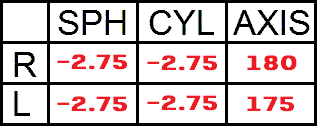
example prescription of compound myopic astigmatism

You see a bunch of -2.75 everywhere so you might think that 1.50 index would work fine for this prescription. But this would be incorrect.

What a prescription with cylinder is really saying is that half of the lens contains the ‘sphere’ power only, and the other half has the ‘sphere’ + ‘cylinder’ power.

This means that the strongest portion of the lenses in this example prescription above would be -5.50 (-2.75 + -2.75).

Making these lenses with 1.50 index would result in half the lenses being very thick. Therefore, 1.67 index would be a more appropriate.

Remember to Look at the Add

The ‘add’ power is similar to the ‘cylinder’ power in that it get’s added to the ‘sphere’ power when making reading glasses.

FOR EXAMPLE

If this is your customer’s prescription:

example prescription of hyperopia and presbyopia

If you only look at the sphere or the add you might think that 1.50 index would be appropriate for this prescription. But that would be incorrect.

An ‘add’ is always added to the ‘sphere’ when making reading glasses.

This means that the strength of the reading glasses in this example would be +4.00 (+2.00 + +2.00).

Making these reading glasses with 1.50 index would result in glasses that are thick and heavy. Therefore, 1.61 index would be more appropriate.

The Index of Refraction of Other Materials

If you’re interested in learning what the index of refraction of other materials like air, water, glass, ice, diamonds, & more, click here.

Summary

When making glasses, we select the most appropriate lens index for the every prescription in order to maximize the satisfaction of the customer. Knowing the different lens indices and when to use them will make you a much better eye-wear consultant and optical associate.  Please take the time to memorize the different indices and be sure to keep a reference chart for each index’s prescription range somewhere in your store.

Next in this lesson series we will learn about something called the base curve.

==> CLICK HERE TO READ ‘INTRODUCTION TO LENSES – THE BASE CURVE’ <==

The Crystalline Lens - Featured

The Optics of Vision – Part 9: The Crystalline Lens

If you thought the way the eye works was cool before, this is going to blow your mind. You’re about to learn about the crazy wonders of the the cyrstalline lens.

This lesson builds on all of the previous lessons in this course, so please make sure you are up to speed before tackling this one.

What is The Crystalline Lens?

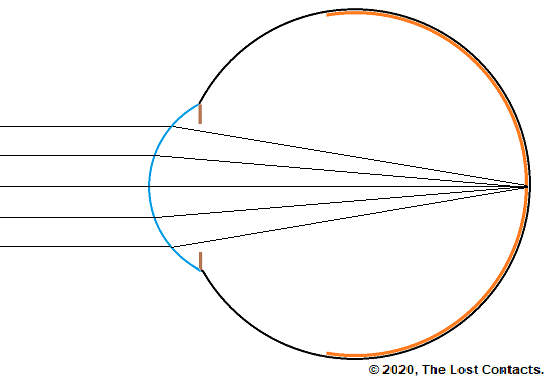
This is the ray diagram of the eye that we are familiar with now.

Ray diagram of an emmetropic eye

The truth is that this diagram doesn’t actually show the complete picture of how the eye focuses light. This diagram depicts the cornea as being the only lens that focuses light for the eye. In fact, there are actually two structures that act as lenses. 

  1. The cornea
  2. The crystalline lens

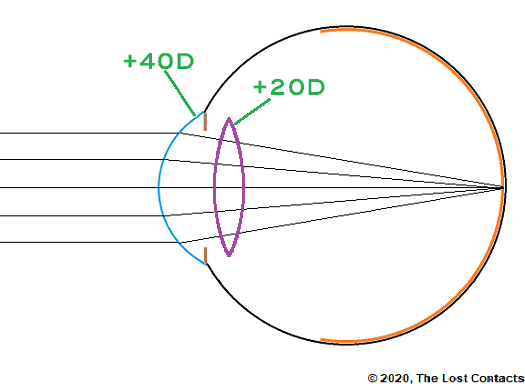
Here is a diagram that depicts both the cornea and the crystalline lens. 

Ray Diagram of the eye with labelled cornea and crystalline lens

The crystalline lens is hidden just behind the iris. You cannot see it on your own as it is transparent and it is too dark in side the eyes to see.

What is the Power of the Crystalline Lens?

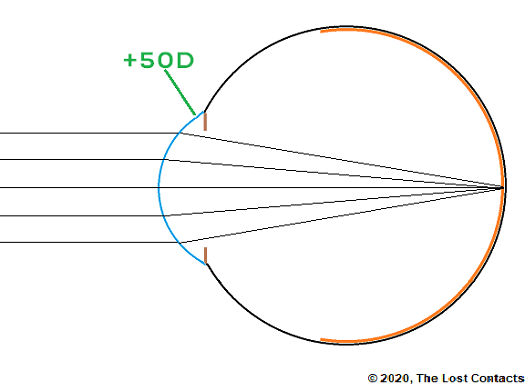
In past lessons, I have used +50D to represent the strength of the cornea.Ray Diagram of the eye with no crystalline lens


This is not actually the case. In reality, the total power of the eye is closer to +60D. The cornea is about +40D and the crystalline lens is approximately +20D (at rest… more on this a little later on). 

Here is a more accurate picture of the power of the eye. Keep in mind this is still a little simplified, but this is more than enough for you to know.

Power of the corean and crystalline lens

Review of Light Vergence & Distance

Before I reveal why the crystalline lens is so fascinating, we need to do a brief review of the vergence of light emitted from different distances. 

This would be a good time to review Lesson 1: Understanding Light

Here are the key points to remember:

  • Light that is emitted by objects is always divergent.
  • As the light travels away from the object it becomes less divergent.
  • Eventually, when the light has traveled more than 6 meters (20 feet), the light becomes parallel and stays that way.  

This diagram illustrates these key points:

ray diagram showing divergent light from object becoming parallel over a distance of 20ft

Have you noticed that whenever I have drawn a ray diagram of the eye, the incoming light has always been parallel?

Ray diagram showing parallel light entering the eye
Every ray diagram of the eye in this course so far has had parallel light entering the eye.

Why is that?

The answer is because we have always assumed that the eye was at least 6 meters (20 feet) away from the object producing the light. 

So…

Q: What happens when the eye is closer than 6 metres (20 feet) away from the object it’s looking it?

A: The light rays entering the eye will be diverging (not parallel)

We are now going to study 3 diagrams that illustrate the effect of distance (between the object and the eye) on the vergence of light entering the eye and focal distance. 

*Note: These are all emmetropic eyes i.e., not nearsighted, farsighted and no astigmatism.

  1. This first eye is looking at an object situated over 6 meters (20 feet) away – hence the light reaching the eye is parallel.
  2. This results in the focal point forming on the retina.
  3. This means vision is clear
Eye looking at Distance Object
The eye looking at a distant object.
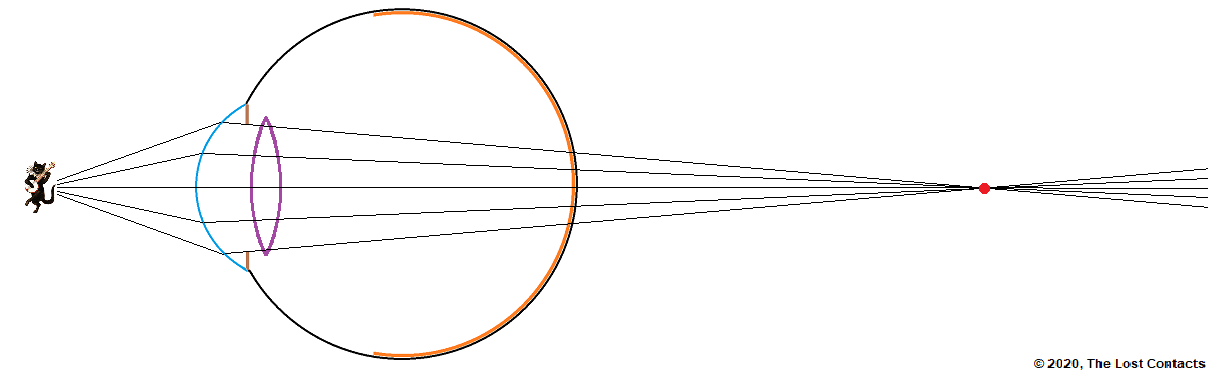
  1. This second eye is looking at an object that is less than 6 meters (20 feet) away – hence the light reaching the eye is divergent.
  2. This results in the focal point forming behind the retina.
  3. This means the vision is blurry.
Eye Looking at Near Object
The eye looking at a near object.
  1. This third eye is looking at an object the very close to the eye – hence the light reaching the eye is very divergent.
  2. This results in the focal point being formed even further behind the retina.
  3. This means the vision is very blurry.
Eye Looking at Very Near Object
The eye looking at a very near object.

Wait… What?

Am I trying to say that anytime we look at something up close the vision is blurry?!

If you are an emmetrope (you don’t wear glasses), you know that’s not true. You can see well in the distance just as well as you can see up close, right? But how can that be if these diagrams are accurate?

Because the crystalline lens is flexible and automatically adjusts its power depending on where you are looking!

This is called accommodation

Yes, let that sink in…

Mind Blown

So check it out;

When looking into the distance, the image already falls on the retina, so the crystalline lens can just relax. In this state, it is said to be at rest. 

The Crystalline Lens at Rest

When looking up close, the crystalline lens ‘knows’ that the light entering the eye is divergent, so it becomes more curved in order to increase they eye’s converging power (to offset the incoming diverging light). This keeps the focal point on the retina and the eye sees clearly. 

The Crystalline Lens Medium Curvature

When looking really close, the light entering the eye is very divergent, so the lens becomes extremely curved in order to compensate. Again, by doing so, the focal point remains on the retina and the eye sees clearly. 

The Crystalline Lens With High Curvature

When the eye is finished looking up close and switches back to looking into the distance, the crystalline lens goes back to being at rest (which means it gets flatter again). 

Accommodation

The constant adjustments that the cyrstalline lens makes in order to keep the vision clear is called accommodation. 

Speed of Accommodation

Accommodation is very fast. So fast in fact that we’re not even aware that it’s happening. When we change the distance at which we are looking, the cyrstalline lens accommodates to that distance before we have time to notice any blur in the vision. 

What Controls Accommodation

Accommodation is all controlled by a muscle that surrounds and suspend the lens in place. This muscle is called the ciliary muscle.

Here is a more in-depth explanation of the mechanism that controls accommodation:

Limits of Accommodation

Accommodation has it’s limits. Generally speaking, the limit is based on age. As we get older, our ability to accommodate gets worse. You can test the limit of your accommodation right now by looking into your palm and moving it closer to your eyes until it becomes blurry. The distance at which you are no longer able to see the details on your palm clearly is the limit of your accommodation. 

If you were to measure and record this limit every year, you would find that it gets further and further out every year.

Eventually, accommodation runs out. But more about that in the next lesson!

==> THE OPTICS OF VISION – PART 10: PRESBYOPIA <== 

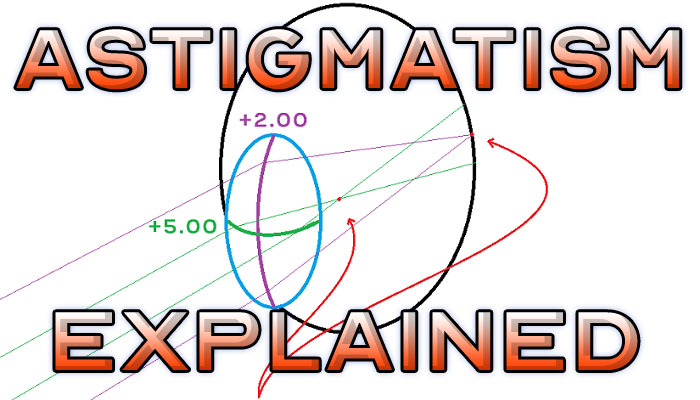
Astigmatism Explained

The Optics of Vision – Lesson 8: Astigmatism

After studying this lesson, you will understand a concept that eludes the vast majority of people – Astigmatism! But before you proceed, keep in mind that this is Lesson 8 of the course and it is highly advisable that you have read lessons 1-7 before tackling this one.

Astigmatism

What is Astigmatism?

Astigmatism is a refractive condition that results in the creation of 2 separate focal points.

Recall from Lesson 6 & Lesson 7 that the difference between emmetropia, myopia and hyperopia is where the focal point forms inside the eye.

  • In emmetropia the focal point forms on the retina
  • In myopia the focal point forms in front of the retina
  • In hyperopia the focal point forms behind the retina

In all 3 of these conditions the eye produces only a single focal point. But what if there were 2 focal points…? Then that would be astigmatism!

How Can There Be 2 Focal Points?

Brilliant question!

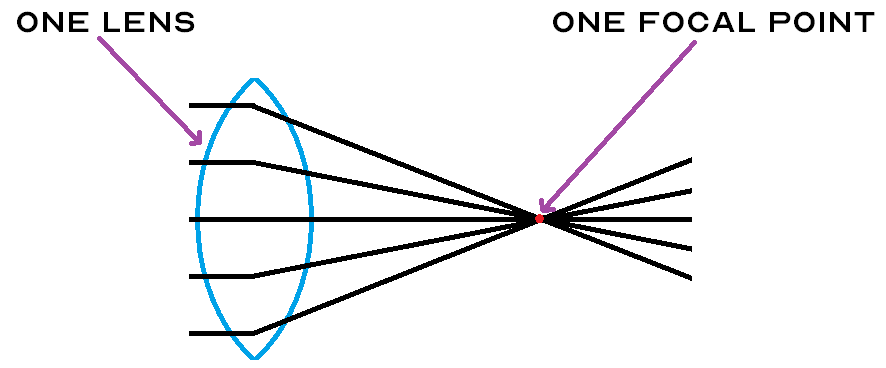
Everything that you have learned in this course so far suggests that it is impossible for a lens to produce two focal points.

One Lens One Focal Point

Question: So how can one lens produce two different focal points?

Answer: It must have two different curvatures!

Up until now we have always assumed that the lenses and the cornea in our examples have only one curvature, but this is not always true. A lens can have two different curvatures.

Spherical Vs Spherocylindrical Lenses

A lens that has two different curvatures is called a spherocylindrical lens. Before we delve into spherocylindrical lenses, let’s make sure we understand simple spherical lenses.

Spherical Lens

A spherical lens is simply a lens that has the same curvature all around. This is the type of lens we’ve been dealing with in all of our lessons so far.

In the following diagram, you will see a +2.00D spherical lens from two different perspectives. The top is the side view you’re familiar with, but the bottom is an approximately 45° angle view. That’s why it appears oval in nature, but keep in mind that it is the same lens.

Two Perspectives of a Spherical Lens

There’s a lot going on in this diagram so let’s examine it closely.

Notice that:

  • Both top and bottom lenses have the same power; +2.00D
  • Both top and bottom lenses have the same focal distance; 50 cm
  • In a side view (top) only one curvature can be seen; the vertical curvature
  • In a 45° angle view, two curvatures can be seen; the vertical curvature (purple) and the horizontal curvature (green)

In this diagram, we see a lens with a vertical and horizontal curvature that are the same. That’s what makes this a spherical lens.

A spherical lens has the same vertical and horizontal curvature

Note: Just because the horizontal view (top) shows a lens that appears to only have a vertical curvature, it does not mean that it has no horizontal curvature. The horizontal curvature is just not visible from that perspective. When drawn this way, the horizontal curvature is simply assumed to be the same as the vertical curvature.

Now let’s see what happens when the vertical and horizontal curvatures are not the same.

Spherocylindrical Lens

A spherocylindrical lens is different from a spherical lens in that:

  • They have two different curvatures
  • The different curvatures are always 90° apart
  • Each curvatures creates a separate focal point

The following diagram illustrates a spherocylindrical lens.

Spherocylindrical Lens

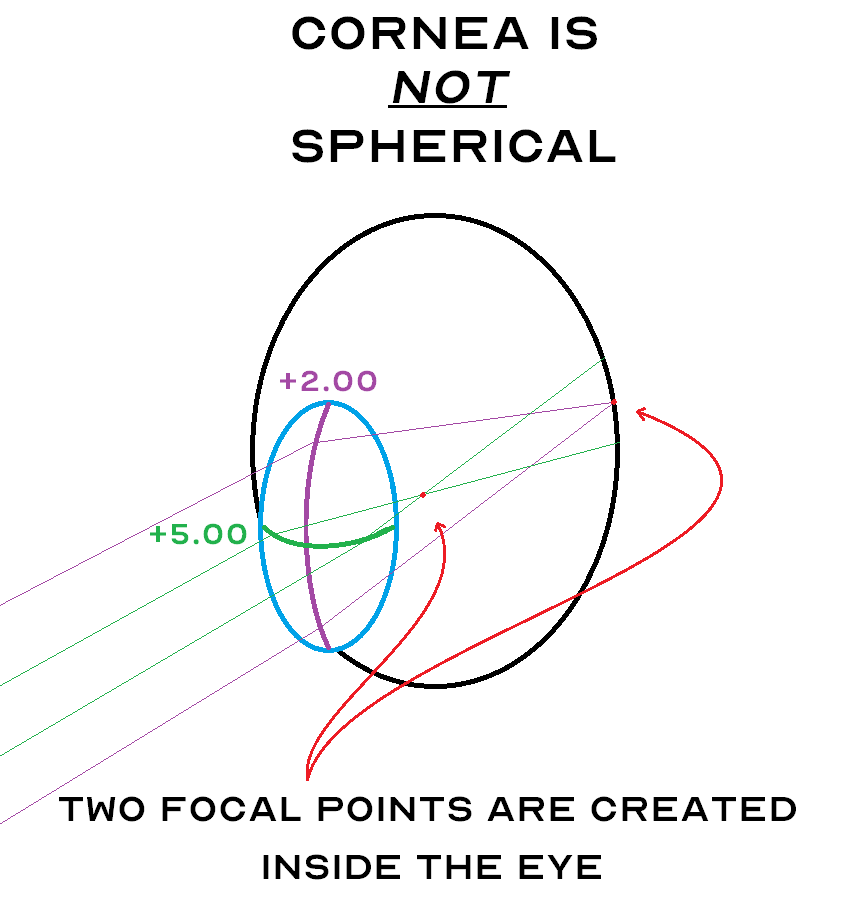
Notice that this lens has two different curvatures instead of just one. The vertical curvature (purple) corresponds to a +2.00D lens power and the horizontal curvature (green) corresponds to a +5.00D lens power.

When light passes through this spherocylindrical lens, each curve will receive exactly half of the light rays.

  • The rays that pass through the +2.00D curve get focused at 50cm from the lens
  • The rays that pass through the +5.00D curve get focused at 20cm from the lens

The Cornea As A Lens

Remember that the cornea acts as a lens for the eye – and yes – it can either be spherical or spherocylindrical lens!

  • If the cornea is spherical – the eye has no astigmatism
  • If the cornea is spherocylindrical – the eye has astigmatism

First, let’s look at a spherical cornea. Remember, this means there is no astigmatism.

spherical cornea

The cornea is the blue circle. It appears oval because again, we are looking at a 45° angle. If we looked at it straight on it would be a perfect circle.

This cornea has the same curvature in both directions. This makes it a spherical cornea. That’s why it only produces one focal point inside the eye.

Now let’s look at a shperocylindrical cornea.

spherocylindrical cornea

Because this cornea has two different curvatures, it creates two separate focal points inside the eye. That is astigmatism.

What Does Astigmatism Mean For You?

If you have astigmatism, it means that the glasses or contact lenses that you wear will have to correct (with spherocylindrical lenses) for both curvatures of the cornea so that there is only one focal point inside your eye. Remember from Lesson 5 that for an eye to see clearly, there must only be only one focal point and it has to form on the retina. If there are two focal points inside the eye, the eye will not see clearly.

Glasses for astigmatism are no different than glasses that are not for astigmatism. On the other hand, contact lenses for astigmatism are specialized contact lenses that are more expensive and may be more difficult to wear successfully.

Summary

Astigmatism is not an easy concept to grasp. This is a lesson I highly recommend reading a few times as it is quite complex. If you still have questions I would be happy to answer them for you, just let me know in the comments below!

If you’re comfortable with this lesson, congratulations! You now possess knowledge that very few people possess, so use it wisely! You’ll certainly find that it will come in handy if you work in an eye doctor’s office or an optical store.

In the next lesson we’re going to learn about a new part of the eye and how it affects vision. It’s called the crystalline lens. See you there!

==>THE OPTICS OF VISION – LESSON 9: THE CRYSTALLINE LENS <==

Lens Power - Featured Image

The Optics of Vision – Lesson 3: Lens Power

Now that we understand light and lenses, we will be learning about how to quantify the effect that lenses have on light. This is the concept of lens power and it will put us well on our way to understand vision and glasses work.

To understand the concepts covered in this lesson, it is best to have read:

Now let’s begin!

Lens Power

What is Lens Power?

The power of a lens is also often referred to as the strength of a lens. It refers to how much of an effect a lens has on light passing through it.

A lens with high power has a big effect on the path of light passing through it and a lens with low power has a small effect.

What Determines Lens Power?

The main determinant of lens power is the curvature of the lens.

The more curved a lens’ surface is, the more power it has and the more it will change the direction of light.

Insert Image

What Types of Lens Powers Are There?

Recall from Lesson 2 that lenses can either be converging (+) or diverging (-).

  1. Converging lenses have converging or plus power 
  2. Diverging lenses have diverging or minus power

Plus Power

The following diagram will illustrate the concept of plus power.

It shows 3 different converging lenses, each with a different curvature.

The most curved lens has the most power and changes the direction of light the most.

The least curved (flattest) lens has the least power and changes the direction of light the least.

Convex lenses Different powers - Curves

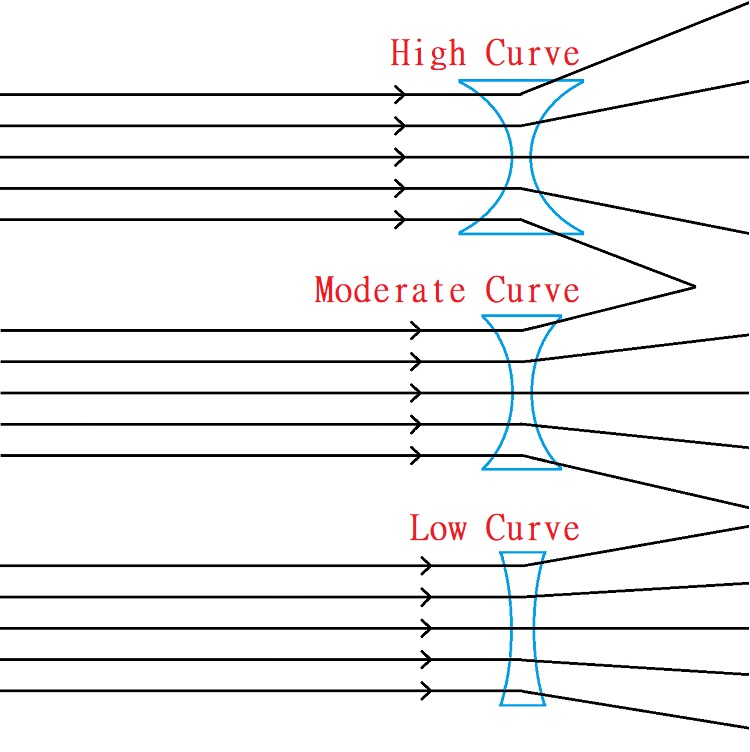
Minus Power

The next diagram will illustrate the concept of minus power.

It shows 3 different diverging lenses, each with a different curvature.

Again, the most curved lens has the most power and changes the direction of light the most.

The least curved (flattest) lens has the least power and changes the direction of light the least.

Concave Lenses Different Curves

Can you see that in both diagrams, the most curved lens ‘bends’ the light rays the most and the least curved lens ‘bends’ them the least? That is the result of each lens having a different power/strength, which is based on the curvature of the lens.

Now, in the real world, we need a way of describing the exact curvatures of lenses. We can’t just say ‘high curve’, ‘moderate curve’, or ‘low curve’ to describe lenses. That is not accurate enough.

Next, we will learn exactly how lens power is measured and quantified.

How is Lens Power Measured?

It has to do with something called the focal distance of the lens. Let’s learn more about focal distance before we delve into lens power.

Focal Distance of a Plus Lens

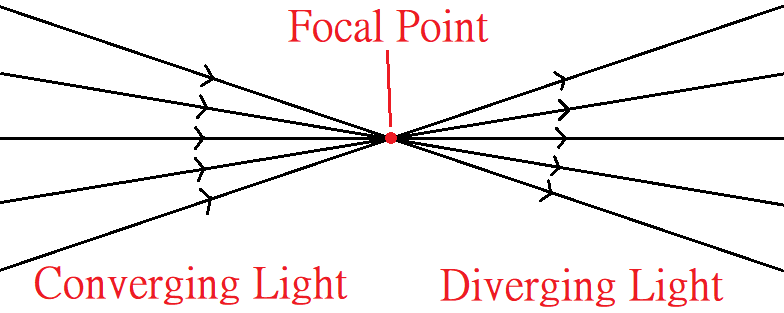
Recall from Lesson 1 that converging light eventually forms something called a focal point.

ray diagram of converging light, focal point, and diverging light
Figure from Lesson 1

We’ve also learned from Lesson 2 that plus lenses cause incoming parallel light to become converging.

Ray diagram of parallel light passing through a convex lens
Figure from Lesson 2

So if plus lenses cause light to converge and converging light forms a focal point, then every plus lens will create a focal point.

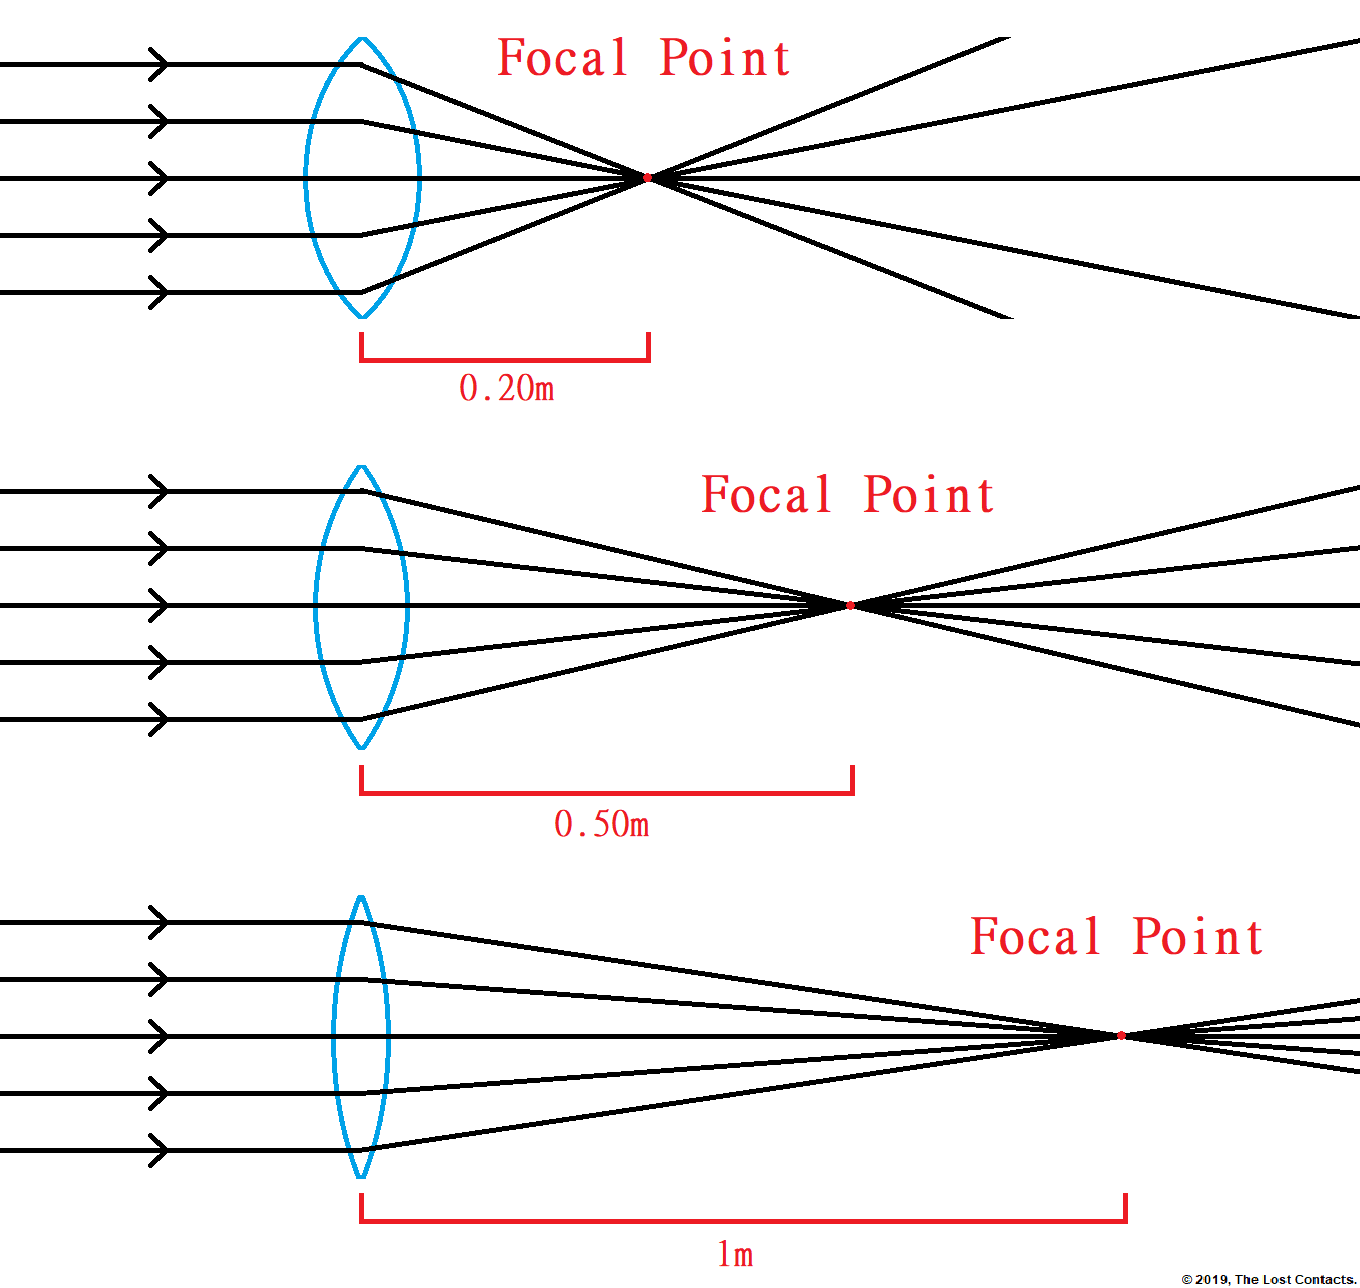
Let’s re-examine the following diagram. This time, note how the focal point for each lens is formed at different distances from the lenses themselves.

Convex lenses Different powers - Focal Point

The distance from the lens to the focal point is called the focal distance.

Focal Distance of a Minus Lens

Just like plus lenses, minus lenses also form focal points. There’s just a small difference.

Remember that minus lenses cause light to diverge, meaning that once the light passes through a minus lens, the light rays move further and further apart from each other.

Now at this point, you may be wondering… If a focal point happens when all the light rays come together, then how can diverging light ever come to a focal point? That’s a great question!

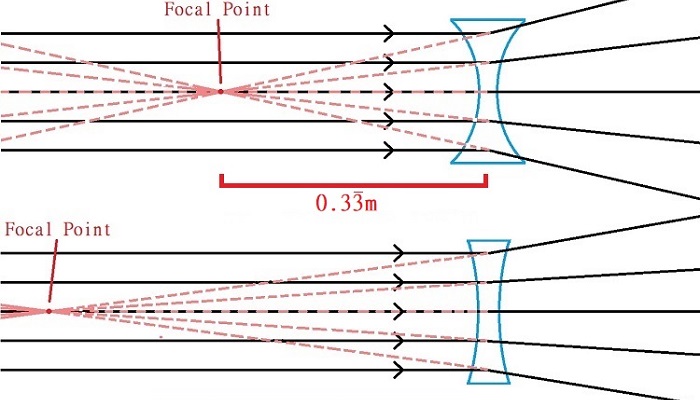
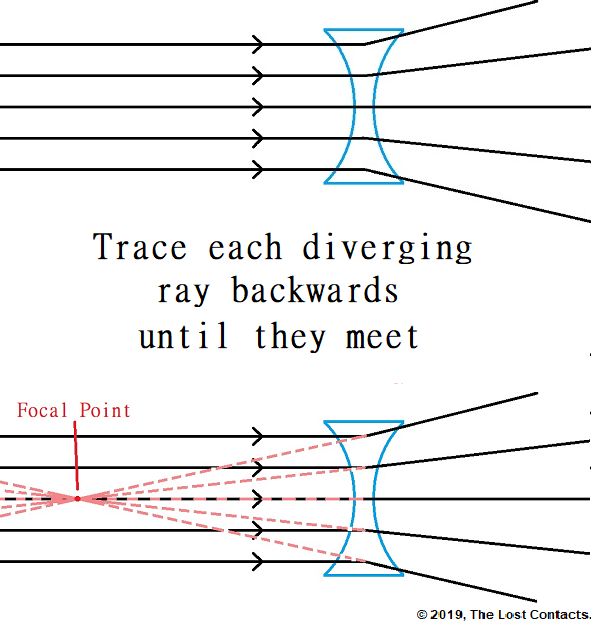
In fact, the focal point doesn’t happen after the light passes through the lens, it happens before.

To find where the focal point is on a minus lens, you have to extend each of the light rays exiting the lens backward until they all meet.

The Focal Point of a Concave Lens

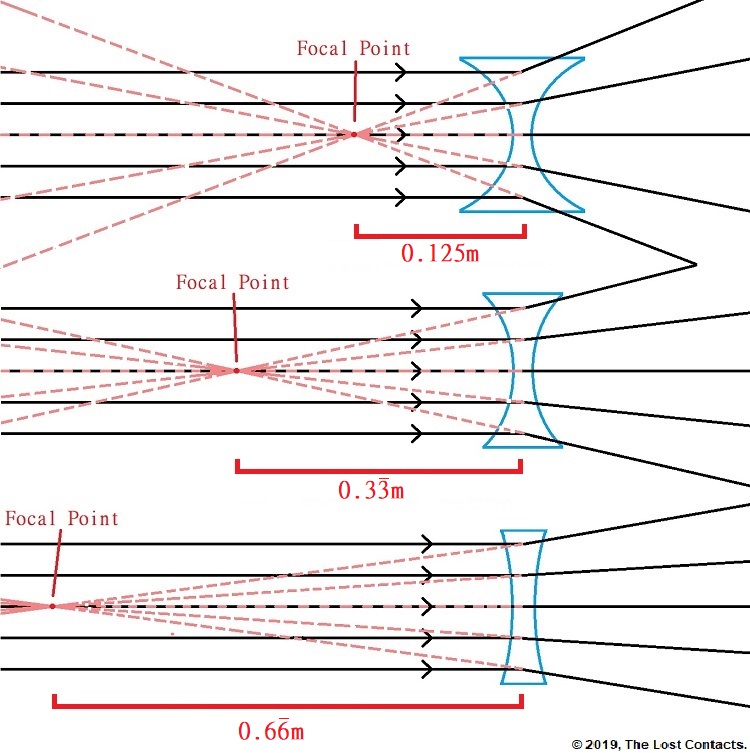
We can do this with any minus lens. Let’s see what it looks like with our 3 minus lenses from earlier. Also note here that distance between the focal point and the lens increases as the lens gets flatter, just as it did with plus lenses.

Concave Lenses Different Powers With Focal Point and Distance

Again, just as with plus lenses, the distance between the focal point and the lens is called the focal distance.

Calculating Lens Power From Focal Distance

The power of any lens is based on its focal distance. To be more precise, the power of a plus lens is the inverse of its focal distance.

The power of a lens is the inverse of its focal distance.

What does this mean? Don’t worry, it’s not difficult!

In mathematical terms, the inverse of ‘something’ means dividing 1 by that ‘something’.

In this case, I said that the power of a plus lens is the inverse of its focal distance. The inverse of the focal distance means 1 divided by the focal distance. Therefore, lens power = 1 / focal distance.

Lens Power = 1 / Focal Distance

See, simple right?

Now there’s just one last thing to remember. When calculating lens power, we must use meters when measuring the focal distance. This produces a unit called Diopters, and that’s what lens power is measured in!

This will make a lot of sense when we start looking at examples.

We’re going to use the same diagrams as before but now we will assign some values to the focal distance so we can calculate the lens power.

Calculating Plus Lens Power

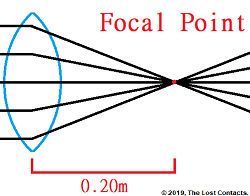
Convex lenses Different powers - Focal Distances

Let’s calculate the lens power of each lens in the diagram.


Top Lens

Example of a plus 5D lens small

The focal length is 0.20m.

The equation we’re using is:

Lens Power = 1 / Focal Length

The Calculation is:

Lens Power = 1 / 0.20m = +5D


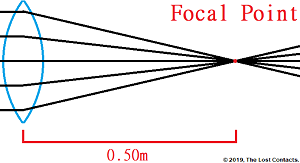
Middle Lens

Example of a plus 2D lens smallThe focal length is 0.50m.

The equation we’re using is:

Lens Power = 1 / Focal Length

The Calculation is:

Lens Power = 1 / 0.50m = +2D


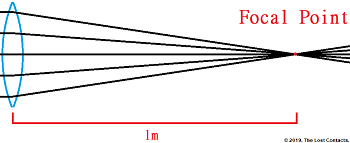
Bottom Lens

Example of a plus 1D lens smallThe focal length is 1m.

The equation we’re using is:

Lens Power = 1 / Focal Length

The Calculation is:

Lens Power = 1 / 1m = +1D


That was easy right?

Let me just point out 2 things before we move onto minus lenses.

  1. No conversions were necessary because all values were already in meters. If I had given the values 20cm, 50cm and 100cm, we would have had to convert them to meters before we did the calculations.
  2. Because we were calculating the power of a plus lens, by convention we must include a plus sign in front of the lens power.

Calculating Minus Lens Power

Calculating the power of minus lenses may seem more complicated, but it’s the exact same steps.


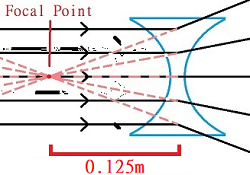
Top Lens

Minus 8 diopter concave lens

The focal length is 0.125m.

The equation we’re using is:

Lens Power = 1 / Focal Length

The Calculation is:

Lens Power = 1 / 0.125m = -8D


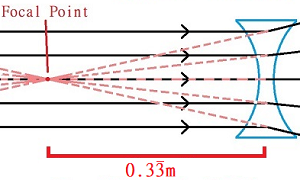
Middle Lens

Minus 3 diopter concave lens

The focal length is 0.333m.

The equation we’re using is:

Lens Power = 1 / Focal Length

The Calculation is:

Lens Power = 1 / 0.333m = -3D


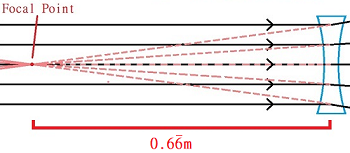
Bottom Lens

Minus 1 and half diopter concave lens

The focal length is 0.666m.

The equation we’re using is:

Lens Power = 1 / Focal Length

The Calculation is:

Lens Power = 1 / 0.666m = -1.5D


Again, keep in mind these 2 things when calculating lens power.

  1. No conversions were necessary for the examples above because all values were already in meters. If I had given the values 12.5cm, 33.3cm and 66.6cm, we would have had to convert them to meters before we did the calculations.
  2. Because we were calculating the power of minus lenses, by convention we must include a minus sign in front of the lens power.

Key Points to Remember:

  • Every lens (plus or minus) has a focal point
  • The distance between the focal point and the lens is called the focal distance
  • The formula for lens power is the same for plus or minus lenses:

Lens Power = 1 / Focal Distance

  • The power of plus lenses are always denoted with a + (plus sign)
  • The power of minus lenses are always denoted with a – (plus sign)

This lesson may take a few reads to really set in. If you still have questions about the material, feel free to leave them in the comments section and I will post some additional clarifications for you.

Great job making it this far into the course! This may be a good time to review Lessons 1,2 & 3 because in Lesson 4 we will switch gears and start learning about eye anatomy!

==> The Optics of Vision – Lesson 4: Introduction to Eye Anatomy <==

Introduction To Lenses - Featured Image

The Optics of Vision – Lesson 2: Introduction to Lenses

In this lesson, we will be learning about what lenses are and how they affect the path of light rays. Understanding lenses will be crucial in understanding how the eyes produce vision as well as how glasses work.

To understand the concepts covered in this lesson, it is best to have read:

==> The Optics of Vision – Lesson 1: Understanding Light <==

Now let’s begin!

What is a lens?

Let’s start with a dictionary definition:

A piece of glass or other transparent substance with curved sides for concentrating or dispersing light rays.

The above definition touches upon the 2 critical properties of lenses:

  1. They must be transparent
  2. They must be curved

If either one of these criteria are not met, you do not have a lens.

For example:

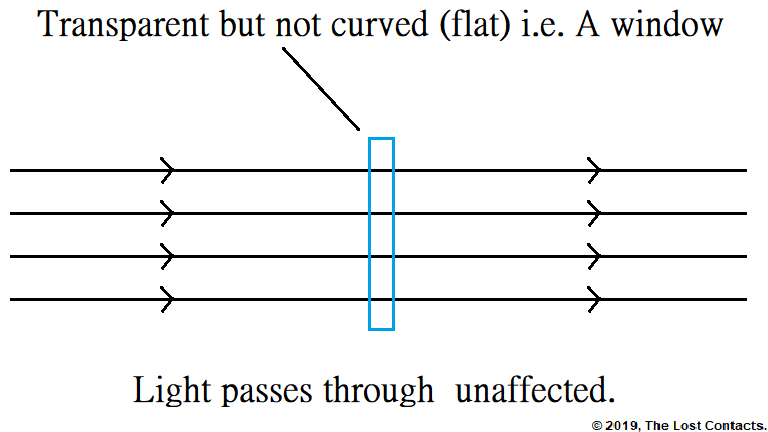
Would a window be considered a lens?

A window is not a type lensNo. Although windows meets the first criterion of being transparent, they are flat (meaning they have no curvature) therefore they are not lenses.
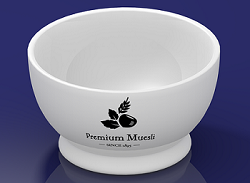
Would a cereal bowl be considered a lens?

A bowl is not a type of lens  No. Although cereal bowls are curved, they are not transparent (light does not pass through them) therefore they are not lenses.
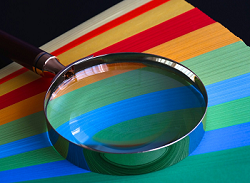
Would a magnifying glass be a considered a lens?

A magnifying glass is a convex lensYes! A magnifying glasses is transparent and its surfaces are curved therefore it acts as a lens.
Of course, a magnifying glass is just one example of one type of lenses. Lenses come in all different shapes and sizes and they are used in countless different applications.

Lenses in Ray Diagrams

In Lesson 1 we learned what light rays and ray diagrams are. Now let’s add a lens into a ray diagram and see how it affects light rays.

First, let’s reiterate the 2 key properties of lenses and see what happens if either of them is missing.

Here is a ray diagram showing passing through a flat ‘lens’.

Ray diagram of a flat lens

Here is a ray diagram showing what happens to light attempting to pass through an opaque ‘lens’.

Ray diagram of an opaque lens

Now if we have a proper lens, one that is transparent and curved, and we pass some light rays through it, the lens will affect the path of the light rays.

Ray diagram of parallel light passing through a convex lens

As you can see from the example, the lens causes the light rays to change directions.

Of course, not all lenses have the same effect of light. There are sorts of different lenses that affect light in many different ways. For the rest of this lesson, we will focus mainly on the types of lenses used in glasses.

They are:

Convex

Concave

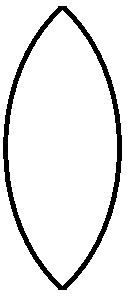
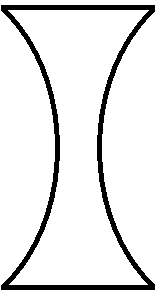
A Convex Lens A Concave Lens

An easy way to remember which is which:


Mnemonic ow to remember convex and concave lenses

Now let’s explore how each type of lens affects incoming light rays.

Until more advanced lessons, for simplicity, we will always consider incoming light that is parallel.

Convex Lenses

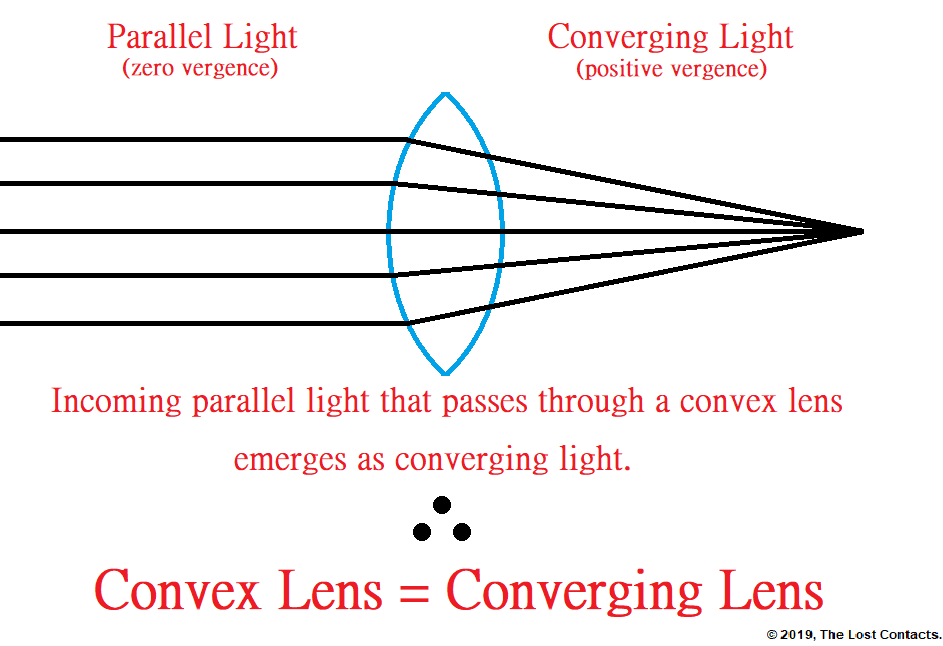
Convex lenses add vergence to light that passes through them.

If you’re not familiar with what light vergence is, please review Lesson 1.

Recall that parallel light has zero vergence. So if you take the light with zero vergence and you add vergence to it, the result is light with positive vergence.

Also, recall that light with positive vergence is called converging light.

Therefore, the result of passing parallel light through a convex lens is converging light.

Ray Diagram of a Convex Lens

Yes, another name for a convex lens is a converging lens. They mean the exact same thing. But if that wasn’t enough, there’s also another name for them!

Because convex/converging lenses increase the vergence of light, they are also called + (plus) lenses.

Convex

Describes the shape of the lens

Converging

Describes the lens’ effect on light

+

Simple notation

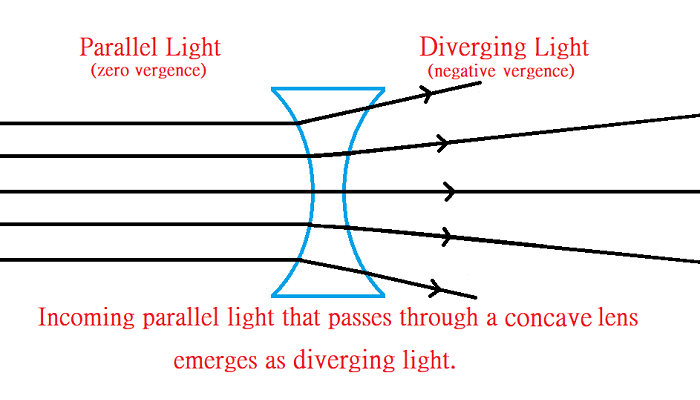
Concave Lenses

Convex lenses decrease the vergence of light that passes through them.

Again, recall that parallel light has zero vergence. So if you take the light with zero vergence and you decrease its vergence, the result is light with negative vergence.

Also, recall that light with negative vergence is called diverging light.

Therefore, the result of passing parallel light through a concave lens is diverging light.

Ray Diagram of a Concave Lens

Now you know that concave lenses are also known as diverging lenses because they cause parallel light to diverge. Another way looking at it is that concave lenses decrease the vergence of light. Because of this, they are also known as – (minus) lenses.

Concave

Describes the shape of the lens

Diverging

Describes the lens’ effect on light

–

Simple notation

Summary

Lenses must be made of transparent materials and must have a curved surface. Being transparent allows light to pass through them, and the curved surfaces cause the light passing through to change direction.

Glasses primarily use two different types of lenses. They are convex and concave.

Convex lenses cause parallel light passing through them to become convergent and concave lenses cause parallel light passing through them to become divergent.

Though the terms convex/concave and converging/diverging are useful in understanding the lenses, in the day-to-day operations of an optical shop, eye doctor clinic, lens manufacturing lab, etc., they are referred to simply with a + (convex/converging) or – (concave/diverging) sign.

Now that we are familiar with the two main types of lenses, we will begin to explore the concept of lens power.

==> The Optics of Vision – Lesson 3: Lens Power <==