Pupillary Distance and Heights Featured

Introduction To Dispensing – Pupillary Distance & Heights

Measuring the correct pupillary distance and pupil heights for your customers is quintessential to proper optical dispensing. Get it right and your customers will love their new glasses, get it wrong and they will promptly be back to return their glasses.

In this lesson, you will learn why are these measurements so important, as well as how they are used during the lens edging & mounting process.

Why Are Pupillary Distance and Pupil Height Measurements So Important?

To gain a deeper understanding let’s first review a few important points from previous lessons:

Here’s an example:

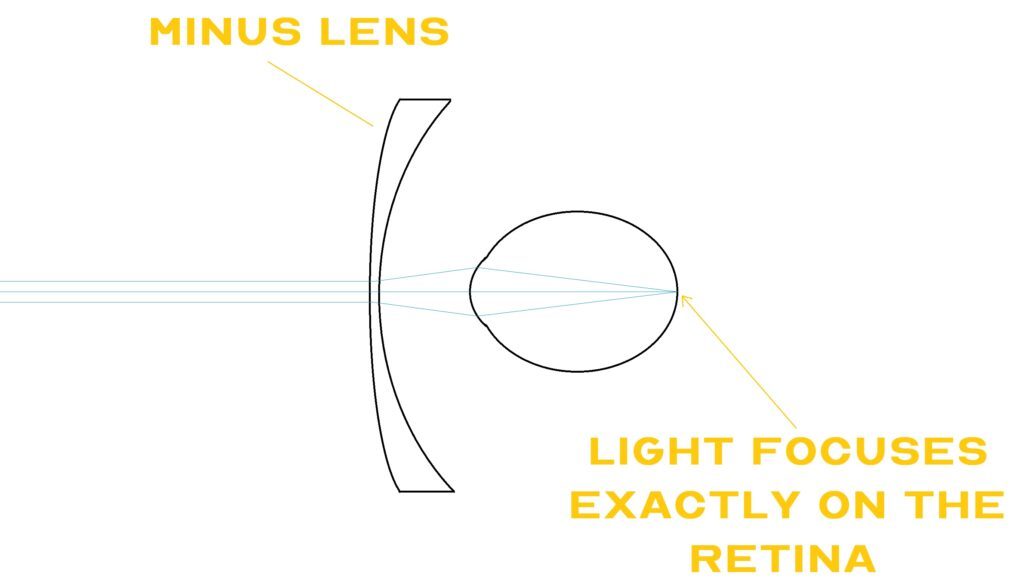
Light is focused on the retina - minus lens

In this example, we have a myopic eye. A minus lens diverges light slightly, then the cornea (a plus lens) converges the light to a focal point that is on the retina.

Side note: Compared to ray diagrams in The Optics of Vision course, you might think that I’ve drawn an absurdly large lens in this diagram. In actuality, this is much closer to the real-life proportions of the lenses we work with.
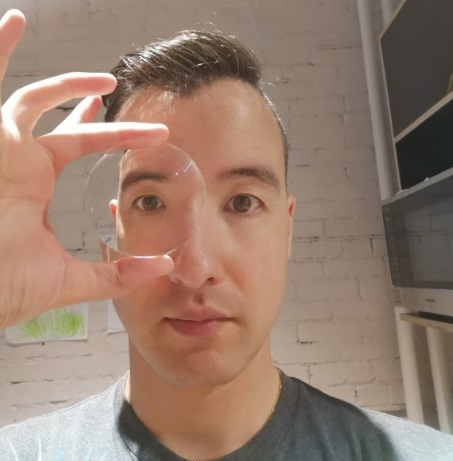
Picture showing the size of a lens blank compared to the eye

Now let’s focus in on the area of interest from the diagram above; the focal point forming on the retina.
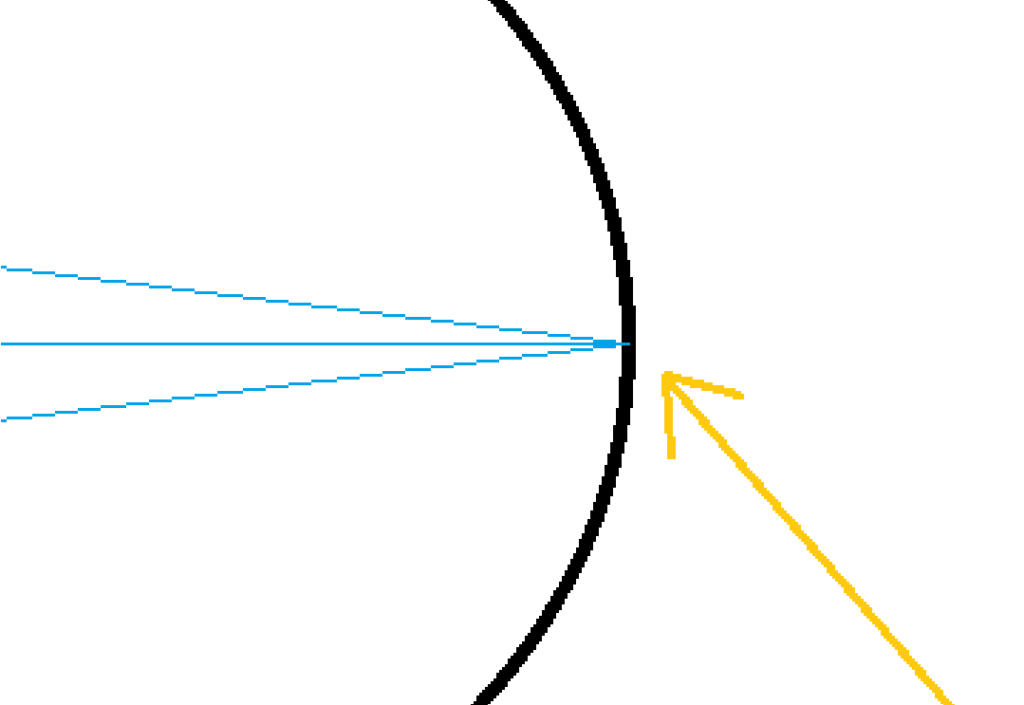
Close up of light focusing on retina
Light comes to a focus precisely on the retina.

In reality, we don’t just want the focal point to be on the retina, we want it to be exactly on the macula.

What is the Macula?

The macula is a small red area on the retina that is able to produce very sharp vision. Click here for more information.

What is the Difference Between the Retina and the Macula?

The retina is the entire layer that lines the inside back portion of the eyes. Most of the retina cannot produce sharp vision.

The macula makes up a very small portion of the retina, but it is the only portion able to produce sharp vision.
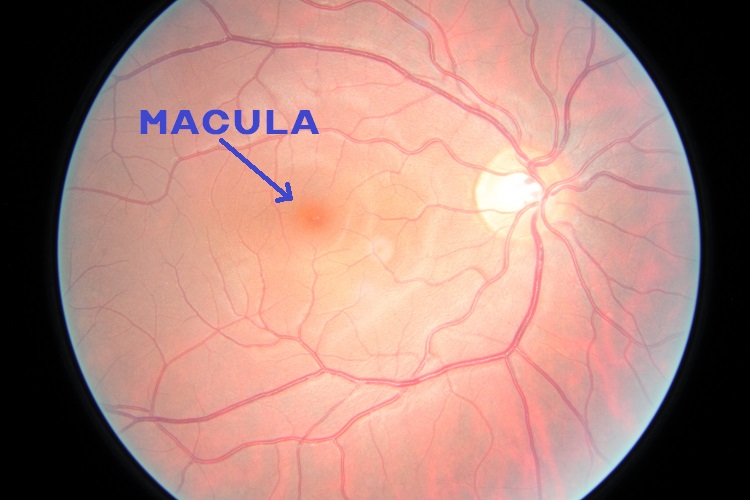
Picture of the Macula

This image shows the macula. It appears as a small red spot inside the eyes. It is on that tiny little red spot that light must come to a focus for us to see clearly. The rest of the retina senses light, but does not produce sharp vision.

Important Take-Home:

The macula produces sharp vision, the rest of the retina does not.

Therefore:

Light must focus on the macula for vision to be clear. 

Here is how I will represent the macula in a cross-section diagram.
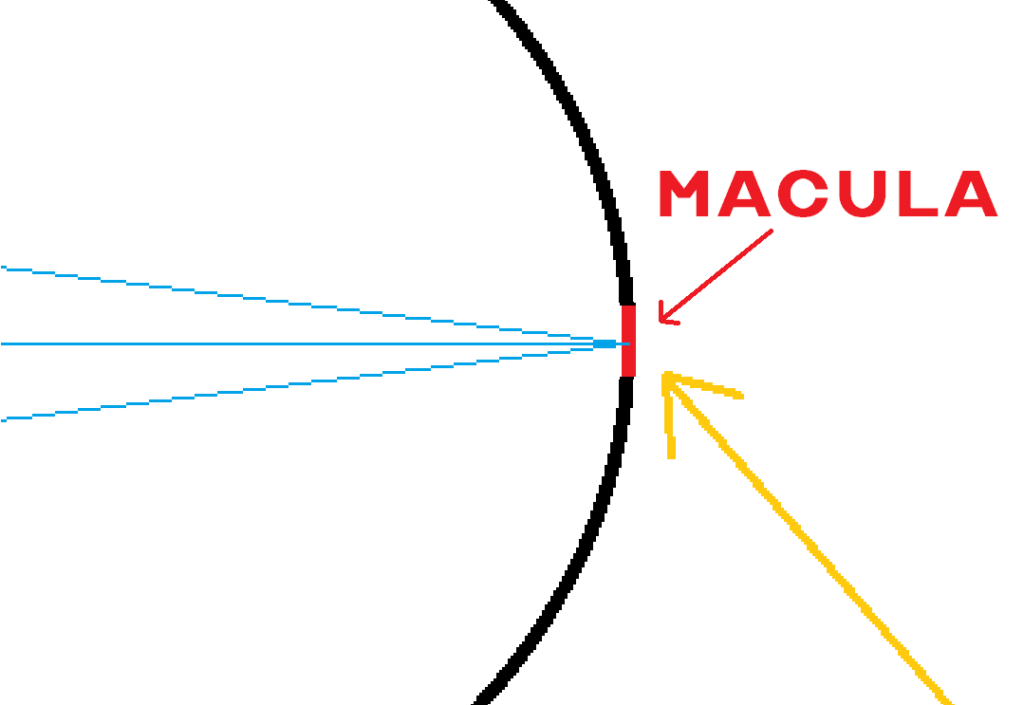
Close up of light focusing on the macula

How Do We Get The Focal Point Onto The Macula?

In order to properly position the focal point on the macula, we have to know:

  1. Where a lens’ focal point will be.
  2. Where the macula is.

Where Is The Focal Point?

A lens’s focal point is always in line with its optical center.

Here is a diagram that illustrates a plus lens creating a focal point. Notice that lens’s optical center and its focal point both lie on the same straight line (green).
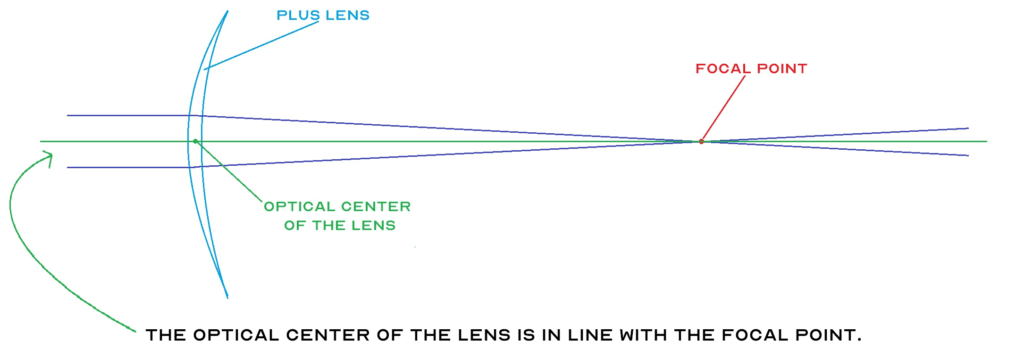
Diagram illustrating the focal point is in line with the optical center of the lens

Where Is The Macula?

The macula is always in line with the center of the pupil.

Here is a cross section of an eye. Notice that the center of the pupil and the macula both lie on the same straight line (green).
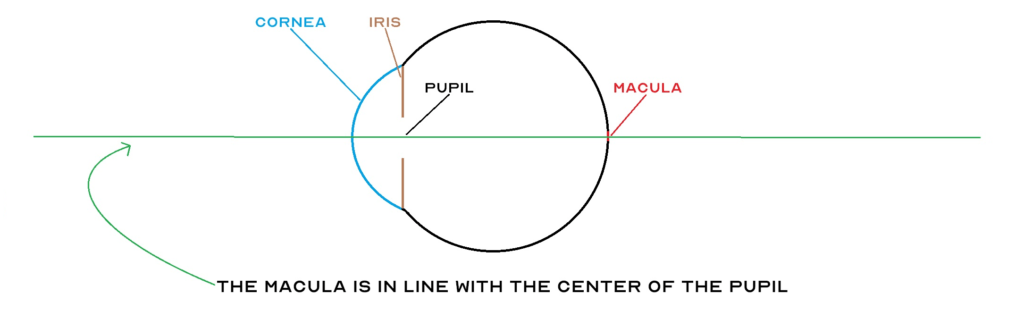
Diagram illustrating that macula is in line with the center of the pupil

Combine It All Together

We now know that that focal point is in line with the lens’ optical center, and the macula is in line with the center of the pupil. Combining these two pieces of information tells us that aligning the lens’ optical center with the center of the pupil will place the focal point on the macula.

This is a diagram showing the optical center of the lens being lined up with the center of the pupil. As a result, the focal point falls exactly on the macula.
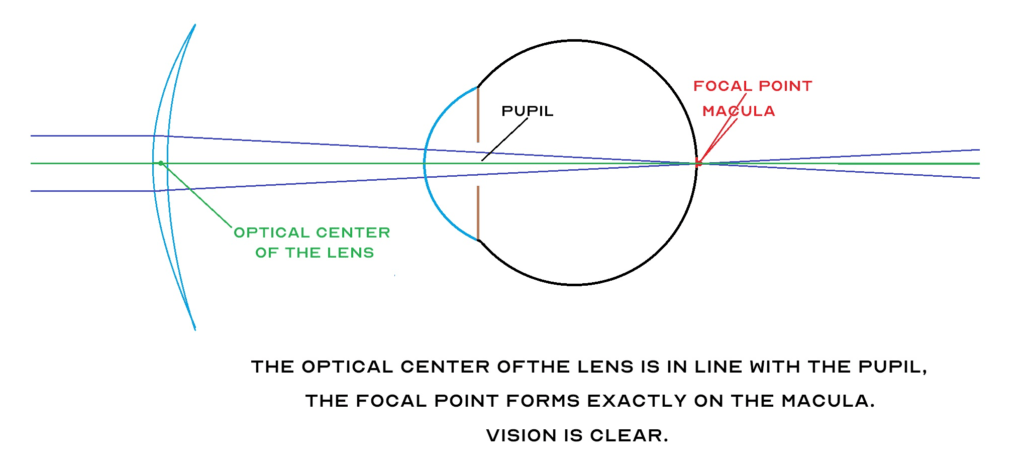
Diagram illustrating the focal point on the macula

This is a diagram showing what happens with the optical center of the lens is not lined up with the center of the pupil. As a result, the focal point does not form on the macula.
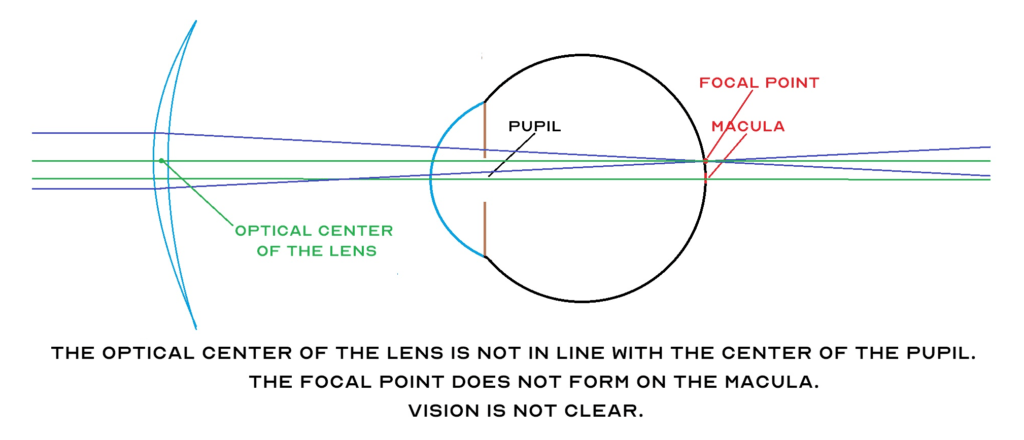
Diagram illustrating the focal point not on the macula

Main Take-Aways

For vision to be clear, the lens must focus light exactly on the macula.

For a lens to focus light exactly on the macula, the optical center of the lens must be aligned with the center of the pupil.

Note to all the seasoned dispensers reading this If you’re screaming ‘INDUCED PRISMATIC EFFECT‘ at the screen right now; cool it. This is a beginners course.

Now, let’s shift gears and talk about glasses.

How To Align the Optical Center of a Lens With The Center of the Pupil

Glasses frames do one thing; they hold the lenses in front of the eyes. But before the lenses are placed in the frames, they are just large discs called semi-finished lenses.

Semi-finished lenses have prescription in them, and coatings on them, but they are not yet cut to the shape of the glasses frame they will eventually be mounted into.
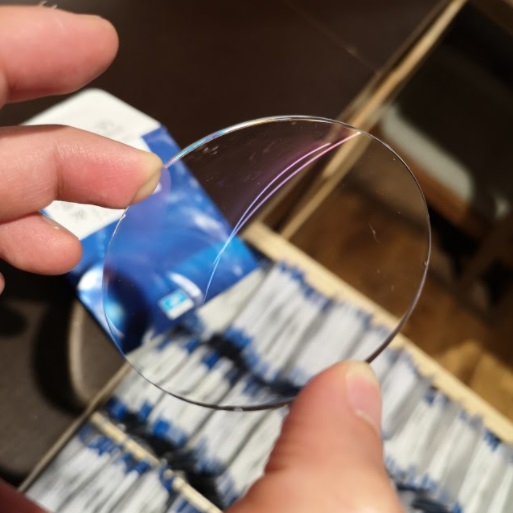
example of a semi-finished lens drawer full of semi-finished lenses
A semi-finished lens. A drawer full of semi-finished lenses in different prescriptions.

Semi-finished lenses typically have a diameter of 70mm. This is intentionally bigger than most glasses frames so that they can be cut down to fit any size/shape of frame.
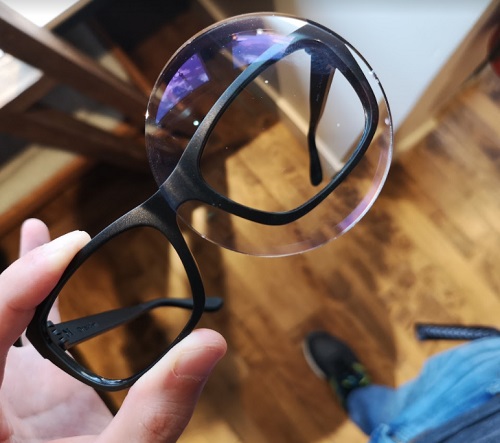
Semi finished lens compared to glasses frames
The size of a semi-finished lens compared to glasses frames.

So if we’re starting with a lens that is way bigger than the glasses frame, here’s the problem: Which part of the lens are we going to put into the frame?

Just imagine that the semi-finished lens blank is a sheet of rolled out cookie dough and the shape of frame is the cookie cutter. We have to cut out a piece of the lens and put it in the frame. But which part of the semi-finished lens (cookie dough) are you going to cut out and use for the glasses?
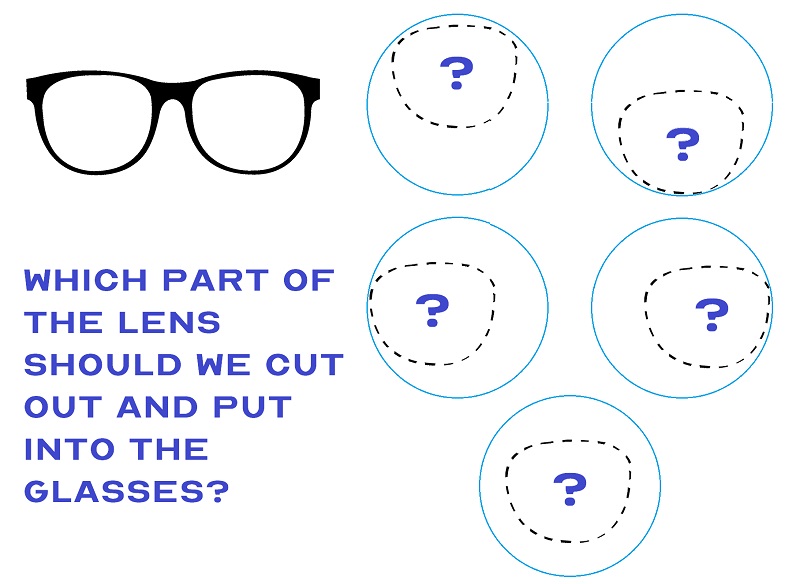
Which Part of The Semi-Finsihed Lens Should Be Cut

Let’s remember what the goal is.

The goal is to align the optical center of the lens with the center of the pupil.

This means we’re going to need to know 2 things:

  1. Where the optical center of the lens is
  2. Where the center of the pupil is when the glasses are worn

Where is the Optical Center of a Semi-Finished Lens?

For now, you can assume that the optical center is in the exact middle of the semi-finished lens. This is not always the case, but for the purpose of this lesson we can assume that it is.
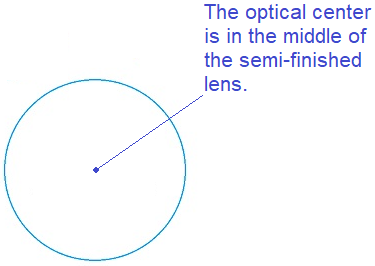
optical center of semi finished lens blank

Where is the center of the pupil when the glasses are worn?

Where the center of the pupil falls when glasses are worn will be different for every person and for every frame. Here is an example of me wearing a pair glasses:
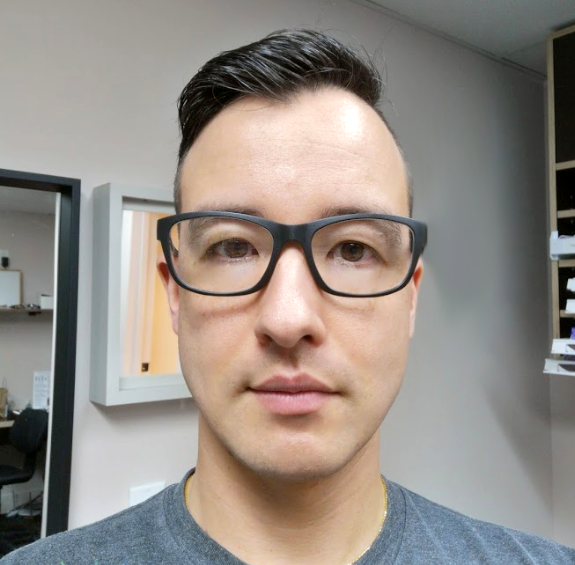
a man wearing black glasses

Look at where the center of my pupils are on both the left and right sides. That is where the optical center of the lenses should be placed.

In order to place the optical center of the lenses exactly where my pupils are, we need two measurements:

  1. The pupillary distance
  2. The pupil height

The Pupillary Distance

The pupillary distance (PD) is the distance between the center of the two pupils, measured in millimeters (mm). It is a very useful measurement to take because for any given (adult) person, the PD never changes. This means that you only have to measure a person’s PD once, and it can used with any frame.

The image below shows that my pupillary distance is 60mm.
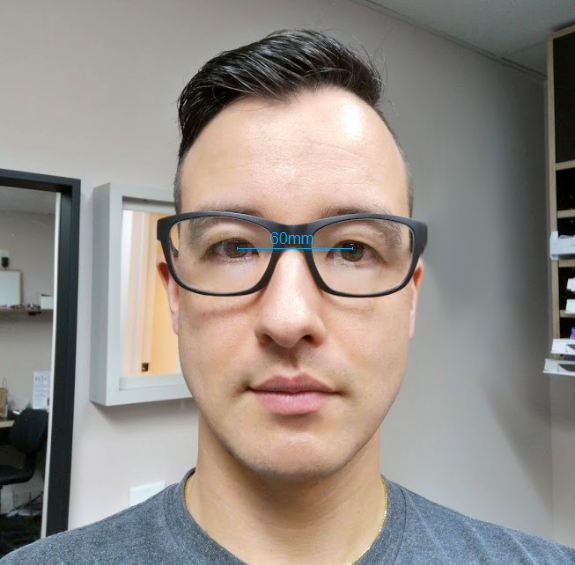
pupillar distance


Pupils Heights

The pupils height, often just called the height, is the distance from the center of the pupil to the frame’s bottom rim, measured in millimeters (mm). This measurement is frame specific, meaning that for any given person, wearing a different frame will result in a different height measurements.

The image below shows that my pupil height with this frame is 23mm.
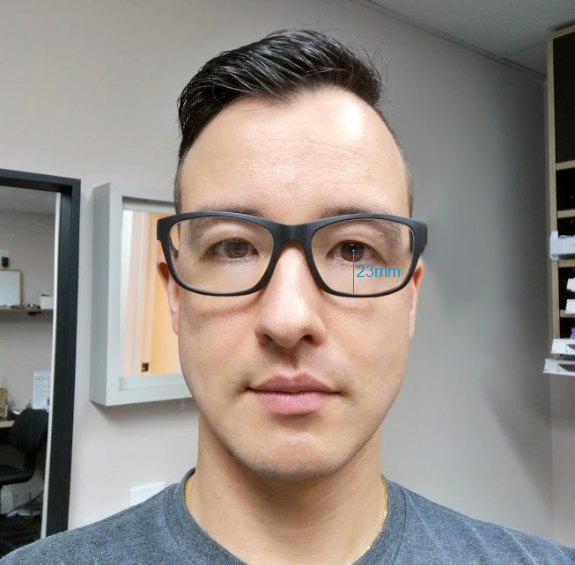
pupil height

Why are Heights Frame Specific but the Pupillary Distance is Not?

You do not have to understand this, but if that’s what you’re wondering: I like where you’re head’s at. You should consider becoming an optician.

Once the pupillary distance and pupil heights have been measured, you have essentially established a set of coordinates. These coordinates will tell the edging lab exactly where and how to cut the semi-finished lenses in order for the optical center of the lenses to be perfectly aligned with the center of the pupils when the glasses are worn.

Measuring Pupillary Distance and Pupil Heights

There are many ways to measure both the pupillary distance and pupil heights. In order to properly explore all the relevant techniques, I will dedicate a separate lesson for this.

Let’s Do A Run Through

The customer has chosen a frame and wants to get his prescription put into them. We have a semi-finished lens blank with the customer’s prescription in it. What do we need to do in order to properly position the lens within the frame?

Remember: The goal is to position the lens’ optical center directly over top of the center of the customer’s pupil.
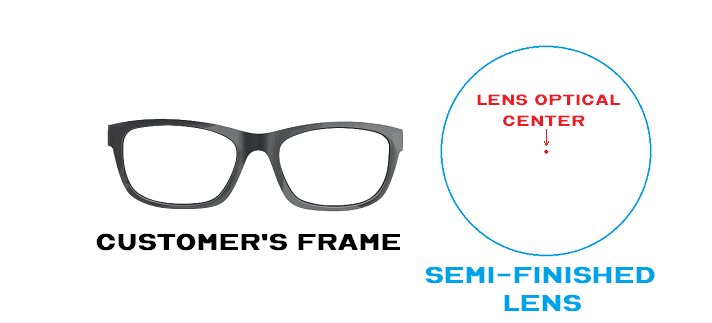
Customers Frame and Semi Finished Lens Blank


Step 1: Measure the customer’s PD (glasses off). This gives us the horizontal position for the lens.

Step 2: Measure the customer’s pupil height (glasses on). This gives us the vertical position for the lens.

We now have all the information to determine exactly where the center of pupils will be when the customer wears the glasses.
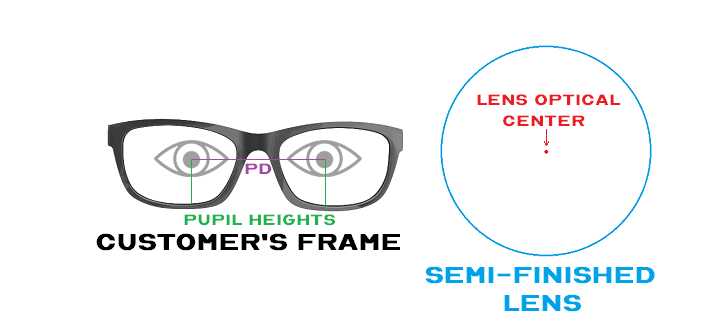
Customers Frame and Semi Finished Lens Blank With Eyes

This tells the edging lab exactly what part of the semi-finished lens to cut out and put into the frame to give the customer the best vision possible.
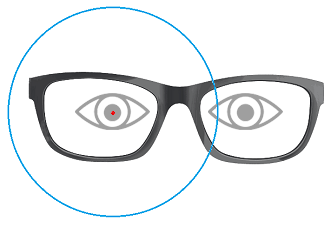
Semi Finished Lens Centered On Pupil

Summary

Making glasses is not as simple as just putting a lens into a frame. Many things have to be taken into careful consideration, including where the optical center of lens is in relation to the customer’s eyes.

Here is a summary of the key take-homes:

  • Every prescription lens has an optical center – the part of the lens that offers the best possible vision
  • The goal when making glasses is to align the lens’ optical center with the center of the customer’s pupil
  • To pinpoint where the center of the customer’s pupil will be when the glasses are worn, two measurements need to be taken – the pupillary distance and the pupil height

In the next lesson we will learn the techniques and instruments used to take these measurements.


The Glasses Order Form - Featured

Introduction To Dispensing – The Glasses Order Form

In this lesson you will learn about the process of creating an order for glasses, as well as all the information that must be gathered to properly fill out a glasses order form.

Where Are Glasses Made?

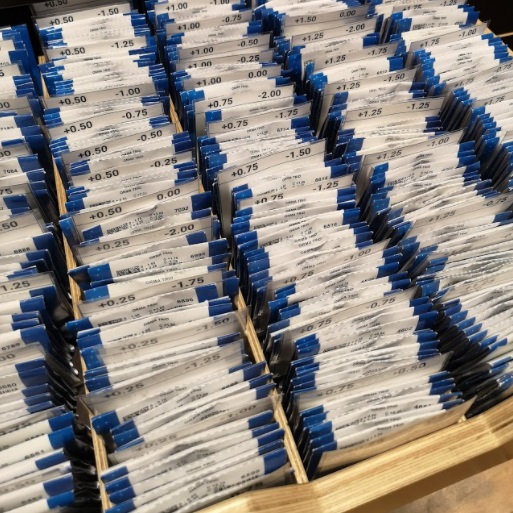
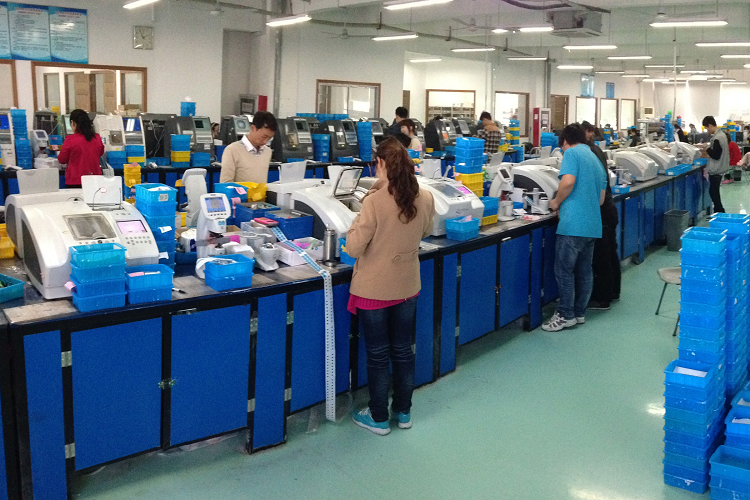
Most optical stores do not make glasses on the spot. Once they have all the information for an order, the job is sent to an edging lab via a courier. The lab workers will put the prescription lenses into the glasses frame, and then ship it back to your store as a complete pair of glasses ready to dispense to your customer.

An Edging Lab
An edging lab for the online glasses store Zenni Optical.

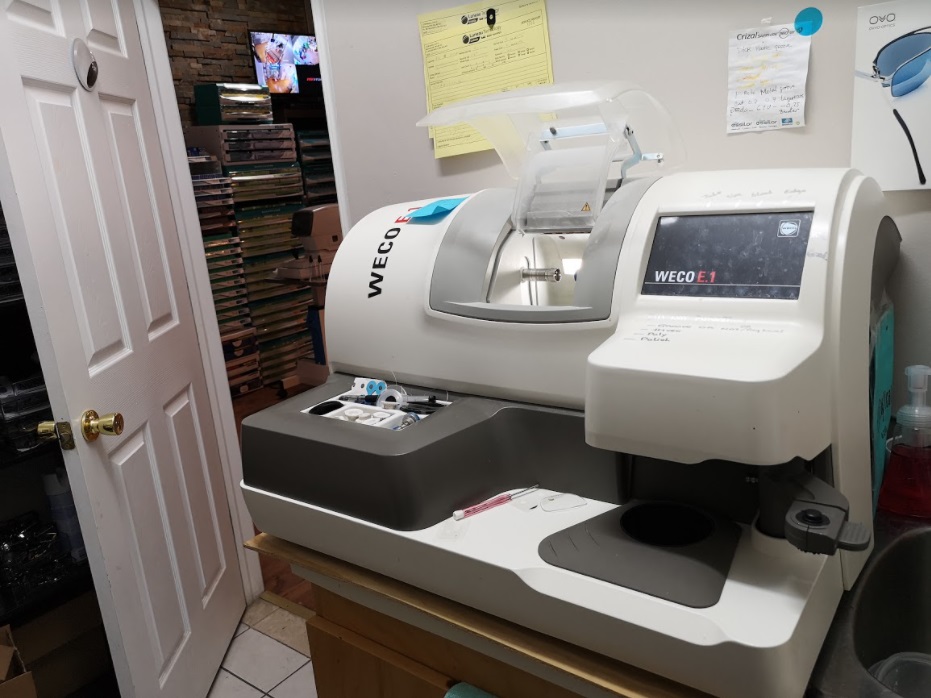
Some offices do have equipment that allows them to make the glasses on the spot.

an in-office edger
An in-office edger.

Regardless, it is your job to make sure that you collect and send all the necessary information needed by the edging lab (whether external or internal) to properly do their job.

What Information Is Required on an Order for Glasses?

Scenario:

A customer walks into your store with his/her glasses prescription and you successfully helped them select a frame that they love. What’s the next step? Are the glasses ready to be made yet?

Answer:

No. We still need to collect a lot more information.

Here is a quick checklist for what needs to be on an order form before it can be sent to the edging lab.

  • Prescription information
  • Frame information
  • Pupillary distance measurements
  • Pupil height measurements
  • Spectacle Lens Style
  • Lens index
  • Lens coating
  • Tints (if applicable)

Let’s go through each one to make sure we don’t miss anything.

The Glasses Order Form

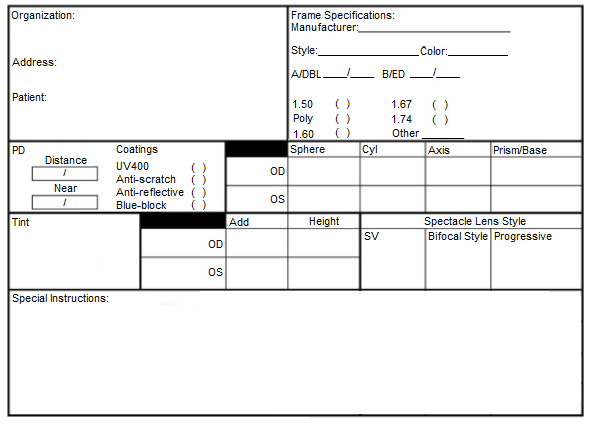
This is an example of a glasses order form. It is not universal. Your office will have a form that looks different, so make sure you familiarize yourself with what your workplace uses.

sample glasses order form

Don’t worry if it seems complicated now. We’ll fill this form out together as we go along and it’ll become very clear.

Prescription Information

Prescriptions for glasses are issued by optometrists.

If your customer doesn’t have valid glasses prescription, you will not be able to make glasses for them. If this is the case, you can book them in for an exam if your office has an optometrist, otherwise you will have to tell them to go see their optometrist and come back to you with a valid glasses prescription.

A valid prescription for glasses must have certain information on it.

A valid prescription for glasses must contain:

  • The doctor’s name, practice address and phone number
  • The patient’s name (who the prescription is for)
  • The date the prescription was issued
  • The doctor’s signature

If any of this information is missing, it is not a valid glasses prescription and cannot be used to make glasses.

When you do have a valid prescription, you want to carefully copy all the numbers on the prescription for right and left eye onto the order form. Make sure that you write down each number from the prescription into its corresponding box on the order form.

Pay particular attention to the + or – sign before some of the numbers.

This is where it’s helpful to know a little bit about prescriptions for glasses. Sometimes, the numbers can be written very sloppy by the optometrist, so you have to use your knowledge of prescriptions to decipher them.

For example, it’s useful to know that:

  • The last two digits of the Sphere and Cylinder numbers can only be 00, 25, 50 or 75
  • The Sphere and Cylinder numbers are always preceded with either a + or a – sign.
  • The letters ‘pl’ or ‘plano’ in the Sphere box means the Sphere is zero.
  • The letters ‘ds’ in the Cylinder box means the Cylinder is zero.
  • If there is no Cylinder, there cannot be an Axis.
  • The Axis number can only be a number between 1 and 180.
  • Often, the Axis is written with 3 digits, even if only 1 or 2 are necessary (i.e., 001, 006, 045, 088, etc.)
  • The Axis number does not have a sign in front of it.
  • If there is no Axis number, the Cylinder must be zero.
  • The Add number is always preceded with a + sign (never a minus).

If you have absolutely no idea what is written on the prescription, remember that the doctor’s name, address and phone number must be on the prescription somewhere. You can always call their office for clarification.

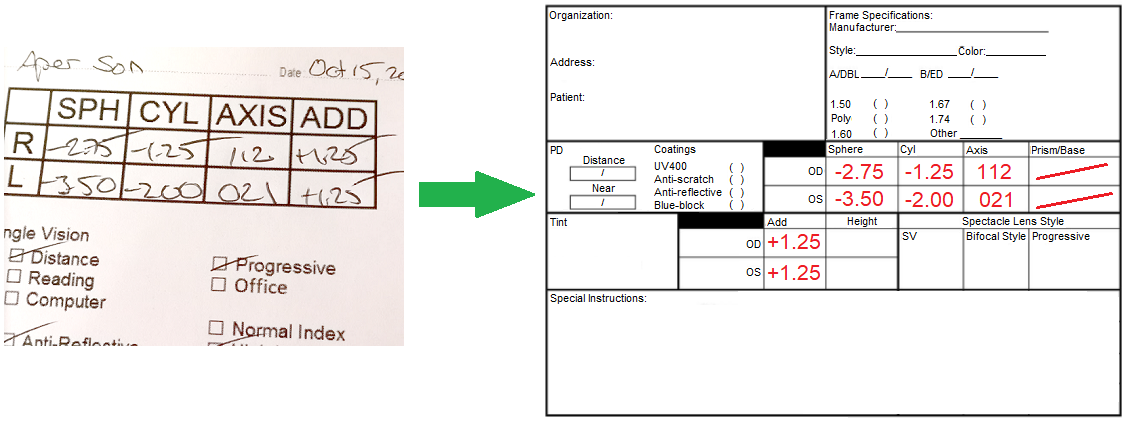
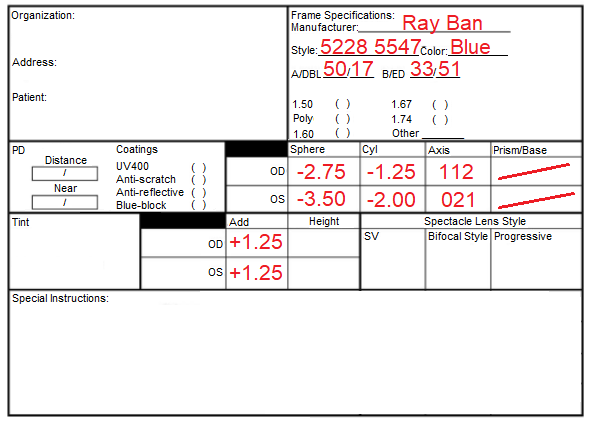
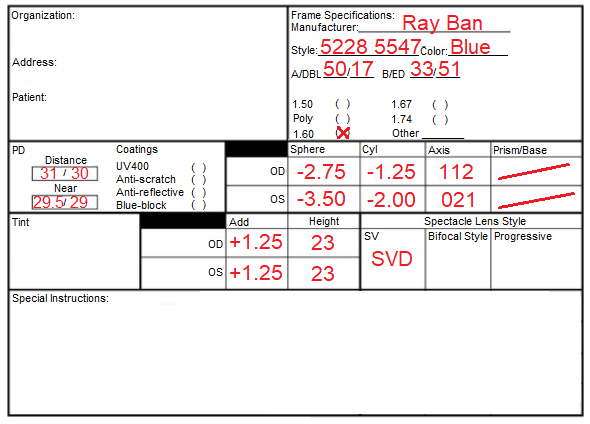
Here is what our sample glasses order form would look like with the prescription information filled in.

glasses prescription and glasses order form
Info from a hand-written glasses prescription transferred to a glasses order form.


Frame Information

Frame information is extremely important. Remember, we are trying to put lenses into a particular glasses frame. So without knowing the size and shape of the frame it would be impossible to do.

Luckily for you, most of the information you need is written right on the frame itself. By inspecting it closely, you will find the following info:

  • Brand
  • Model number
  • Eye size measurement
  • Distance between lenses
  • Temple length

Here’s an example:

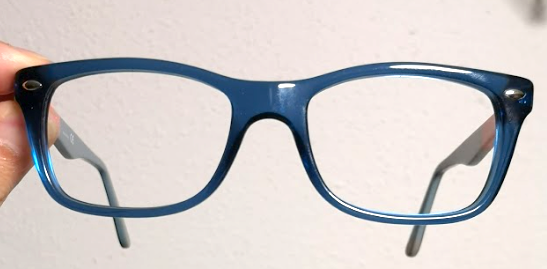
Example Frame

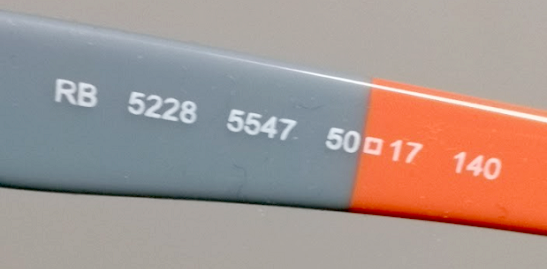
This is a Ray Ban frame. On the inside of one of the temples it is written: RB 5228 5547 50-17 140

Example Frame Information

Here we see:

  • Brand – RB (Ray Ban)
  • Model number – 5228 5547
  • Eye size measurement – 50 (also known as the A measurement)
  • Distance between lenses – 17 (also known as DBL)
  • Temple length – 140

A and DBL, Huh?

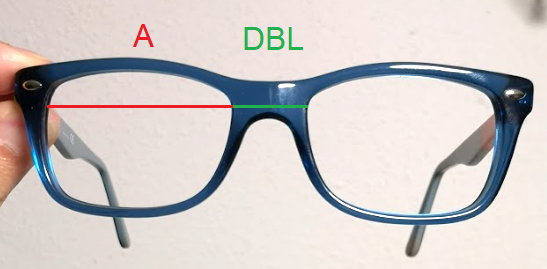
The A measurement is the horizontal length of the lens. The DBL is the distance of the space between the two lenses.

Examples of A and DBL measurement

B and ED, What?

The only information we need on our glasses order form the is not printed on the frame itself is something called the B and ED measurement.

The B measurement is the distance from the top to the bottom of the lens. The ED is the longest part of the lens; usually from one corner to the opposite diagonal corner.

Examples of B and ED measurements

The A, B, ED and DBL measurements are all measured in millimeters (mm). Now, let’s fill in our glasses order form with this information. I will use 33 and 51 for the B and ED measurements respectively.

sample glasses order form with rx and frame info

Pupillary Distance and Height Measurements

These measurements can make or break a pair of glasses. They are so important that they require an entire lesson of their own in order to understand what they represent, why we take them, and how to take them properly.

For now, we’ll keep it simple:

  • The pupillary distance (PD) is the distance between the center of the left and the right pupil (measured in millimeters).
  • Pupil height is the distance from the center of the pupil down to the bottom of the lens (measured in millimeters).

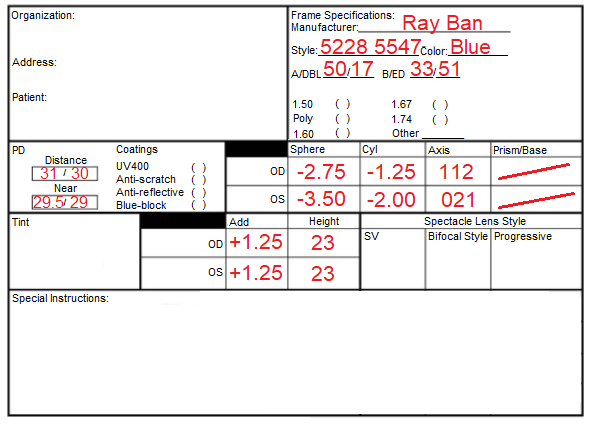
For more on these two important measurements, read this lesson. For now I will fill in the glasses order form with typical PD and height numbers.

sample glasses order form with rx frame and pd info

Spectacle Lens Style

A prescription for glasses can used to used to make several different styles of glasses.

For example, the prescription on our example glasses order form can be made into all of the following styles of glasses:

Single vision distance: Glasses that contain only the distance prescription.

Single vision reading: Glasses that contain only the reading prescription.

Bifocal: Glasses that contain the distance prescription with a small segment at the bottom containing the reading prescription.

Progressive: Glasses that contain the distance prescription at the top of the lens and gradually changes into the reading prescription at the bottom.

Office progressive: Glasses that contain the computer prescription at the top of the lens and gradually changes into the reading prescription at the bottom.

Before making glasses for any customer, it is important to understand their visual needs and what style of lens type would suit those needs best. Therefore, It is important for you to understand all styles of lenses, and what advantages and disadvantages each of them offer.

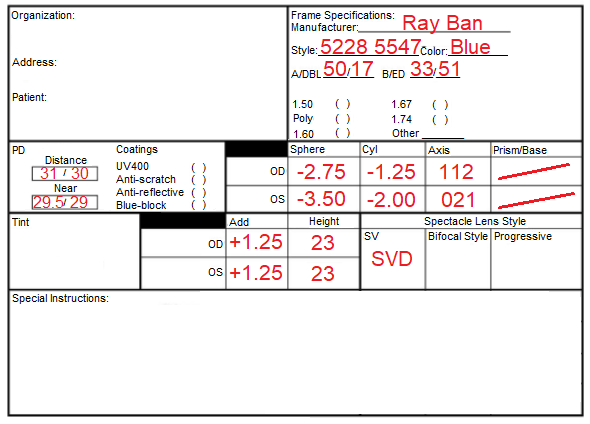
In this example we’ll keep it simple and order SVD for single vision distance glasses.

sample glasses order form with rx frame pd and lens design info

Lens Index

Lesson 1 of this course was all about the lens index. Using what you learned in that lesson, what lens index would recommend to a customer with the prescription in our example above?

Let’s break it down:

Keep in mind that we are ordering single vision distance lenses for this customer.

  • The combined sphere + cylinder power for the right eye is (-2.75 + -1.25) = -4.00
  • The combined sphere + cylinder power for the left eye is (-3.50 + -2.00) = -5.50

Would a 1.5 index be appropriate in this case? No, the lenses would be too thick!

Would 1.59 index (polycarbonate) be appropriate? Maybe for the right eye (borderline), but definitely not for the left eye.

Would 1.6 index be appropriate? Yes!

sample glasses order form with rx frame pd lens design and index info

If you haven’t spent time familiarizing yourself with the different lens indexes and the prescription ranges they are appropriate for, I strongly recommend you do so before you learn to fill out a glasses order form.

Lens Coating

The lenses use in glasses are enhanced by applying different types of coatings to them. Without any of these coatings, our glasses would scratch very easily, they would heavily reflect light, be difficult to clean etc.

Here is a list of some common lens coatings:

  • Scratch-resistant – This makes it more difficult to scracth the lenses, but does not make them scratch proof!
  • Anti-reflective – This reduces the glare and reflections that are otherwise created by the lenses.
  • Blue-block – This coating blocks a type of blue light that is emmitted from digital devices.
  • UV 400 – This coating blocks UVA and UVB rays from passing through.
  • Oleophobic – This coating prevents hard to clean smudges from getting on the lenses.
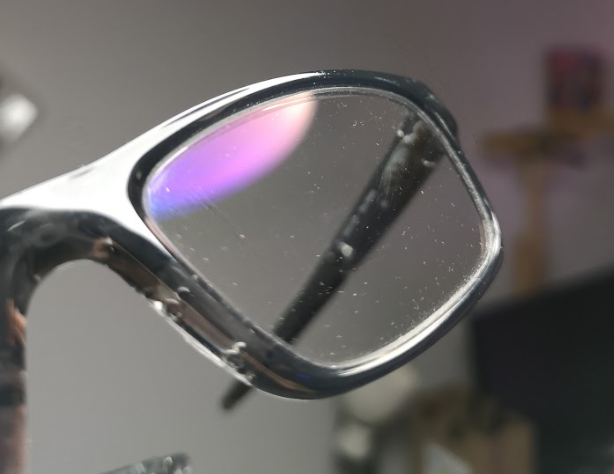
  • Anti-static – This coating prevents small dust particles from sticking to the lenses.
  • Anti-fog – This prevents lenses from fogging up when going from cold to hot.
Dust on a Spectacle Frame with Anti Reflective Coating
An example of dust that can cling to spectacle lenses without an anti-static coating.

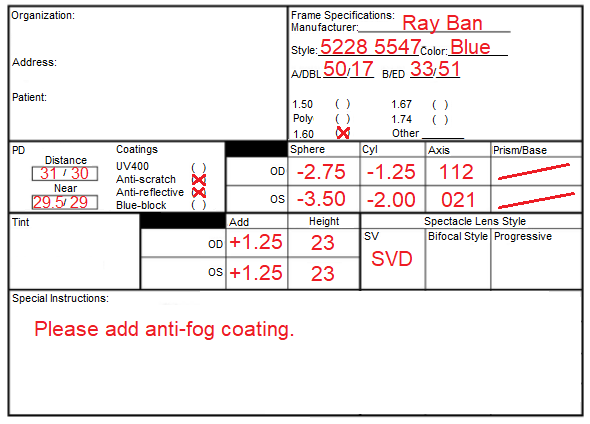
For our example glasses order, we will order scratch-resistant, anti-reflective and in the special instructions we will add anti-fog.

sample glasses order form with rx frame pd lens design index and coating info

Tints

In Lesson 3 of this course you learned all about the different kinds of tints. If your customer requests a certain kind of tint it has to be written on the glasses order form.

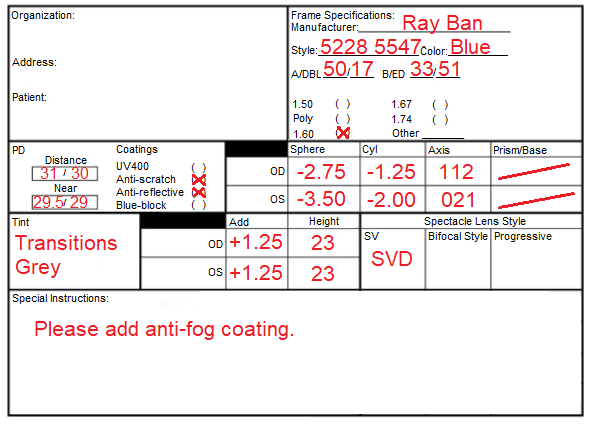
For our example, let’s order Transitions (grey).

sample glasses order form with rx frame pd lens design index coating and tint info

You’re Done!

And there you have it! Now you have gathered all the information necessary to order your customer’s glasses. From here, you just fill in your office’s contact information, pack up the glasses order form and the customer’s frame, and off it goes to the edging lab.

Remember that every store has different processes and different looking glasses order forms. But regardless of what they look like, they all have to be filled in with the same information as the one we filled out in this lesson.

If you have any questions about the information that has to go on a glasses order form, let me know in the comments section below. If your question is about measuring the PD and pupil heights, then hopefully your question is answered in the lesson Introduction To Dispensing – Pupillary Distance & Heights.


Introduction to Tints Featured Image

Introduction To Lenses – Tints

You cannot work in optical store without encountering requests for sunglasses on a daily basis. Hence, it is important to know about all the different ways that lenses can be tinted.

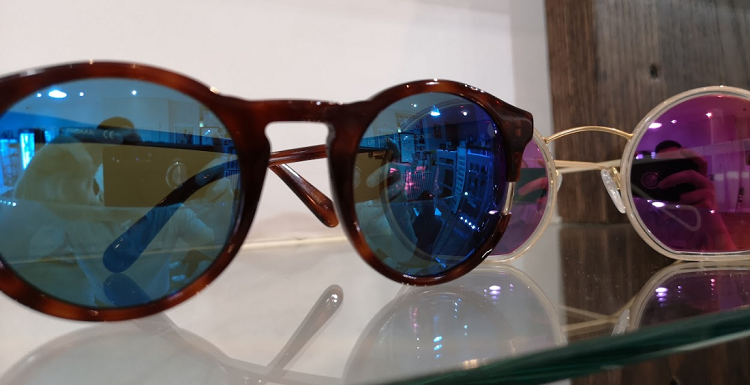
blue and pink sunglasses

How Do Sunglasses Work?

First, let’s consider what sunglasses actually do. You might say they:

  • Make everything darker
  • They protect your eyes from the sun
  • They reduce glare
  • They make everything a different color
  • They make you look cool

They are all correct answers. In this lesson, you will learn how sunglasses do all of these things as well as why the word ‘sunglasses’ is actually an umbrella term for many different types of tinted lenses.

How Sunglasses Make Everything Darker – Absorption & Transmittance

To understand how sunglasses make the work darker, we must understand the concepts of absorption and transmittance.

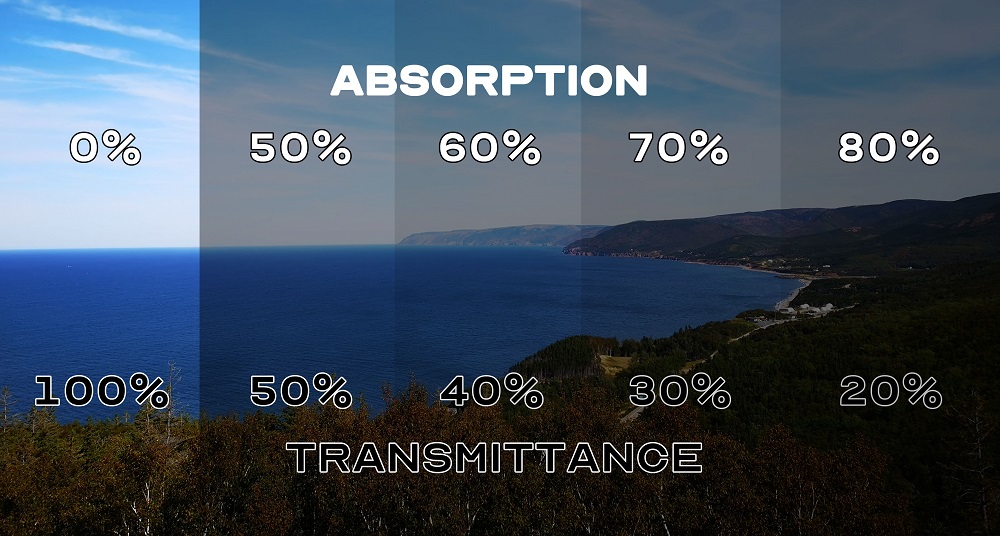
Absorption is a measure of how much a material stops light from passing through.

Transmittance is a measure of how much a material allows light to pass through.

A clear lens (non-sunglasses) does not darken vision at all. That is because they allow all the light that enters the lens to pass through. None of the light is absorbed, all of the light is transmitted. Therefore, a clear lens has an absorption rate of 0% and a transmittance rate of 100%. 

Clear lenses

Absorption rate: 0%

Transmittance rate: 100%

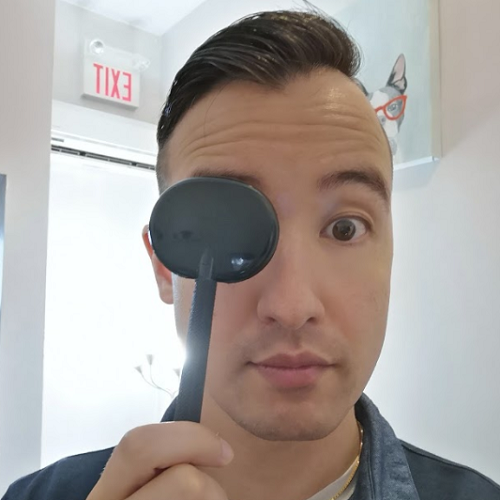
An occluder is a tool used by optometrists to temporarily block one’s vision. An occluder does not let any light pass through it. All of the light hitting the occluder is absorbed, none of the light is transmitted. Therefore, an occluder has an absorption rate of 100% and a transmittance rate of 0%.

Man holing an occluder

Absorption rate: 0%

Transmittance rate: 100%

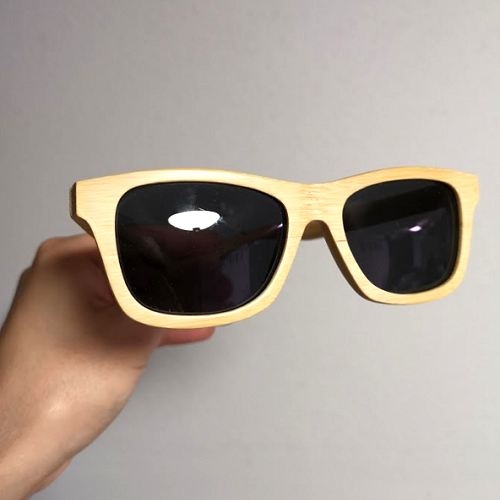
Sunglasses darken the vision, but still allow you to see through the lenses. This means that some light is absorbed by the lenses and some light is transmitted. Typically, sunglasses have an absorption rate of ~80% and a transmittance rate of ~20%.

Wooden Sunglasses

Absorption rate: 80%

Transmittance rate: 20%

If a customer tries on sunglasses and feels that they are too dark or not dark enough, sun-glass lenses can be ordered with the exact absorption and transmittance rates specified by a customer.

Absorption and Transmittance Gradient

How Absorption is Achieved

In order to achieve the desired absorption rate, lenses under go a tinting process. Tinting lenses is a fairly simple process or submerging them into a chemical dye. The longer they remain in this dye solution, the darker the lenses will be when they emerge.

Here is a video of the process taking place.

Full Tint Vs Gradient Tint

Note that in this this video, the lenses were not completely submerged in the dye, but instead dipped about half way in. This is in order to create a gradient tint.

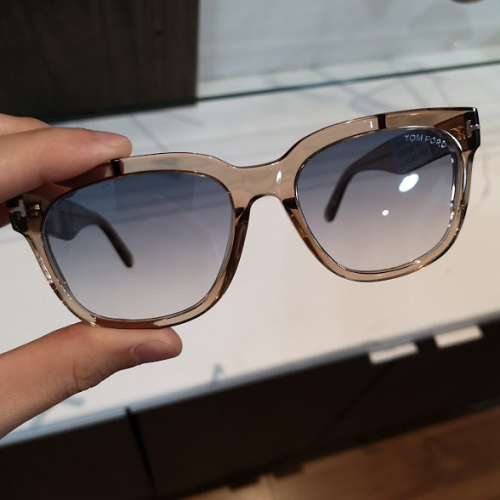
Gradient tints have the darkest tint at the top of the lens, and they gradually get lighter towards the bottom. Gradient tints are useful for blocking out the sunlight from above while not diminishing the overall brightness of vision too much. Additionally, they offer a unique look that many find desirable in their sunglasses.


Light brown sunglasses Tom Ford Gradient Lenses


Colored Tints

Sun-glass lenses need not just be grey or brown. They can be tinted almost any color imaginable. The video above showed a blue gradient tint. The following video shows a red full-lens tint.

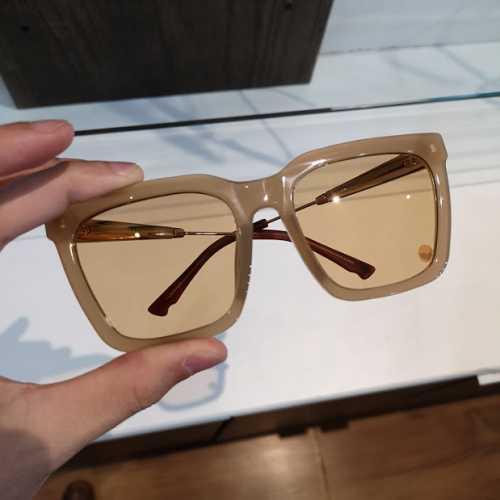
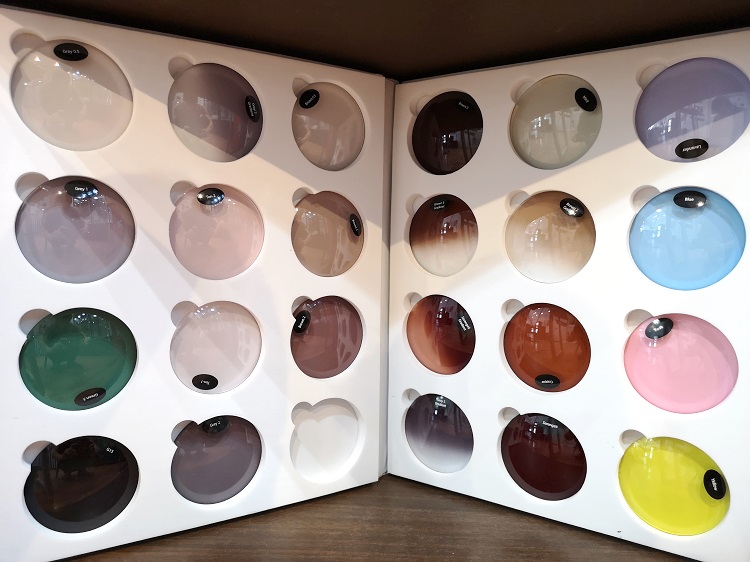
Here is a set of different colored full and gradient lenses readily available on the market. Can you can differentiate the full tints from the gradient tints?

Collection of lens tints and gradients

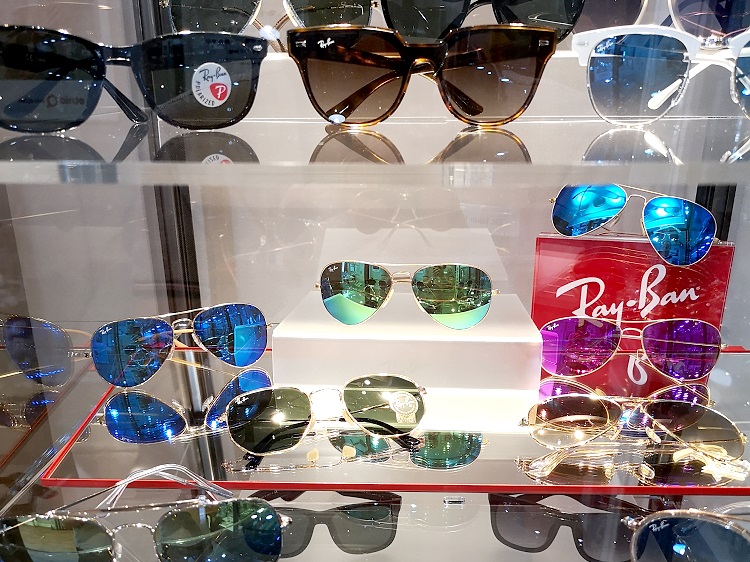
Here is another image showing a collection of ready-made sunglasses. Can you can differentiate the full tints from the gradient tints in this one?

Display Case Showing a Collection of Ray-Ban Sunglasses

How Sunglasses Protect Your Eyes

Perhaps the top reason for wearing sunglasses is the fact that they protect your eyes from the harmful effects of UV light constantly being emanated from the Sun. There are 2 types of UV light which any standard pair of sunglasses must protect against. These are called UVA and UVB rays. Sunglasses must block at least 99% of these UVA and UVB in order to be labelled with UV400, which means they are safe to use.

It is important to understand that tinting lenses in itself does not provide any protection from UV light. In addition to tinting, lenses must be treated with special coatings or layers that block the UV light. In fact, if tinted lenses are worn without the UV blocking treatments, it is even more harmful to they eyes than not wearing sunglasses at all.

Also keep in mind that certain lens indexes like 1.6, 1.67, 1.74 provide 100% UV protection even without any special treatment.

Why Tinted Glasses That Don’t Block UV Light Are Dangerous

You might think that if sunglasses don’t block out UV light, then it’s no more dangerous then simply not wearing sunglasses at all, right? No, Wrong!

Here’s why:

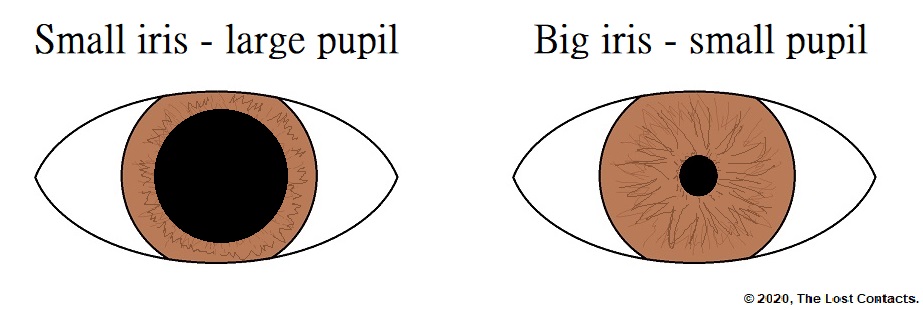
Diagram of large vs small pupil

  • We know that UV light from the sun entering the eyes causes damage.
  • Without sunglasses, when in bright sunlight, the pupils constrict which restricts the amount of UV light entering the eyes.
  • With sunglasses, because they make everything darker, the pupils dilate, allowing more UV light to enter the eyes.
  • Therefore, when sunglasses are worn, if they don’t block UV light, the eyes will be exposed to more UV light than if no sunglasses were worn at all.

What Are Photochromic Lenses?

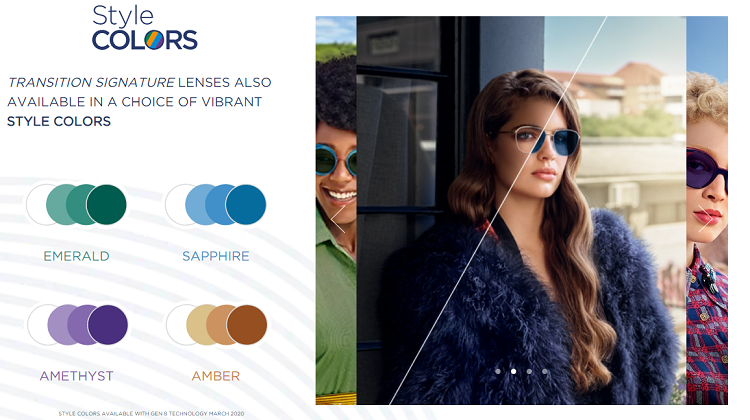
Photochromic Lenses are lenses that remain clear in the absence of UV light, but darken in the presence of UV light. They are more commonly known by the industry leading company Transitions®.

When offering customers Transitions® lenses, it is important to realize that there are many different versions and variations. If the store where you work offers Transitions®, I would highly recommend becoming familiar with their portfolio of options.

A few of the different colors available in Transitions lenses
A few of the different colors available in Transitions lenses.

Mirror Coatings

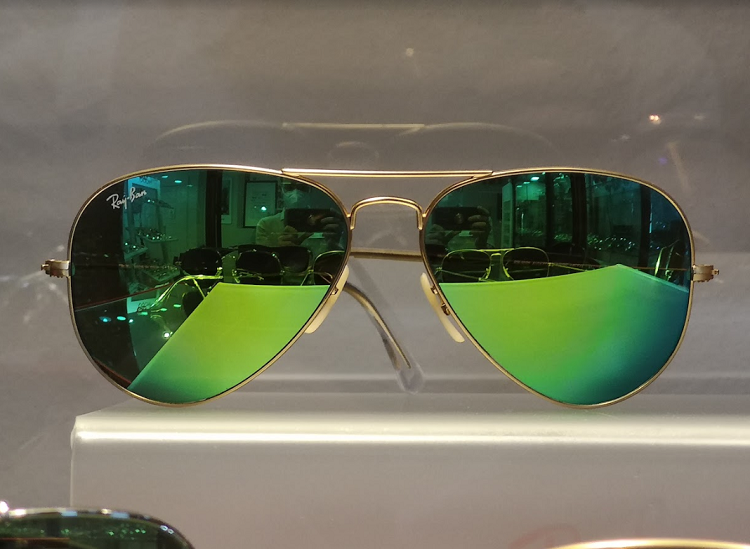
Mirror coatings can be applied to sunglasses to reflect light off of the lenses and to give them a unique look.

Ray-bans with green mirror lenses

Polarized Lenses

And last but not least, we come to polarized lenses. Polarized lenses offer a unique advantage over regularly tinted sunglasses. They not only reduce brightness and block 100% of UV, but they also filter out glare.

Regular sunglasses block a certain percentage of light from passing through them, darkening the overall vision. Polarized sunglasses darken the vision by selectively blocking out the light that causes glare thus making vision better and more comfortable.

Polarized sunglasses are extremely useful during activities where glare can be distracting and bothersome such as driving, biking, fishing, boating, skiing, etc.

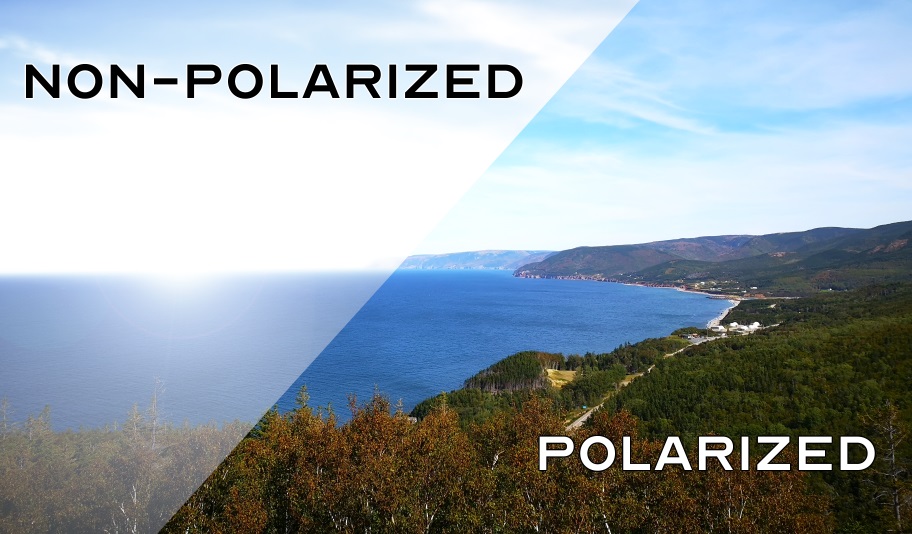
Here is a type of promotional image often used to advertise the effect of polarized sunglasses.

Polarized Vs Non-Polarized

Unfortunately, these are always made in Photoshop and exaggerated. It gets the main point across but can make it seem too good to be true.

Here’s a more realistic look.

I recommend comparing regular sunglasses and polarized sunglasses back to back in an outdoor environment to get a feel for the differences yourself. That way you can better explain it your customers.

Summary

We have covered many different types of sunglasses in this article, all of which are important to be familiar with. So let’s recap.

  • Full tint
  • Gradient tint
  • Colored tints
  • Transitions
  • Mirror coatings
  • Polarized

Make sure you are able to explain the difference between all of these, and become familiar with which ones are offered at the store/office where you work.

The Base Curve Featured Image

Introduction To Lenses – The Base Curve

In Lesson 1 of this course, you learned about the lens index. In this lesson you will learn about another property of lenses called the base curve.

Remember that to fully understand the concepts covered in this lesson, it is best to have read through the entire The Optics of Vision course.

The True Shape of Lenses

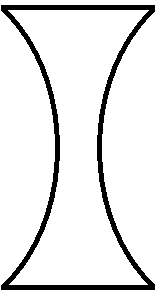
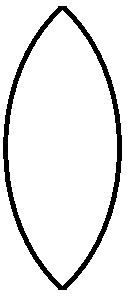
Up until now, I have been simplifying the shape of lenses in order to make obvious the distinction between plus and minus lenses.

Here is the shape of lenses that you are use to seeing:

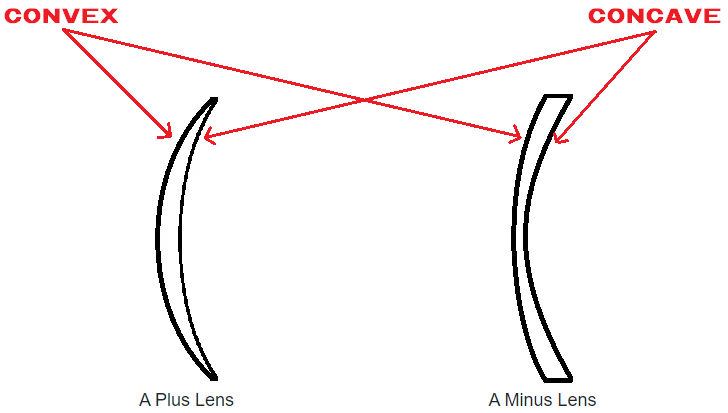
A Convex Lens A Concave Lens
A Plus Lens A Minus Lens

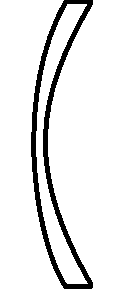
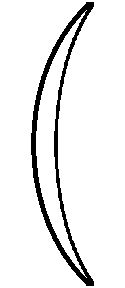
Here is a more realistic depiction what these lenses look like when they are manufactured for glasses:

Ophthalmic Plus Lens Ophthalmic Minus Lens
A Plus Lens A Minus Lens

Quite different, right? But don’t worry, it’s still very simple. Let’s break it down.

The Front and Back Curve

Every lens has a front and a back surface curvature. The front curvature is always convex and the back curvature is concave.

A lens with a flat back curve

The Lens Power

The overall lens power is simply the sum of the front and back curvature.

Remember:

  • The front curve is always positive
  • The back curve is always negative

In order to do this you must be comfortable with adding positive and negative numbers.

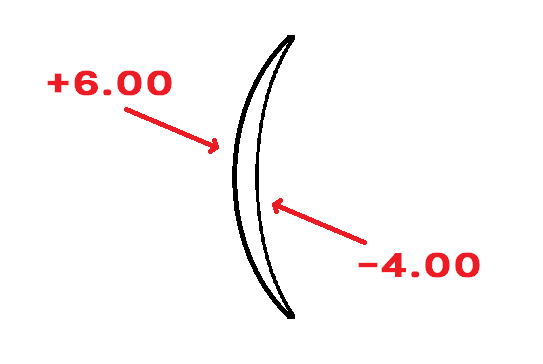
For example, here an example of a +2.00 lens.

Front and Back Curve

This is a +2.00 lens because the front curve is +6.00 and back curve is -4.00. If you sum these together, you get +2.00.

+6.00 + (-4.00) = +2.00

What is the Base Curve?

In practice, we call the front curve the base curve.

Now, of course there are several different ways to combine base (front) curves and back curves in order to arrive a +2.00 lens.

Other options would be:

Base Curve Back Curve
+2.00 0.00
+3.00 -1.00
+4.00 -2.00
+5.00 -3.00

But as it turns out, only specific combinations of base curves and back curves are used for any given desired lens power.  The goal is to create a lens that is as comfortable as possible to see through by using the most appropriate combination of base and back curves.

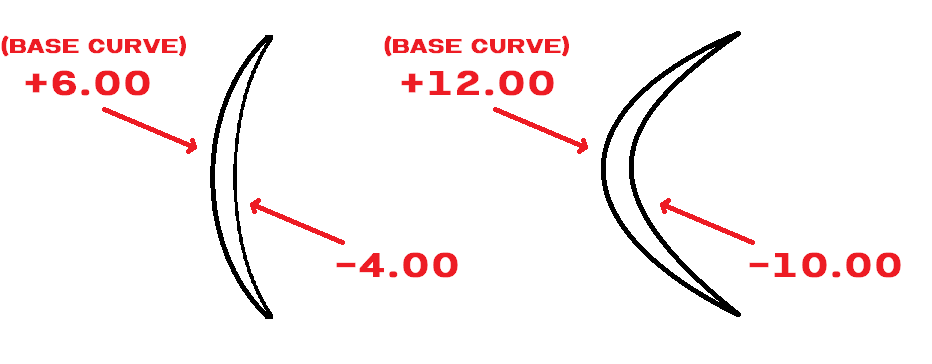
For Example, the following lenses are both +2.00 lenses, but one has a base curve of +6.00 while the other has a base curve of +12.00. Which one would you rather have in your glasses?

Two Different Base Curves Examples

Obviously, the lens with the +6.00 base curve is much more desirable.

How To Determine The Optimal Base Curve

The most optimal base curve for any prescription  can be calculated using these equations:

For Plus Prescriptions

Base Curve = Spherical Equivalent + 6.00

For Minus Prescriptions

Base Curve = [ 1/2 * (Spherical Equivalent) ] + 6.00 

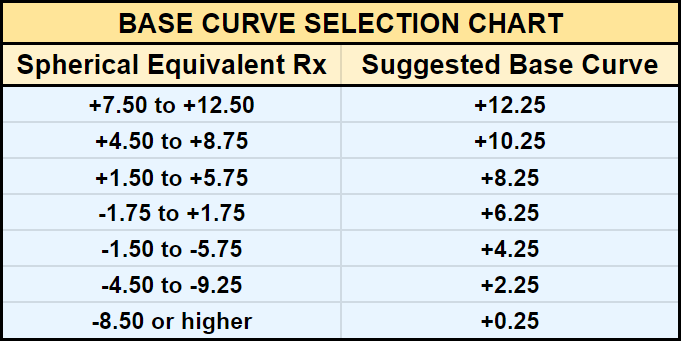
No worries though, as with everything else we don’t actually work with formulas. We make charts.

This is a simple base curve selection chart. Note: This chart does not apply to all lens indexes and lens designs.

Base Curve Selection Chart

There are many reasons why base curves have to be carefully selected for the strength of each prescription. Here are just a few:

The wrong base curve can…

  • cause unnecessary distortions in vision
  • cause inability to adapt to a new prescription
  • cause lenses to be thicker than they need be

How To Measure The Base Curve?

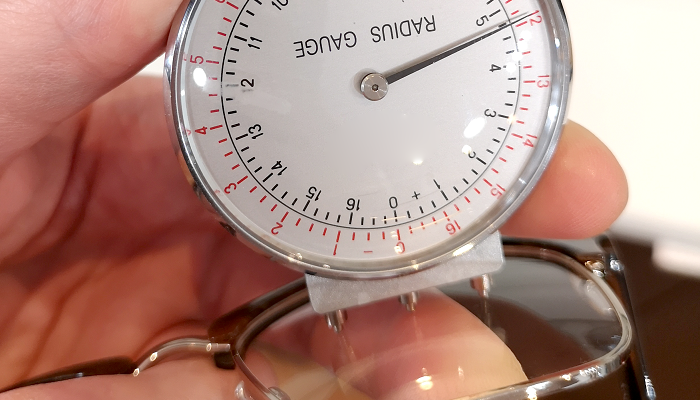
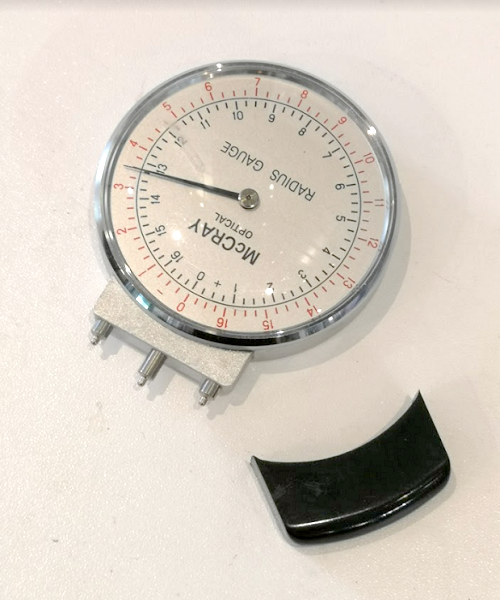
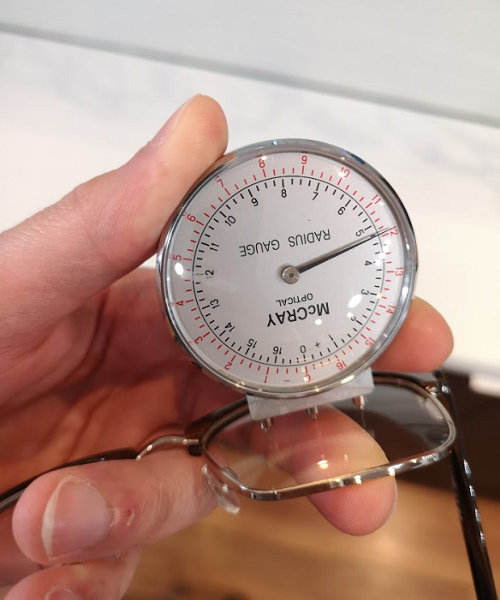
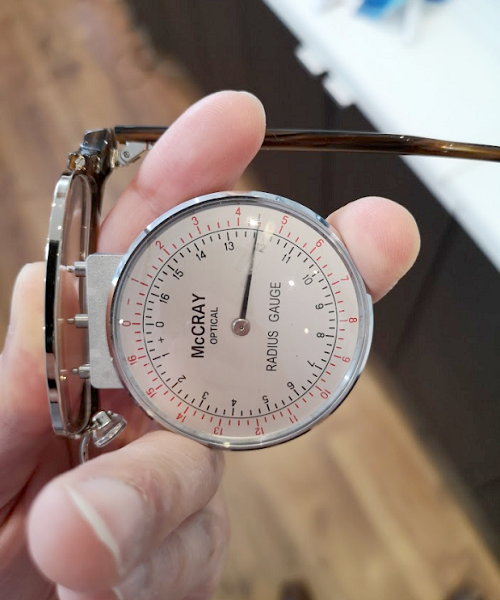
The base curve of any lens can be measured with a tool called  a radius gauge, also known as a lens clock.

Lens Clock

A lens clock has three prongs that can measure the curvature of lenses (and other surfaces).

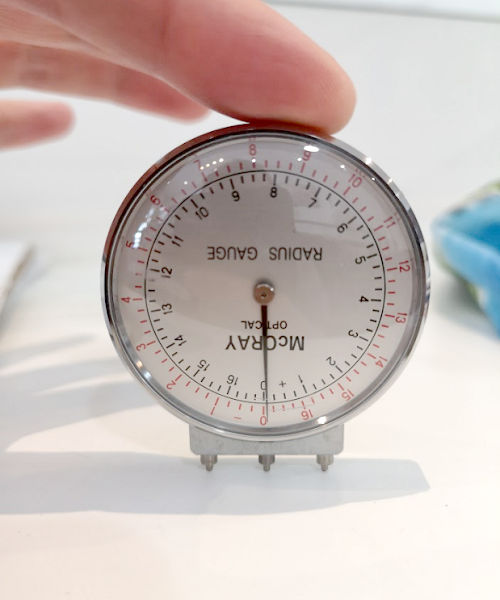
When those 3 prongs are place against a flat surface, the gauge should read zero. The following image shows a lens clock held against a flat counter top.

Lens Clock on Flat Surface
A lens clock read zero (more or less) when held up to a flat surface.

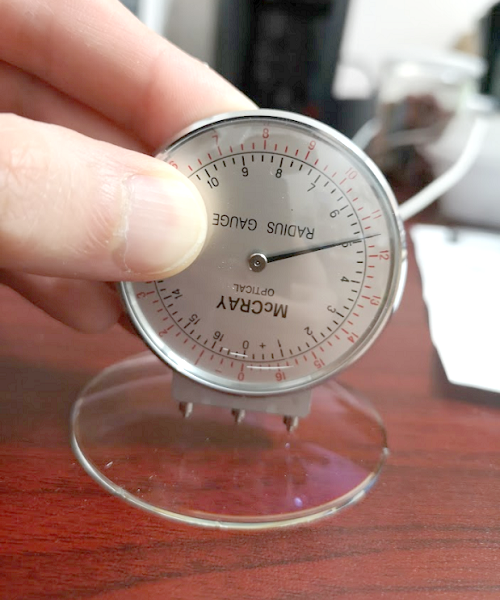
When a lens clock is held up against a convex surface, the black numbers indicate the curvature of that surface.

Lens Clock Measuring Base Curve of Semi Finished Lens
A lens clock measuring a +5.00 front/base curvature.

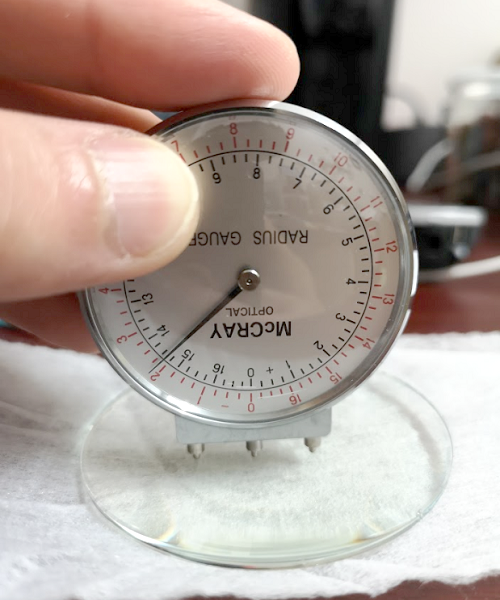
When a lens clock is held up against a concave surface, the red numbers indicate the curvature of that surface.

Lens Clock Measuring Back Curve of Semi Finished Lens
A lens clock measuring -2.00 back curvature.

In the example above, the base curve is +5.00 and the back curve is -2.00. Hence, this lens has an overall power of +3.00 (+5.00 + -2.00).

The same can be done on lenses already mounted into glasses.

Lens Clock on Measuring Base Curve Lens Clock Measuring Back Curve

The process I’ve illustrated here is somewhat simplified and assumes there is only Sphere power in the lenses. In reality, many lenses you encounter will have both Sphere and Cylinder power. It is rare to use a lens clock to determine the cylinder power of glasses, but if you’re interested in learning more about that, click here.

Who Deals With Base Curve?

Optometrists do not write down the base curve on their patient’s prescriptions, so does it fall upon the optician to order the correct base curve? Yes, most of time.

Despite how critical the correct base curve is to the overall finished pair of glasses, it is not typically the biggest concern when dispensing glasses. In most optical stores, the customer’s lens order is sent to a lens manufacturing laboratory who’s skilled technicians select the most appropriate base curve for every lens order.

Of course, if a specific base curve is required, the optometrist or optician can specify this on the prescription/lens order. Often times when the base curve is specified, it is done so in order to match the base of curve of the lenses in the customer’s old glasses.

Quiz Header

Case Scenario:

A customer gets her eye exam and it is determined that her prescription has not changed at all since she got her last pair of glasses. Even though her current glasses are still in good shape, she decides to get new glasses anyway. You make her new glasses with the exact same prescription as her old glasses. The customer returns to the store one week later saying that she can’t see as well with her new glasses as with her old ones.

What could be the problem?

Possibility #1

It could be the base curve. Using a lens clock, measure the base curve of the old and the new pair of glasses. If the base curves are different between the two pairs, it could be very difficult for the customer to adapt to the new glasses (even though the prescriptions are exactly the same).

Possibility #2

If the base curves are the same between the two pairs, another possibility could be incorrect PD (pupillary distance) and OC (ocular center) height measurements.
If you don’t know what a PD and an OC height are, that’s because I haven’t taught it to it you yet, but that is the topic of the next lesson!

Introduction to Lenses The Index - Featured

Introduction To Lenses – The Index

Hello and welcome to the first lesson of The Lost Contacts’ Introduction To Optical Dispensing course! Before tackling this course, please keep in mind that it is meant to build on the knowledge laid out in The Lost Contacts’ The Optics of Vision course. Please make sure you are familiar with the topics in that course before taking this one.

Today’s topic will be something known as a lens index. But let’s make sure we’re familiar with a few things first.

What is a Lens?

Basically, a lens is a clear (transparent) & curved material used for the purpose of refracting light.

Please review The Optics of Vision – Lesson 2: Introduction to Lenses for more information about what lenses are.

What is Refraction?

Refraction is what happens to light when it passes from one medium to another.

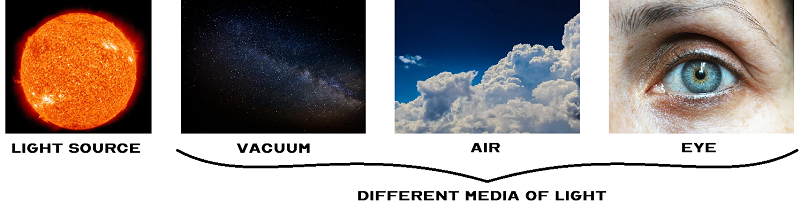
A medium in this context is anything that light can travel through. For example, the first medium for light produced by the sun is the vacuum of outer space.  Eventually it reaches Earth and then switches medium from space to Earth’s atmosphere (air). Then it switches medium again when it enters your eyes.

Different media of light

Other common examples of media that light can travel through are: water, glass & clear plastics.

Whenever light passes from one medium to another, the trajectory of the light changes. This change in trajectory is referred to as refraction. Lenses (usually plastic or glass) are a different medium than the air around them. So as light passes through lenses, it is refracted.

Generally speaking, the denser the medium is, the more it will change the trajectory of the light. Every medium has a different index of refraction, which is a number describes how much it changes the path of light.

The Index of Refraction

In this lesson, we will learn about one of the most important properties of a lens; the index of refraction.

Nowadays, lenses for glasses are made from plastic – not glass. But there isn’t just one plastic that’s used for all lenses. We have a lot of different plastics at our disposable when making a pair of glasses.

The reason for having so many types of plastics to make lenses is to take advantage of their different indices of refraction.

Let me explain.

As mentioned before, different media with different indices of refraction will alter the trajectory of light passing through them by varying amounts.

  • Plastic lenses that have a lower index of refraction will not bend light as much and therefore the focal point will be further away.
  • Plastic lenses that have a higher index of refraction will bend light more and therefore the focal point will be closer.

You may recall from The Optics of Vision – Lesson 3: Lens Power, that the curvature of lenses also affects where the focal point will be.

  • Plastic lenses that have a lower curvature will result in the focal point being further away.
  • Plastic lenses that have a higher curvature will result in the focal point being close.

This means that we now have 2 tools with which to adjust the position of the focal point; the curvature of lens and the index of refraction of the lens.

In the every day operations of an optical store, the index of refraction is simply referred to as ‘the index’.

Why Is The Index Important?

As you may already intuitively know, the more curved a lens is, the thicker it will be. That means that people with prescriptions for strong lenses will have thick lenses. But when it comes to lenses that we wear on our heads all day long, we don’t want those lenses to be too thick.

The solution is to increase the index. Doing this allows us to reduce the curvature (which reduces the thickness) without affecting the focal point of the lens.

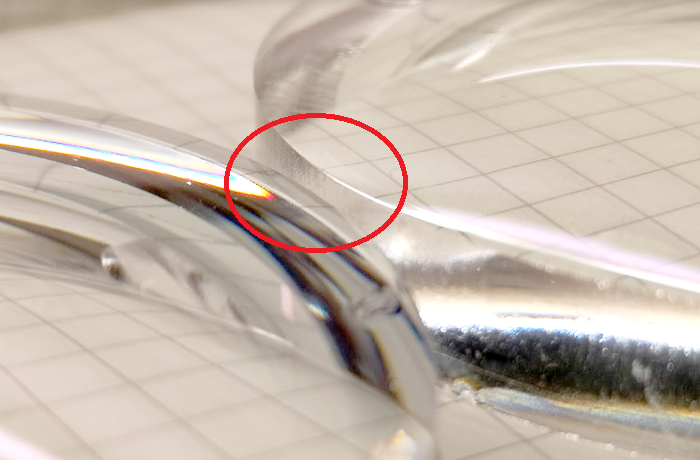
Here are two lenses of the same power side by side. Notice that one of them is significantly thicker than the other. This is because they are made from two different lens indices.

-4.00 normal versus high index lens
Notice the difference in edge thickness in the red circle.

Different Lens Indices


1.50 Index

  • Also known as CR-39.
  • 1.50 CR-39 is the ideal lens index for low prescriptions. It is the least expensive lens material, but also the thickest.
  • Recommended for prescriptions between +2.00 and -3.00
  • 1.50 CR-39 lenses block some but not all UV light.

Keep in mind that 1.5 is not very impact resistant and should not be sold to people who are prone to breaking their glasses/lenses.

Be careful when mounting 1.50 CR-39 lenses into certain frames as they are prone to chipping.


1.53 Index

  • Also known as Trivex.
  • 1.53 Trivex is a light-weight and highly impact resistant lens material. It is more expensive than 1.5 CR-39, but also a little thinner.
  • 1.53 Trivex blocks 100% of UV light.

1.59 Index

  • Also known as polycarbonate.
  • 1.59 polycarbonate is also light-weight and highly impact resistant. It is slightly thinner than 1.53 Trivex but also slightly heavier.
  • 1.59 polycarbonate blocks 100% of UV light.

1.53 Trivex and 1.59 polycarbonate have very similar uses. They are generally used for children’s glasses & safety glasses.


1.61 Index

  • 1.61 index lenses and above are considered to be ‘high index’ lenses. 1.61  index offers considerably thinner lenses than 1.50.
  • Recommended for prescriptions +2.50 to +4.50 and -3.00 to -5.00.
  • 1.61 index lenses block 100% of UV light.

1.67 Index

  • 1.67 index is similar to 1.61 index but used for even strong prescriptions.
  • Recommended for prescriptions +4.50 or higher and -5.50 or higher.
  • 1.67 index lenses block 100% of UV light.

1.74 Index

  • 1.74 is the thinnest and also most expensive lens material offered by most optical stores. The benefits of 1.74 are marginal as it does not make lenses considerably thinner than 1.67, but it does make them considerably more expensive.
  • It can be used instead of 1.67 if customers insist on the thinnest lenses possible.
  • 1.74 index lenses block 100% of UV light.

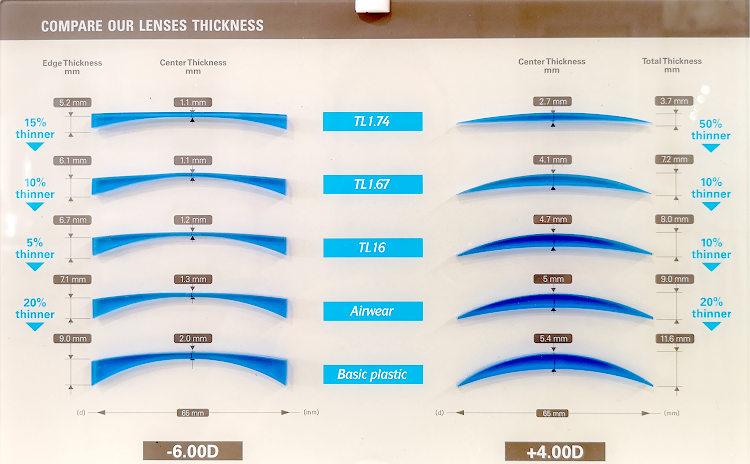
Here is a diagram showing the relative thicknesses of different lens indices.

Lens Index Comparisons
From bottom to top the lens indices shown above are 1.53, 1.59, 1.6, 1.67, 1.74

Clear Lenses Can Block 100% of UV light?

Yes, all lens indices except for 1.50 CR-39 block 100% of UV light and yet they are not tinted. This is something that most people aren’t aware of as we usually think of lenses that block UV light to be sunglasses (tinted lenses).

Despite the fact that clear lenses can block 100% of UV light, that does not mean that sunglasses aren’t necessary. Sunglasses are generally larger and hence offer more protection then regular glasses as well as increased visual comfort from reducing the overall brightness.

Remember to Look at the Cylinder

Recommended power rangers for different lens indices typically just show the ‘sphere’ power. But what if your customer has ‘sphere’ and ‘cylinder’ in his/her prescription?

FOR EXAMPLE

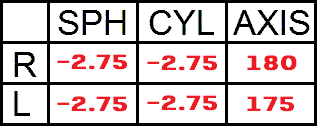
If this is your customer’s prescription:

example prescription of compound myopic astigmatism

You see a bunch of -2.75 everywhere so you might think that 1.50 index would work fine for this prescription. But this would be incorrect.

What a prescription with cylinder is really saying is that half of the lens contains the ‘sphere’ power only, and the other half has the ‘sphere’ + ‘cylinder’ power.

This means that the strongest portion of the lenses in this example prescription above would be -5.50 (-2.75 + -2.75).

Making these lenses with 1.50 index would result in half the lenses being very thick. Therefore, 1.67 index would be a more appropriate.

Remember to Look at the Add

The ‘add’ power is similar to the ‘cylinder’ power in that it get’s added to the ‘sphere’ power when making reading glasses.

FOR EXAMPLE

If this is your customer’s prescription:

example prescription of hyperopia and presbyopia

If you only look at the sphere or the add you might think that 1.50 index would be appropriate for this prescription. But that would be incorrect.

An ‘add’ is always added to the ‘sphere’ when making reading glasses.

This means that the strength of the reading glasses in this example would be +4.00 (+2.00 + +2.00).

Making these reading glasses with 1.50 index would result in glasses that are thick and heavy. Therefore, 1.61 index would be more appropriate.

The Index of Refraction of Other Materials

If you’re interested in learning what the index of refraction of other materials like air, water, glass, ice, diamonds, & more, click here.

Summary

When making glasses, we select the most appropriate lens index for the every prescription in order to maximize the satisfaction of the customer. Knowing the different lens indices and when to use them will make you a much better eye-wear consultant and optical associate.  Please take the time to memorize the different indices and be sure to keep a reference chart for each index’s prescription range somewhere in your store.

Next in this lesson series we will learn about something called the base curve.

==> CLICK HERE TO READ ‘INTRODUCTION TO LENSES – THE BASE CURVE’ <==

Ordering Trial Contact Lenses - Featured

Ordering Your Patient’s Free Contact Lens Trial Pair

This is the 5th installment of my Fitting Contact Lenses Course. So far we’ve learned:

The next step is to get your patient a free trial contact lenses so that you can assess their fit and performance.

This lesson is going to be centered around ordering your patient/client’s first pair of free contact lens trials. I wrote it assuming your don’t have trial fitting sets in your office and have to order your trial lenses from the companies. If you do have the fitting sets, you can just get your trials from there (assuming they are well maintained).

Working With What’s Available

At this point, you’ve successfully converted your patient/client’s glasses prescription to contact lenses and you know what contact lens trial pair you want to order. However, the exact numbers that you calculated in your conversion is not always available for you to order. To avoid problems and unnecessary delays, it’s important to order contact lens trials that are actually available.

Limitations in Sphere Power

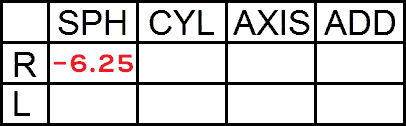
+6.00 to -6.00

If the sphere number you want for your patient’s contact lens trails is between +6.00 and -6.00, you shouldn’t have any problems finding what you are looking for. Contact lenses generally come in 0.25 steps in that range.

Dailies TOTAL1 trial contact lenses
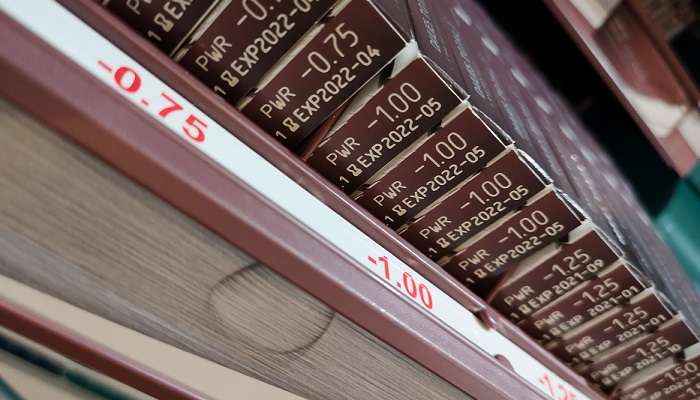
A Dailies TOTAL1 fitting set showing sphere power increasing in 0.25D increments.
The problem you may come across in this range is when your glasses to contact lens conversion gives you a sphere power that ends in an eighth diopter step, i.e., .12, .37, .62 & .87. You will have no choice but to choose from one of the two nearest quarter diopter step, i.e., .00, .25, .50 & .75.

If this happens, you can use your professional judgement to choose the one you think would work best for you patient. However, if there’s some uncertainty you can always order and try them both.

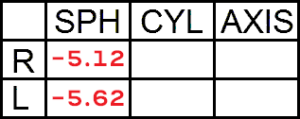
For example, if your glasses to contact lens conversion is:

Example Eighth Diopter Glasses Prescription

Since neither of those sphere powers are available in contact lenses, a safe bet would be to order -5.00 and -5.25 for the right eye, and -5.50 and -5.75 for the left eye.

Over +/-6.00

If you need a contact lens trail with a power that is higher than +6.00 or -6.00, you will be more limited. Outside of the +/-6.00 range, most contact lens brands become available only in steps of 0.50, i.e., -6.00, -6.50, -7.00, -7.50, -8.00 etc.

So if you’re looking for trail contact lenses with a sphere power ending in .25 or .75, what do you do? Well, at this point you should be expecting to have to try 2 or 3 different combinations of powers before you find the one the works best for your patient. The best thing to do would be to order the contact lens trials in both powers that bracket what you calculated in your conversion.

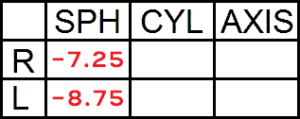
For example, if your glasses to contact lenses conversion is:

Example Converted Glasses Prescription

Since neither of the those sphere powers are available in typical (non-extended range) contact lens brands, a safe bet would be to order -7.00 and -7.50 for the right eye, and -8.50 and -9.00 for the left eye.

Start by having the patient try on the lower power and see if holding a -0.50 trial lens over the eye makes a significant difference in the vision. If it does, you’ll be happy that you ordered the stronger power.

It’s A Trial & Error Process

Keep in mind that it may still be possible that despite this, your patient will be need something that’s even lower or higher that what you have ordered. There are many factors that influence this such as specific contact lens designs, patient age, patient visual demands, etc.

Additionally, it is important to keep in mind that whatever sphere power ends up working best for any given brand does not necessarily translate to other brands. Every time you try a different brand, it is advisable to re-test the vision and perform a contact lens over-refraction to find the best sphere power for each brand you try.

Limitations in Cylinder Power

What’s Available

Cylinder power is perhaps the most limited parameter in contact lenses. There are 3 cylinder powers that every contact lens for astigmatism have. They are:

  • -0.75
  • -1.25
  • -1.75

Many brands also have:

  • -2.25

A few brands have:

  • -2.75

As you can see, the cylinder powers in contact lenses are quite limited and only appear in 0.50 diopter steps. This is due to manufacturing limitations as well as the fact that when the cylinder is only slightly off, it doesn’t affect the vision all that much.

Clariti 1 day toric trial contact lenses
A clariti-1day toric fitting set showing -0.75, -1.25 and -1.75 cylinder options.

To Round Up Or Down?

If you need a cylinder power that isn’t available, should you pick the closest lower one or the closest higher one? In this situation it’s typical to round down to the nearest available cylinder power. People who wear contact lenses for astigmatism do best when they have the lowest possible cylinder power that still allows them to see 20/20.

For example, if your glasses to contact lenses conversion is:

Example Glasses to Contact Lenses Prescription

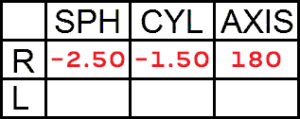
The right eye’s contact lens cylinder power should be -1.50 but due to restricted availability we have to pick between -1.25 and -1.75. It is quite possible that the patient would be able to see perfectly and equally well with either one. If that is the case, it would be best to opt for the lower cylinder of -1.25.

It’s also possible that when you convert a glasses prescription to contact lenses, the cylinder ends in a eighth diopter step. When this happens, simply choose the nearest available cylinder (a cylinder ending in an eighth diopter step never falls squarely between two available cylinders.

For example, if your glasses to contact lens conversion is:

Example Eighth Diopter Cylinder Prescription

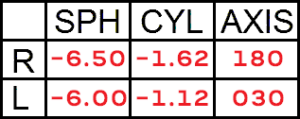
For the right eye: -1.62 falls between -1.25 and -1.75 but it much close to -1.75.

For the left eye: -1.37 falls between -1.25 and -1.75 but it much close to -1.25.

Limitations in Axis

Excluding extended range and specialty contact lens brands, contact lenses for astigmatism are available in axes of steps of 10.

Bauch Lomb ULTRA for astigmatism trial contact lenses
A Bausch + Lomb ULTRA for Astigmatism fitting set showing axis increments of 10 degrees.

When you convert a glasses prescription to contact lenses, the axis does not change. This means that you could end up with an axis that’s any number between from 1 – 180.

When picking the contact lens free trial for your patient, what you have to do is choose the axis that is the closest to the glasses axis.

Of course, you’re going to encounter many prescriptions where the axis ends in a 5. When this is the case, I tend to order both axes that straddle the glasses axis so that I don’t have to wait on another delivery if that one I ordered wasn’t the right one.

Assessing The Vision/Examining The Fit

Once you’ve ordered all the contact lens trials you think you’ll need for your patient, the next step is to have the patient try them on assess their performance. This is where you’ll make the decision as to whether what you’ve ordered is adequate, or if you have to make adjustments.
This is what I discuss in the next installment of my Fitting Contact Lenses Course.

Presbyopia - Featured

The Optics of Vision – Part 10: Presbyopia

In The Optics of Vision – Part 9, we learned about the function of the crystalline lens. But as I pointed out towards the end of the lesson, the crystalline lens gradually stops functioning. This results in the condition we’re going to discuss in this lesson called Presbyopia.

This being the last lesson of The Optics of Vision course, it will continue to build off of everything taught so far. I strongly recommend making sure that you have read every previous lesson before reading this one.

The Crystalline Lens & Accommodation

Recall from Lesson 9 that crystalline lens allows us to see clearly up close by automatically adjusting its curvature to give just the right amount of focusing power for the distance the eye is looking at.

Quick Accommodation Recap

Looking in the distance (further than 6m/20ft)

  • The crystalline lens is at rest (as flat as possible)
  • Takes no effort

Looking at intermediate distances (~1m/40”)

  • The crystalline lens ‘accommodates’ (gets more curved)
  • Requires minimal effort

Looking at near distances (~30cm/12”)

  • The crystalline lens accommodates even more (gets even more curved)
  • Requires significant effort

Looking at extremely near distances (~15cm/6”)

  • The crystalline lens maximally accommodates (gets as curved as it can)
  • Requires maximal effort

Takeaway: Without accommodation, we cannot see clearly up close.

Requirements for Accommodation

Functioning accommodation requires 2 things:

  1. A flexible crystalline lens
  2. Functioning ciliary muscles (the mucles that act on the crystalline lens)

For the vast majority of people, the crystalline lens is very flexible and the ciliary muscles are very strong in the first 4 decades of life (~ age 0 to 40 yrs). During this time, accommodation works so well that most of us don’t even know its happening – and thus take it for granted.

After the age of 40, the crystalline lens becomes stiff to the point that the ciliary muscles can no longer flex it. That’s when accommodation begins to fail. This is what is called presbyopia.

What is Presbyopia?

Presbyopia begins when accommodation starts to become sluggish due to changes in the crystalline lens and ciliary muscle. When presbyopia kicks in, our vision up close becomes blurry. It’s often noticed for the first time when attempting to make out small print up close such as the kind found of medicine bottles. From there, it gradually gets worse year after year until eventually, nothing within a couple of arm lengths is clear.

Presbyopia FAQ

Who Does Presbyopia Affect?

Everybody will eventually be affected by presbyopia.

When Does Presbyopia Start?

Presbyopia starts at different times for different people. On average it is at age 40, but it it not unusual for it to start in the late 30’s or even into the mid 40’s for some people.

In addition, the prescription one has for distance viewing can also impact when the symptoms of presbyopia are first felt. People are farsighted tend to notice the symptoms of presbyopia earlier than people who are nearsighted (especially if the nearsightedness is very low).

What Are The Symptoms of Presbyopia?

In the early stages (late 30’s to mid 40’s), presbyopia will cause very detailed objects that are held quite close to the eyes to be blurry, as well as difficulty seeing up close in dim lighting. Most near viewing tasks such as reading and computer work are still possible in this stage.

In mid stages (late 40’s to mid 50’s), anything held in one’s hands will be difficult to see clearly. In addition to the blur, persistently trying to ‘fight’ the blur can lead to eyestrain and headaches. Reading is very difficult in this stage but computer work is still possible.

In the late stages (late 50’s and onwards), everything within two arm’s lengths or so will be blurry. Both reading and computer work will be impossible without the use of corrective lenses.

What is the Treatment for Presbyopia?

The treatment for presbyopia is simply to wear glasses or contact lenses for reading/computer work. In the eye care industry, the things we do that require us to see clearly up close is called near work. Glasses that help with near work are called reading glasses.

Reading glasses can be as simple as a pair of glasses that are worn for near work, and removed when looking in the distance. However, for people who need glasses for the distance as well, a different type of glasses may be required. You will have heard of these as bifocal glasses.

Bifocal glasses hold lenses that carry the distance prescription throughout the entire lens except for a small segment at the bottom which holds the reading prescription. Most new presbyopes (people with presbyopia) associate bifocal glasses with their parents or grandparents and are resistant adopt them. That’s why bifocals are very rare nowadays. Instead, the go-to type of glasses for presbyopes are called progressives.

Other common names for progressive lenses are no-line bifocals, varifocal lenses & PALs (progressive addition lenses).

Progressive glasses have multiple prescription within different places in the lens. There is a distance prescription, an intermediate prescription for computer monitors and a reading prescription for hand held reading material. However some people can see well in the distance without glasses an only need help with computer work and reading. For these people there is a specialized type of progressive lenses called office progressives.

Here is a good summary of different types of progressive lenses. 

As a completely different alternative for people who don’t like glasses at all, there are contact lenses that can – to a certain extent – help people see in the distance as well as up close for reading. These are called multifocal contact lenses.

Can You Reverse Presbyopia Naturally?

Unfortunately, there is no natural cure for presbyopia in the form of eye exercises, eye drops, supplements or otherwise.

From time to time there are claims of this or that exercise program that can reverse the effects of presbyopia. Though I have not seen any concrete evidence for these methods, it would be great if they actually worked. if you have tried them, I would love for you to share your experience in the comments below.

Can You Reverse Presbyopia With Medication?

There is currently no medication to cure presbyopia.

Can Presbyopia be Reversed Surgically?

Yes and no.

When someone has their cyrstalline lens surgically removed, they are technically no longer presbyopic. Instead, they become pseudophakic, which is essentially the same thing. Unless… the surgically implanted lens that replaces the crystalline lens is something called a multifocal intraocular lens.

Additionally, there is a laser surgery for presbyopia that is producing very good results for some people. The technique is called PRESBYOND and is offered at most laser vision correction centers.

Note that PRESBYOND does not affect the crystalline lens or ciliary muscles in any way. It reshapes the corneas in order to compensate for the loss of function of the crystalline lens/ciliary muscles.

Summary

Presbyopia is the inability of our eyes to focus on near objects due to the loss of accommodation. It’s a normal age-related change and will happen to everybody once they enter their 40’s. The best treatment for presbyopia depends on many factors such as your underlying distance prescription, occupation, lifestyle, etc.

Congratulations!

If you’ve read through lessons 1-10 and you understand the material presented, you now know a lot about the eyes, optics, and how vision works. Congratulations on making it through! It really shows your dedication to becoming successful in the eye care industry.

With all of this knowledge in the bank, the next step of your training is to take The Lost Contact’s course on Optical Dispensing. I’ll see you there!

Good luck pig

Astigmatism Explained

The Optics of Vision – Lesson 8: Astigmatism

After studying this lesson, you will understand a concept that eludes the vast majority of people – Astigmatism! But before you proceed, keep in mind that this is Lesson 8 of the course and it is highly advisable that you have read lessons 1-7 before tackling this one.

Astigmatism

What is Astigmatism?

Astigmatism is a refractive condition that results in the creation of 2 separate focal points.
Recall from Lesson 6 & Lesson 7 that the difference between emmetropia, myopia and hyperopia is where the focal point forms inside the eye.

  • In emmetropia the focal point forms on the retina
  • In myopia the focal point forms in front of the retina
  • In hyperopia the focal point forms behind the retina

In all 3 of these conditions the eye produces only a single focal point. But what if there were 2 focal points…? Then that would be astigmatism!

How Can There Be 2 Focal Points?

Brilliant question!

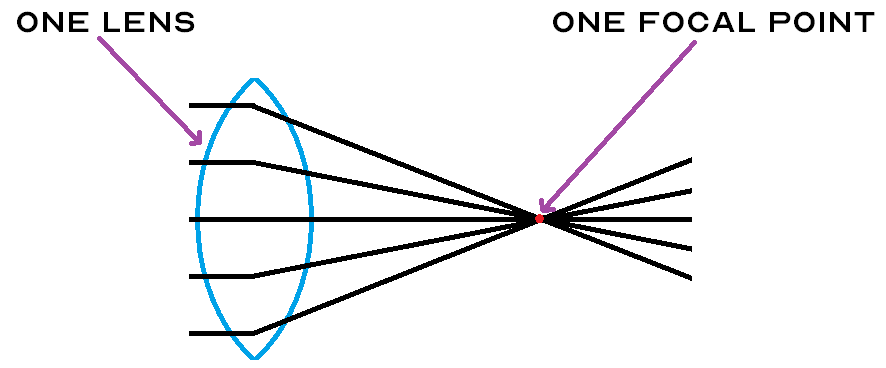
Everything that you have learned in this course so far suggests that it is impossible for a lens to produce two focal points.
One Lens One Focal Point

Question: So how can one lens produce two different focal points?

Answer: It must have two different curvatures!

Up until now we have always assumed that the lenses and the cornea in our examples have only one curvature, but this is not always true. A lens can have two different curvatures.
Spherical Vs Spherocylindrical Lenses

A lens that has two different curvatures is called a spherocylindrical lens. Before we delve into spherocylindrical lenses, let’s make sure we understand simple spherical lenses.
Spherical Lens

A spherical lens is simply a lens that has the same curvature all around. This is the type of lens we’ve been dealing with in all of our lessons so far.

In the following diagram, you will see a +2.00D spherical lens from two different perspectives. The top is the side view you’re familiar with, but the bottom is an approximately 45° angle view. That’s why it appears oval in nature, but keep in mind that it is the same lens.

Two Perspectives of a Spherical Lens

There’s a lot going on in this diagram so let’s examine it closely.

Notice that:

  • Both top and bottom lenses have the same power; +2.00D
  • Both top and bottom lenses have the same focal distance; 50 cm
  • In a side view (top) only one curvature can be seen; the vertical curvature
  • In a 45° angle view, two curvatures can be seen; the vertical curvature (purple) and the horizontal curvature (green)

In this diagram, we see a lens with a vertical and horizontal curvature that are the same. That’s what makes this a spherical lens.

A spherical lens has the same vertical and horizontal curvature

Note: Just because the horizontal view (top) shows a lens that appears to only have a vertical curvature, it does not mean that it has no horizontal curvature. The horizontal curvature is just not visible from that perspective. When drawn this way, the horizontal curvature is simply assumed to be the same as the vertical curvature.

Now let’s see what happens when the vertical and horizontal curvatures are not the same.

Spherocylindrical Lens

A spherocylindrical lens is different from a spherical lens in that:

  • They have two different curvatures
  • The different curvatures are always 90° apart
  • Each curvatures creates a separate focal point

The following diagram illustrates a spherocylindrical lens.

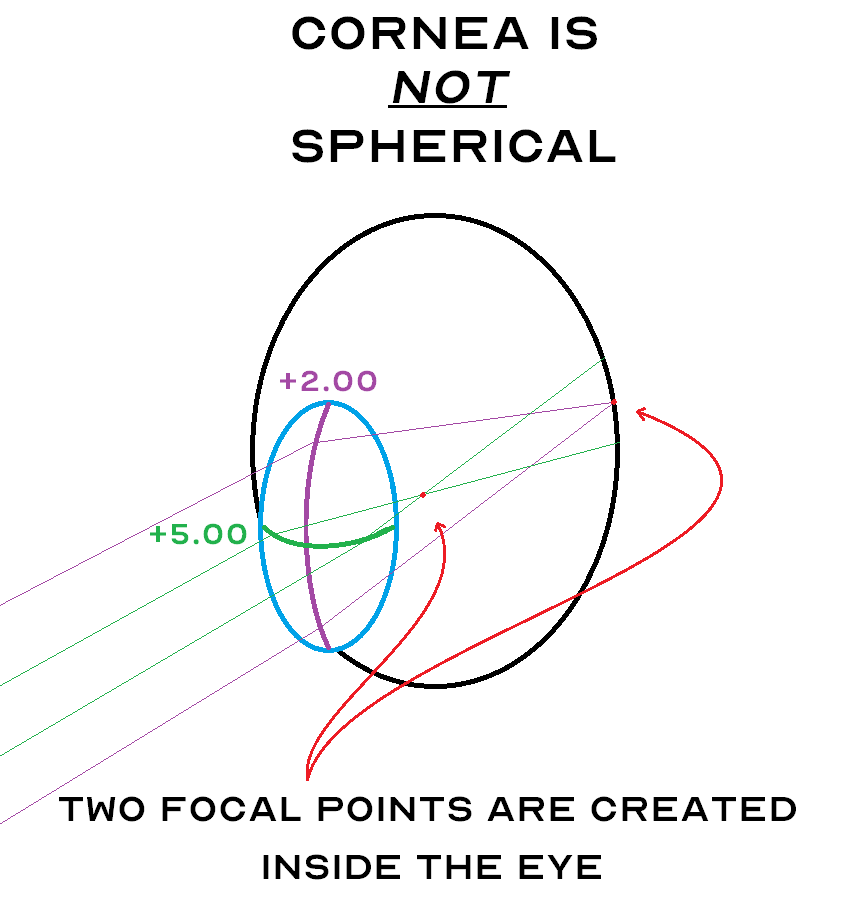
Spherocylindrical Lens

Notice that this lens has two different curvatures instead of just one. The vertical curvature (purple) corresponds to a +2.00D lens power and the horizontal curvature (green) corresponds to a +5.00D lens power.

When light passes through this spherocylindrical lens, each curve will receive exactly half of the light rays.

  • The rays that pass through the +2.00D curve get focused at 50cm from the lens
  • The rays that pass through the +5.00D curve get focused at 20cm from the lens

The Cornea As A Lens

Remember that the cornea acts as a lens for the eye – and yes – it can either be spherical or spherocylindrical lens!

  • If the cornea is spherical – the eye has no astigmatism
  • If the cornea is spherocylindrical – the eye has astigmatism

First, let’s look at a spherical cornea. Remember, this means there is no astigmatism.

spherical cornea

The cornea is the blue circle. It appears oval because again, we are looking at a 45° angle. If we looked at it straight on it would be a perfect circle.

This cornea has the same curvature in both directions. This makes it a spherical cornea. That’s why it only produces one focal point inside the eye.

Now let’s look at a shperocylindrical cornea.

spherocylindrical cornea

Because this cornea has two different curvatures, it creates two separate focal points inside the eye. That is astigmatism.

What Does Astigmatism Mean For You?

If you have astigmatism, it means that the glasses or contact lenses that you wear will have to correct (with spherocylindrical lenses) for both curvatures of the cornea so that there is only one focal point inside your eye. Remember from Lesson 5 that for an eye to see clearly, there must only be only one focal point and it has to form on the retina. If there are two focal points inside the eye, the eye will not see clearly.

Glasses for astigmatism are no different than glasses that are not for astigmatism. On the other hand, contact lenses for astigmatism are specialized contact lenses that are more expensive and may be more difficult to wear successfully.

Summary

Astigmatism is not an easy concept to grasp. This is a lesson I highly recommend reading a few times as it is quite complex. If you still have questions I would be happy to answer them for you, just let me know in the comments below!

If you’re comfortable with this lesson, congratulations! You now possess knowledge that very few people possess, so use it wisely! You’ll certainly find that it will come in handy if you work in an eye doctor’s office or an optical store.

In the next lesson we’re going to learn about a new part of the eye and how it affects vision. It’s called the crystalline lens. See you there!

==>THE OPTICS OF VISION – LESSON 9: THE CRYSTALLINE LENS <==

Convert a Glasses Prescription to Contact Lenses Astigmatism - featured

How To Convert A Glasses Prescription To Contact Lenses: Astigmatism

In the previous lesson: “How To Convert A Glasses Prescription to Contact Lenses“, I covered only situations that did not involve any astigmatism correction. In this lesson, I will only be discussing how to convert a glasses prescription to contact lenses when there is astigmatism to deal with.

Before I get into it I just want to say that some of this may appear to be difficult. Sure, it does take a little longer, but it’s literally nothing more than a little bit of addition, subtraction, as well as looking up numbers on our vertex distance conversion chart.

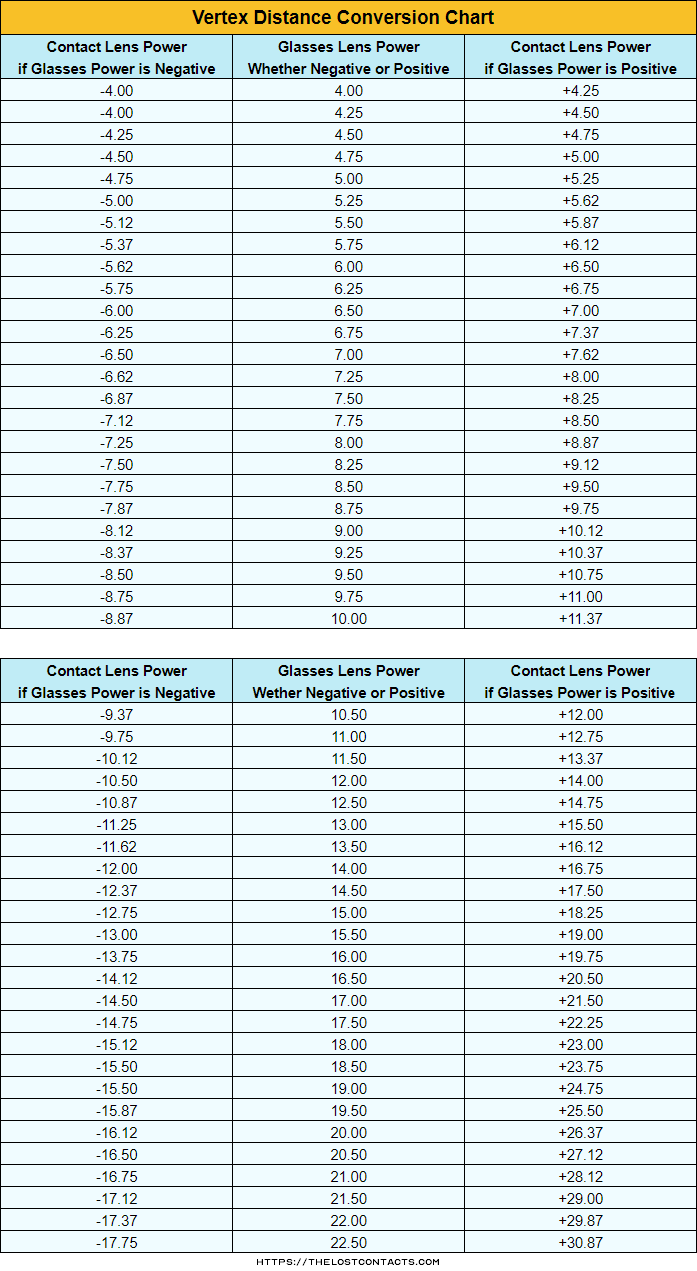
Here it is again for you to reference throughout this lesson.

Vertex Distance Conversion Chart
*Note that this chart is based on a 14mm vertex distance.

Now let’s get right into it. Everything is done one eye at a time so complete steps 1- 5 for the right eye and then again for the left eye.

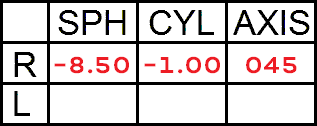
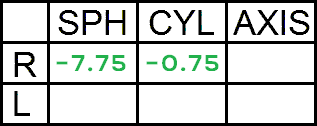
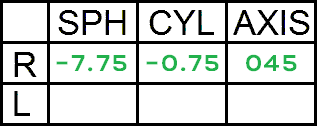
Here is the glasses prescription we will be working with:

Example Glasses Prescription For Power Cross

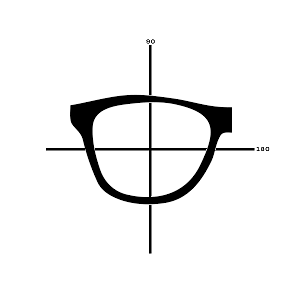
Step 1: Draw 180° and 90° Reference Lines

The power cross is the main tool used in visualizing and organizing the calculations involved in this conversion process.

Here we will draw two reference lines 180° and 90°.

The Blank Power Cross

Think of this cross as overlaying the lens of the glasses prescription you’re working with, like this:

The Blank Power Cross over glasses frame

Step 2: Add The Sphere Power Line

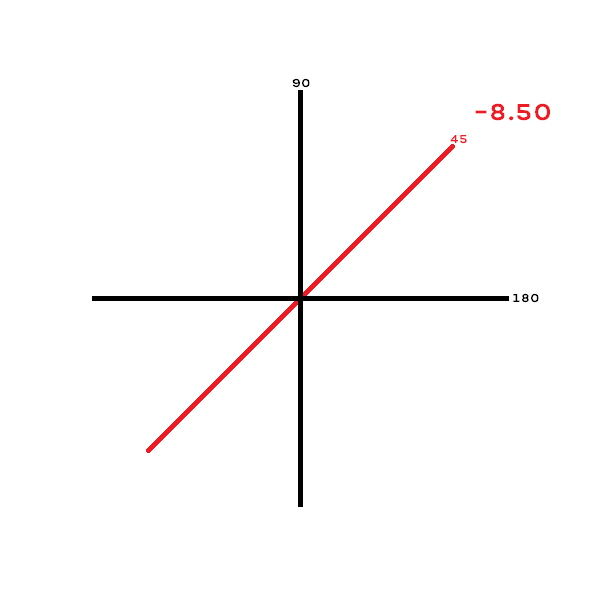
Look at the glasses prescription that you’re working with and locate the ‘Axis’ number. This number represents a degree value and will be somewhere between 1 and 180. Now draw a line in the direction of the Axis .

In our example prescription, that’s 45. That means that a line at 45° must be drawn on the power cross. This is the Sphere Power Line. It represents the sphere power so write it down next to that line.

The Blank Power Cross Sphere

Step 3: Add The Sphere+Cylinder Power Line

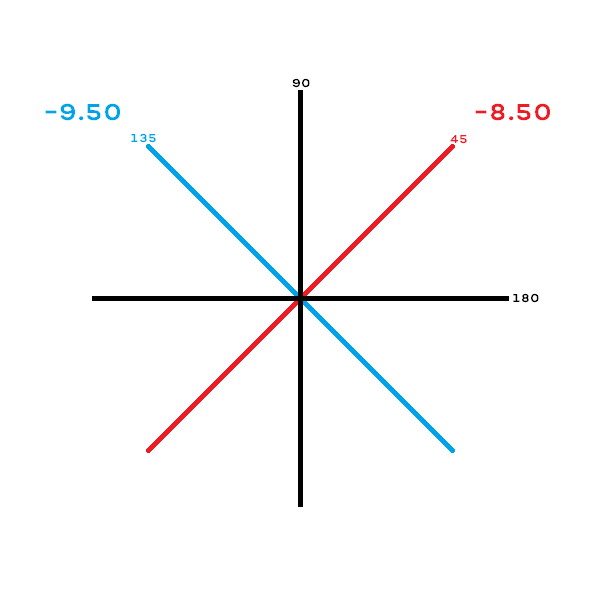
Next add 90 to the axis number and draw another line in that direction. For the example prescription above that would be 90 + 45 = 135.

This new line is the Sphere+Cylinder Line.

Now, as the name implies, to find the power of this line we must add the sphere and cylinder together.

For the example prescription above that would be -8.50 + (-1.00) = -9.50.

The Blank Power Cross Sphere and Cylinder

This the completed power cross.

Step 4: Covert The Powers

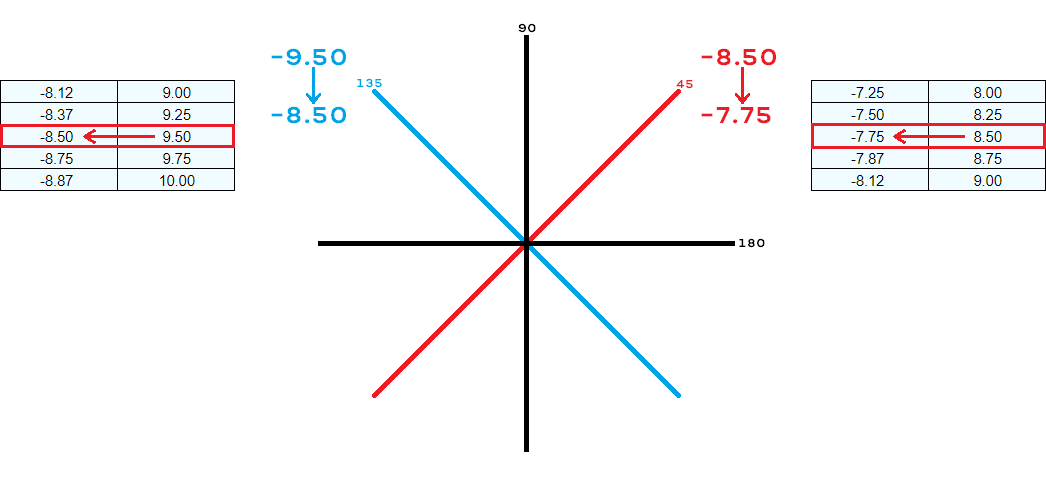
This is the step where we actually convert the glasses prescription to contact lenses. Now that we’ve laid out both the sphere and the sphere+cylinder powers, use the vertex distance conversion chart above to convert them and write those down as well.

The Blank Power Cross Sphere and Cylinder Converted

Step 5: Returning To Prescription Format

At this point, the glasses prescription is converted to contact lenses, but it’s not in the correct Sphere/Cylinder/Axis format. To return to the correct format, follow these 3 rules:

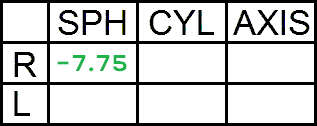
    1. The converted sphere power becomes the contact lens sphere power.
      Example Converted Glasses Prescription Sphere Only 775
    2. The converted sphere+cylinder number minus the converted sphere number becomes the contact lens cylinder power.

      -8.50 – (-7.75) = -0.75

      Example Converted Glasses Prescription Sphere and Cylinder 775

    3. The original glasses axis becomes the contact lens axis (it doesn’t change)Example Converted Glasses Prescription 775

And that’s it!

You’ve done it! Not bad right?


Let’s work through the left eye together.

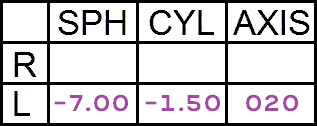
Example Left Eye Glasses Prescription


Step 1: Draw 180° and 90° Reference Lines

The Blank Power Cross

Step 2: Add The Sphere Power Line

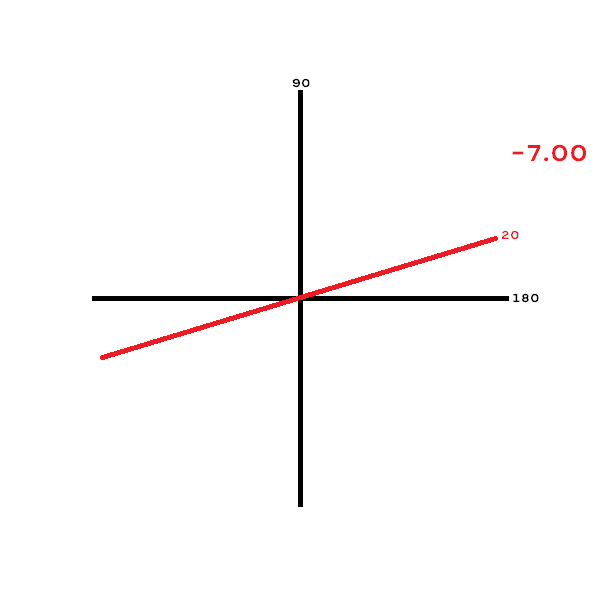
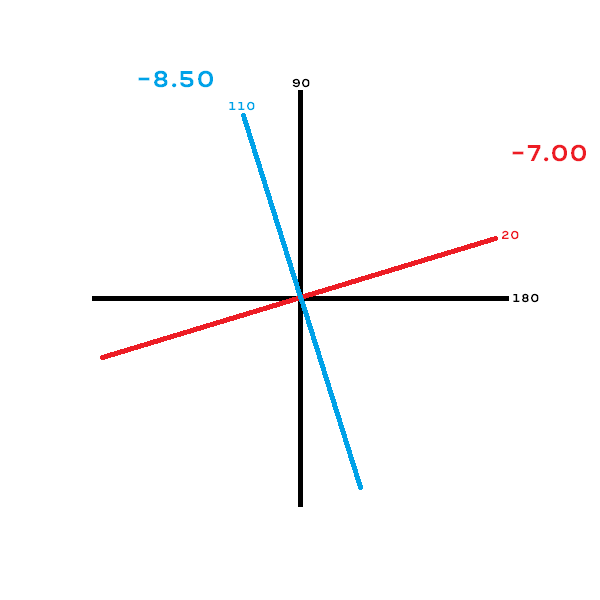
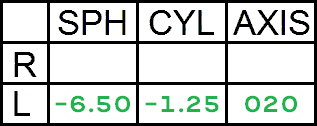
This time the axis is 020 so the sphere power line must be drawn at 20°. The sphere power is -7.00 so that will go next to the sphere power line.

Power Cross To Convert a Glasses Prescription To Contact Lenses

Step 3: Add The Sphere+Cylinder Power Line

Next, add 90 to the axis on the prescription. In this case it’s 90 + 20 = 110, so the sphere+cylinder power line must be drawn at 110°.

The sphere+cylinder power for this prescription is -7.00 + (-1.50) = -8.50, so that will go next to the sphere+cylinder line.

Power Cross To Convert a Glasses Prescription To Contact Lenses

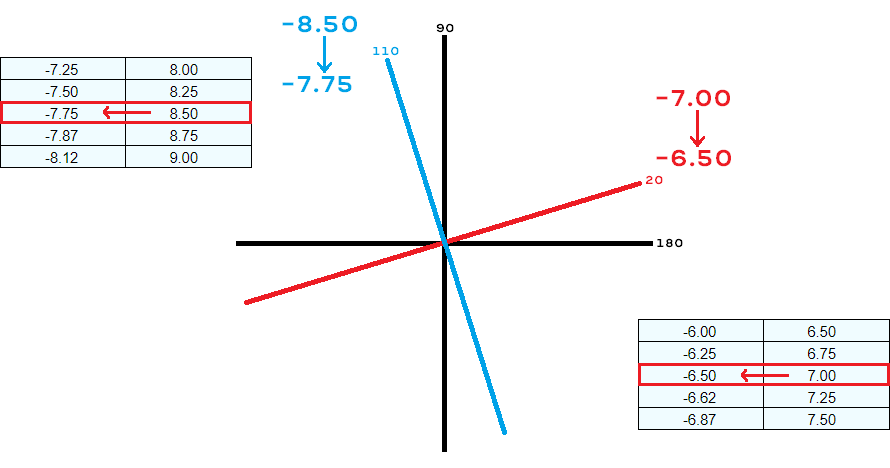
Step 4: Covert The Powers

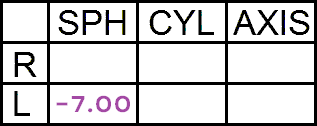
The vertex distance conversion chart is now used to convert both the sphere power and the sphere+cylinder power. The converted powers are written down to help with the next step.

Power Cross To Convert a Glasses Prescription To Contact Lenses

Step 5: Returning To Prescription Format

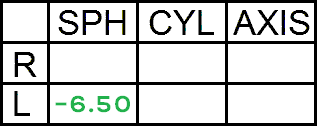
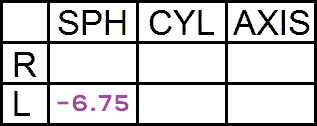
  1. The converted sphere power becomes the contact lens sphere power.
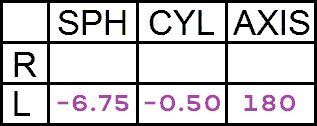
    How To Convert A Glasses Prescription To Contact Lenses Example
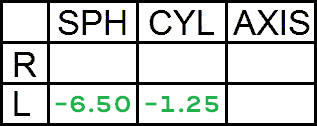
  2. The converted sphere power minus the converted sphere+cylinder power becomes the contact lens cylinder power.

    -7.75 – (-6.50) = -1.25

    How To Convert A Glasses Prescription To Contact Lenses Example

  3. The original glasses axis becomes the contact lens axis (it doesn’t change).
    How To Convert A Glasses Prescription To Contact Lenses Example

And that’s how to convert a glasses prescription to contact lenses!

Important Shortcuts

Despite the simplicity of converting a glasses prescription with astigmatism to contact lenses using the 5 step process outlined above, it’s not always necessary. There are some shortcuts that can save a lot of time in a real-world practice setting.

When The Glasses Cylinder is -0.25

If the cylinder on the glasses prescription that is being converted to contact lenses is -0.25, there is no need to go through the 5-step power cross procedure. In fact, most of the time there is no need to do anything at all.

With a cylinder of -0.25, after the conversion process the cylinder will either stay -0.25 or become even less. Since there are absolutely no contact lens company that offer a contact lens for astigmatism with a cylinder correction of -0.25, it is a pointless exercise to convert.

Instead, the most common solution is to ignore it altogether. Simply, the cylinder and axis are removed from the contact lens prescription and only the glasses sphere is converted according to these guidelines.

When The Glasses Cylinder is -0.50

This is perhaps the trickiest situation. Contact lenses are not available in cylinder power of -0.50, yet, a cylinder power of -0.50 is significant enough that it can’t just be ignored. So what is the solution?

The -0.50 cylinder & axis are still dropped from the contact lens prescription, however, to compensate for it, and additional -0.25 is added to the glasses sphere. That is, you do not have to use the power cross method. Simply:

  1. Remove the -0.50 cylinder & axis.
  2. Add -0.25 to the glasses sphere.
  3. Convert the new glasses sphere using a vertex distance conversion chart.

*Side note, this is called taking the spherical equivalent of a prescription.

Here’s an example:

Example Glasses Prescription with 050 Cylinder

      1. Remove the -0.50 cylinder & axis.
        Example Glasses Prescription Cylinder dropped
      2. Add -0.25 to the glasses sphere.
        Example Glasses Prescription Sphere Adjusted
      3. Convert the new glasses sphere using a vertex distance conversion chart.
        Example Glasses Prescription Converted To Contact Lenses With Conversion Chart

And there you have it. You now have all the tools and knowledge necessary to convert any glasses prescription to contact lenses. But are you now ready to start prescribing contact lenses? Not quite yet! Actually, at this point we’re still in the very early stages of the contact lens fitting.

Next Steps

You know how to convert a glasses prescription to contact lenses, even if it has astigmatism, but what if contact lenses aren’t available in the numbers that you calculated?

Have you noticed that many of the conversions on the vertex distance conversion chart end in weird numbers like 0.12, 0.37, 0.62, & 0.87? Have you noticed that only certain cylinder powers and axis are available for contact lenses?

If the conversion you calculated doesn’t match what is available in contact lenses, there will be additional adjustments needed in order for trials to be ordered for the patient/client. And that’s what we’re going to learn about next!

If you have any questions about the process laid out in this article, please let me know in the comments and I’ll help you through it.

How To Convert A Glasses Prescription To Contact Lenses - featured

How To Convert A Glasses Prescription To Contact Lenses

Now that you know who can or can’t wear contact lenses, it’s time to get the contact lens fitting started. The first step is to determine the power of contact lenses needed for your patient. To do this so it is crucial to know how to convert a glasses prescription to contact lenses.

Is A Contact Lens Prescription The Same As Glasses?

NO!

Well… sometimes yes.

Ok, it depends! let me explain.

What’s The Difference?

Glasses hold lenses up in front of the eyes, whereas contact lenses sit directly on the eyes. By understanding this key difference between contact lenses and glasses, you will understand why contact lens and glasses prescriptions are not always the same.

Why Does Distance Between Lens And Eye Matter?

It matters because of this:

Vertex Distance Conversion Formula

In a nutshell, this simple equation states that the perceived power of lenses changes as you change the distance between the lens and the eye.

“The perceived power of lenses changes as you change the distance between the lens and the eye.”

Now, as we know, the lenses in glasses are at a different distance from the eyes than contact lenses are. The distance between a corrective lens and they eye is called the vertex distance.

  • For glasses, the vertex distance is usually somewhere between 12-15mm
  • For contact lenses, the vertex distance is always zero

This equation tells us that, for example, a -6.00D lens held 13mm from the eye will not feel like a -6.00D lens if placed directly on the eye. That’s why we need this equation in order to convert a glasses prescription to contact lenses.

Do We Really Need An Equation Though?

I can already sense that you’re trying to find a way around doing calculations using this or any other equation. So don’t worry! I only brought up the equation in order to help explain the concept and the math behind doing these conversions.

The much easier way is to refer to a chart which already has the results of the equation listed for every single possible lens power. These charts have several different names, but I tend to go with vertex conversion chart or vertex distance conversion chart.

Vertex distance conversion charts are easy to find online, but I’ve made my own just for you! If you find this chart useful you can download & print it for your office.

Vertex Distance Conversion Chart
*Note that this chart is based on a vertex distance of 14mm

How To Use A Vertex Distance Conversion Chart

Using a vertex distance conversion chart is simple.

  • The ‘Glasses Lens Power’ column refers to the power on the glasses prescription.
  • If the power on the glasses prescription is negative, then the converted power is directly to the left.
  • If the power on the glasses prescription is positive, then the converted power is directly to the right.

Let’s do a quick example to demonstrate this.

Say you have this glasses prescription and want to convert it to contact lenses:

Example Glasses Prescription

You could use the formula:

Vertex Distance Conversion Formula

Perceived lens power = -6.25 / {1 – [(0.014)(-6.25)]} = -5.75

Or, we can simply refer to the vertex distance conversion chart:

Example Use of a Vertex Distance Conversion Chart

Find the number on the glasses prescription in the middle column. If that number is negative, the converted number is the one on the left as is the case in this example. If number on the glasses prescription was positive, the converted number would be on the right.

This is showing that a -6.25D lens placed at 14mm from the eye would only seem like a -5.75D if it was place directly on the eye’s surface. Recall that a prescription for glasses is measured with lenses at 14mm from the eye, not at the eye’s surface. So if -6.25D was given in contact lenses, it would actually feel like -6.75D at 14mm which would be too strong!

This may feel a little confusing but the minutia of the exact reason and mechanism by which this happens is not overly important to practitioners like yourselves.

What About Low Powers?

You probably noticed that the vertex distance conversion chart above only starts at glasses prescriptions of +/-4.00D. What about zero to +/-4.00D? Good observation!

The nature of the equation which populates vertex distance conversion charts is such that for small powers, the converted power is not significantly different than the original power. Remember that glasses and contact lenses are only available in steps of 0.25. So if the vertex distance conversion formula yields a difference of less than 0.25 than it is of no real significance.

So what happens to glasses prescriptions between zero and +/-4.00D? By and large, for these values the glasses and contact lens power will be the same.

For powers between 0 and +/- 4.00D, glasses and contact lens prescriptions are the same. 

The Exception: ASTIGMATISM!

If the sphere and the cylinder numbers combined add up to more than -4.00, a conversion is necessary. To learn how to convert a glasses prescription to contact lenses that has astigmatism, click right here!

If you don’t have time or learn the full the process, you can simply look up the conversion in my Astigmatism Vertex Distance Conversion Chart.

How Accurate Is This?

Using a vertex distance conversion chart to convert a glasses prescription to contact lenses is just the first of many steps involved in getting to the final contact lens prescription. Remember, it’s just a mathematical formula spitting out numbers. Every eye is different and every contact lens brand is different. Sometimes the vertex distance conversion chart will give the best result for your patient or client, and sometimes it will have to be modified. It’s the job of a good contact lens practitioner to verify and determine the best power for your patient or client.

How Can You Confirm The Results?Patient Behind a Phoropter

Once you’ve used a vertex distance conversion chart to convert a glasses prescription to contact lenses, the following things should be done to confirm the results.

  1. Pull out some trial contact lenses in those powers and have your patient or client try them on.
  2. Give the contact lenses a couple of minutes to settle in.
  3. Measure the visual acuity of each eye individually.
  4. Perform an over-refraction on eye each using loose trial lenses or a phoropter.
  5. Use the results of the over-refraction to pull new trial contact lenses and repeat the process.

The process ends when the refraction over the contact lenses is zero for each eye.

Summary

So far we’ve covered how to convert a glasses prescription to contact lenses for a few different scenarios.

Briefy, they are:

  • For glasses power between zero and +/- 4.00D –> No conversion needed.
  • For glasses power over +/- 4.00D –> Use a vertex distance conversion chart.
  • When using a vertex distance conversion chart it’s important to confirm the results with an over-refraction.

But major element are what are we still missing? That’s right. Astigmatism.

What you’ve learned here will work just fine so long as there’re no astigmatism present in the glasses prescription. To learn how to deal with astigmatism when converting a glasses lens prescription to contact lenses, we’ll need a whole separate article.

==>Click here to read ‘How To Convert A Glasses Prescription To Contact Lenses: Astigmatism'<==